Solution - PIERRE Controllers
Description
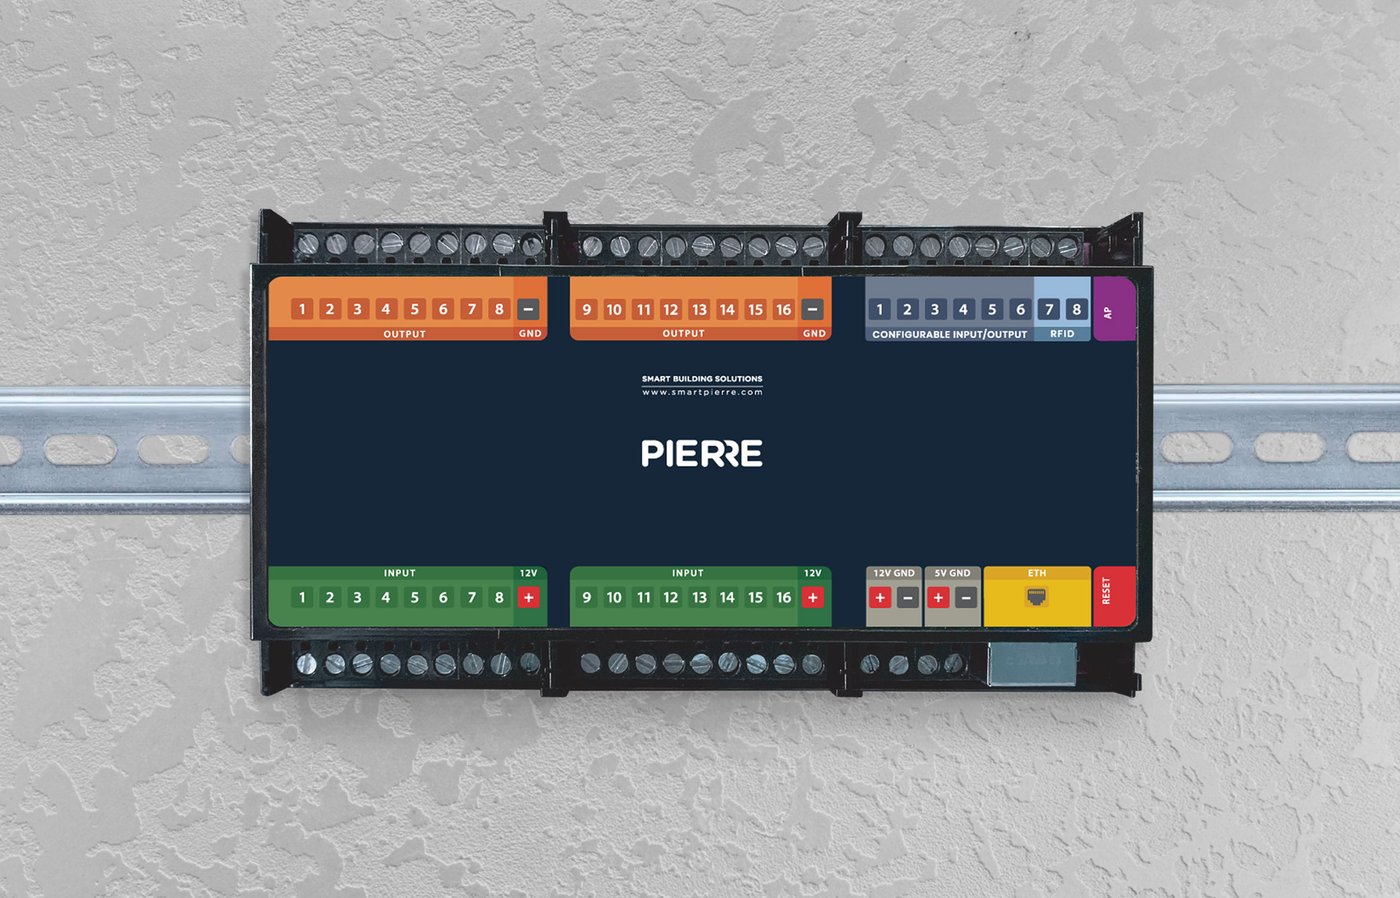
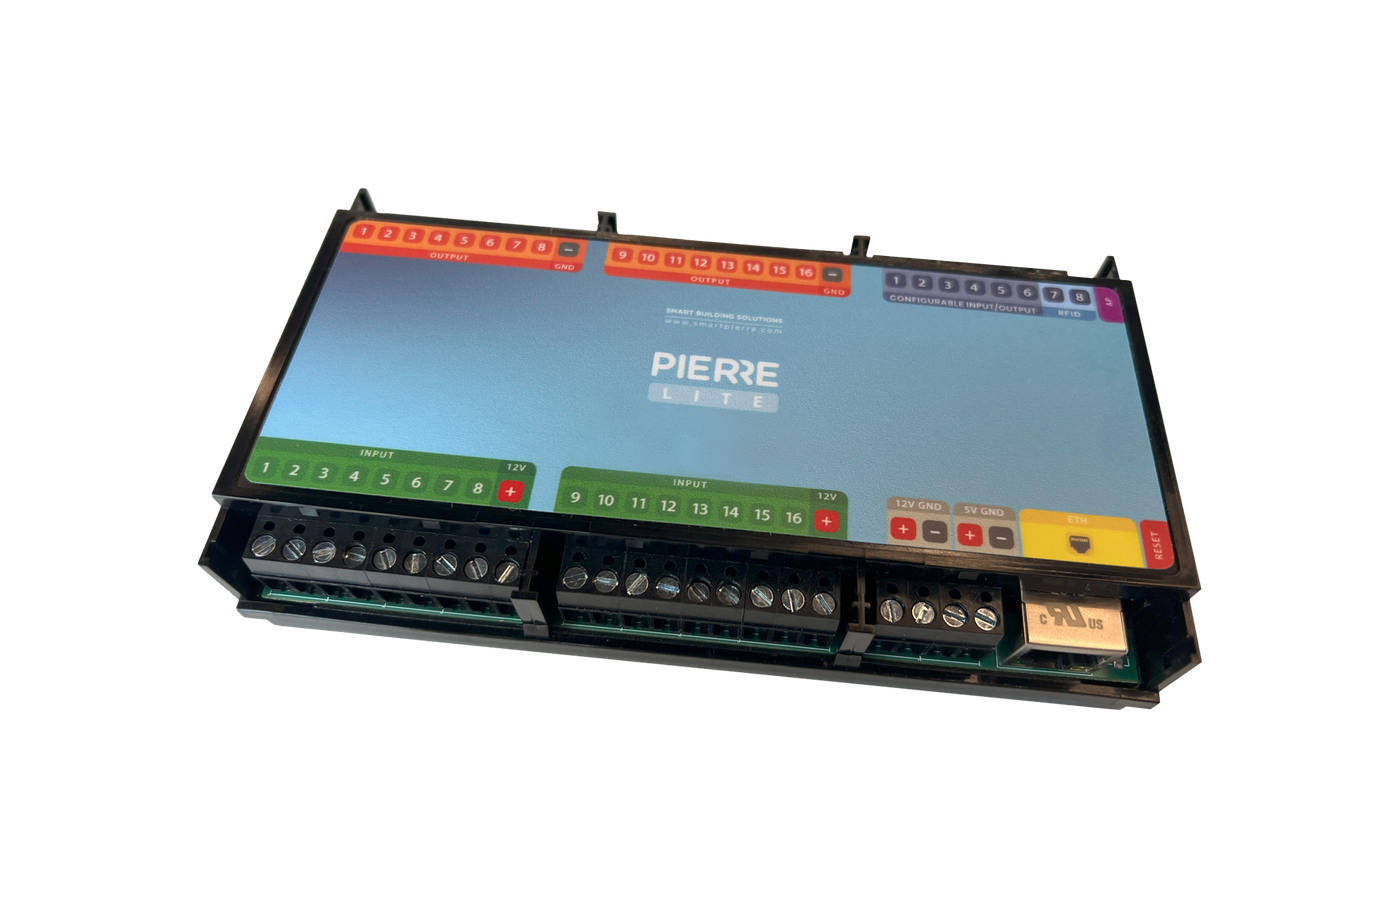
The PIERRE Controller Lite is a wired control unit of the PIERRE Smart Home Solution. It is designed to connect and control various sensors, push buttons, switches, and other controlled devices within a PIERRE installation.
The Controller Lite can be used for applications such as lighting, shading, access control, HVAC, and other automation functions, depending on the technical design of the project.
The Controller Lite supports Ethernet and 2.4 GHz Wi-Fi network connections, operates from a 12 V DC power supply, and is designed for DIN-rail mounting.
Modbus RTU and Modbus TCP are not supported by the Controller Lite. Modbus communication is supported only by the PIERRE Controller Pro.
Controller configuration and system function setup are performed through the PIERRE Partner application.
Main Features
-
16 digital inputs for sensors, push buttons, and other compatible digital signals.
-
16 digital outputs for controlling compatible devices and control elements.
-
Configurable I/O connections for integrating additional supported functions and devices.
-
Ethernet and 2.4 GHz Wi-Fi network connectivity.
-
12 V DC power supply.
-
DIN-rail mounting for installation in an electrical distribution board.
-
AP (Access Point) Mode for local access and configuration of the controller.
-
LED status indication for displaying the current operating and network status of the controller.
Connections and Functions
INPUT 1–16
The digital inputs can be used to connect sensors, push buttons, and other compatible digital signals.
Sensor Power Supply
Connection for supplying power to compatible sensors.
12 V + / −
Connection point for the controller's 12 V DC power supply.
Correct polarity must always be observed.
5 V + / −
Provides a 5 V DC supply connection for compatible devices.
ETH
Ethernet port for connecting the controller to a wired network.
Reset
Push button used to restart the controller and access the reset functions specified in the technical documentation.
OUTPUT 1–16
The digital outputs are used to control compatible devices connected to the system.
Depending on the configured functions, outputs can be controlled by:
-
push buttons,
-
sensors,
-
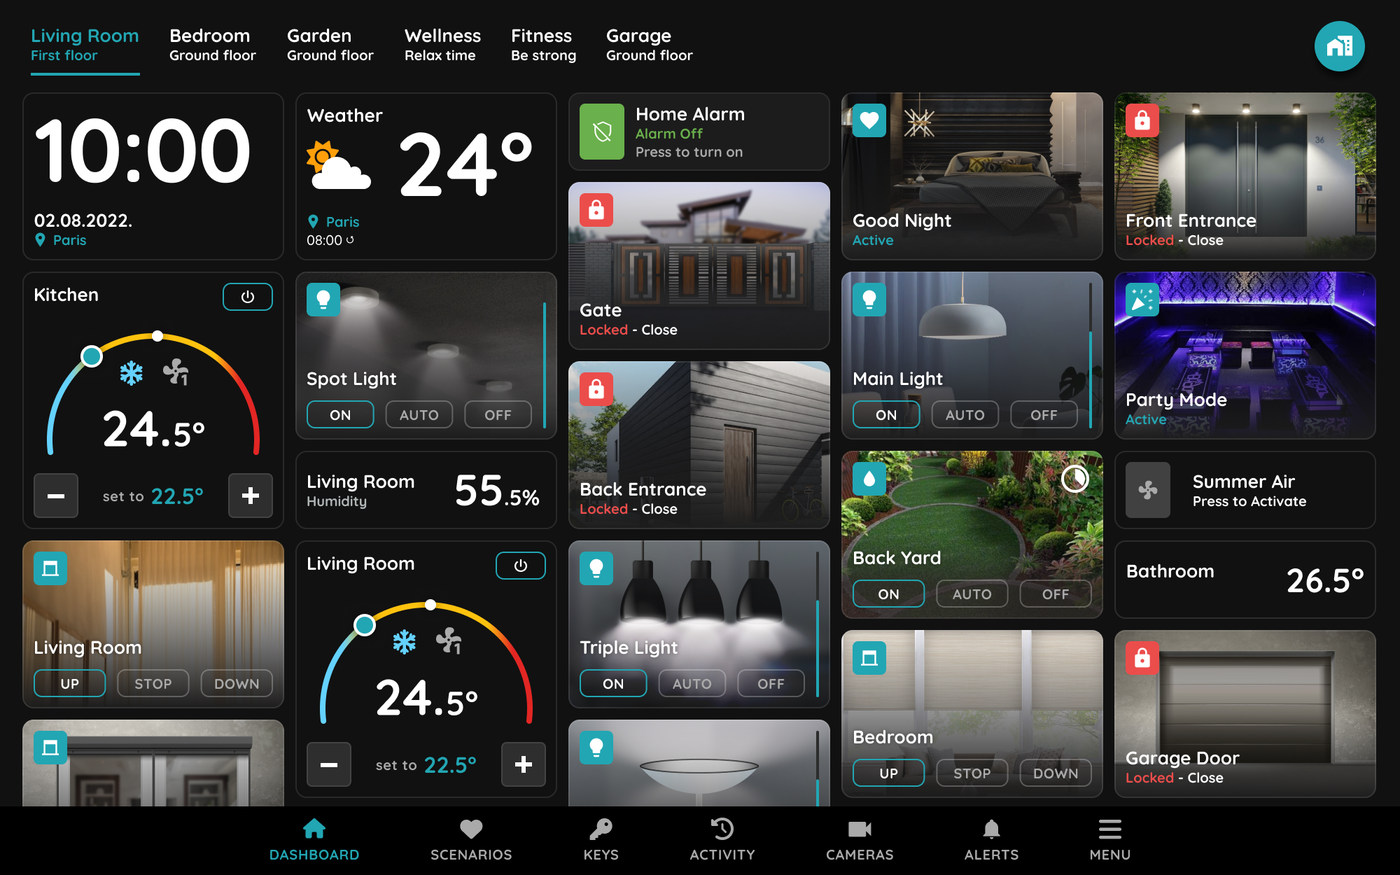
the Smart PIERRE application,
-
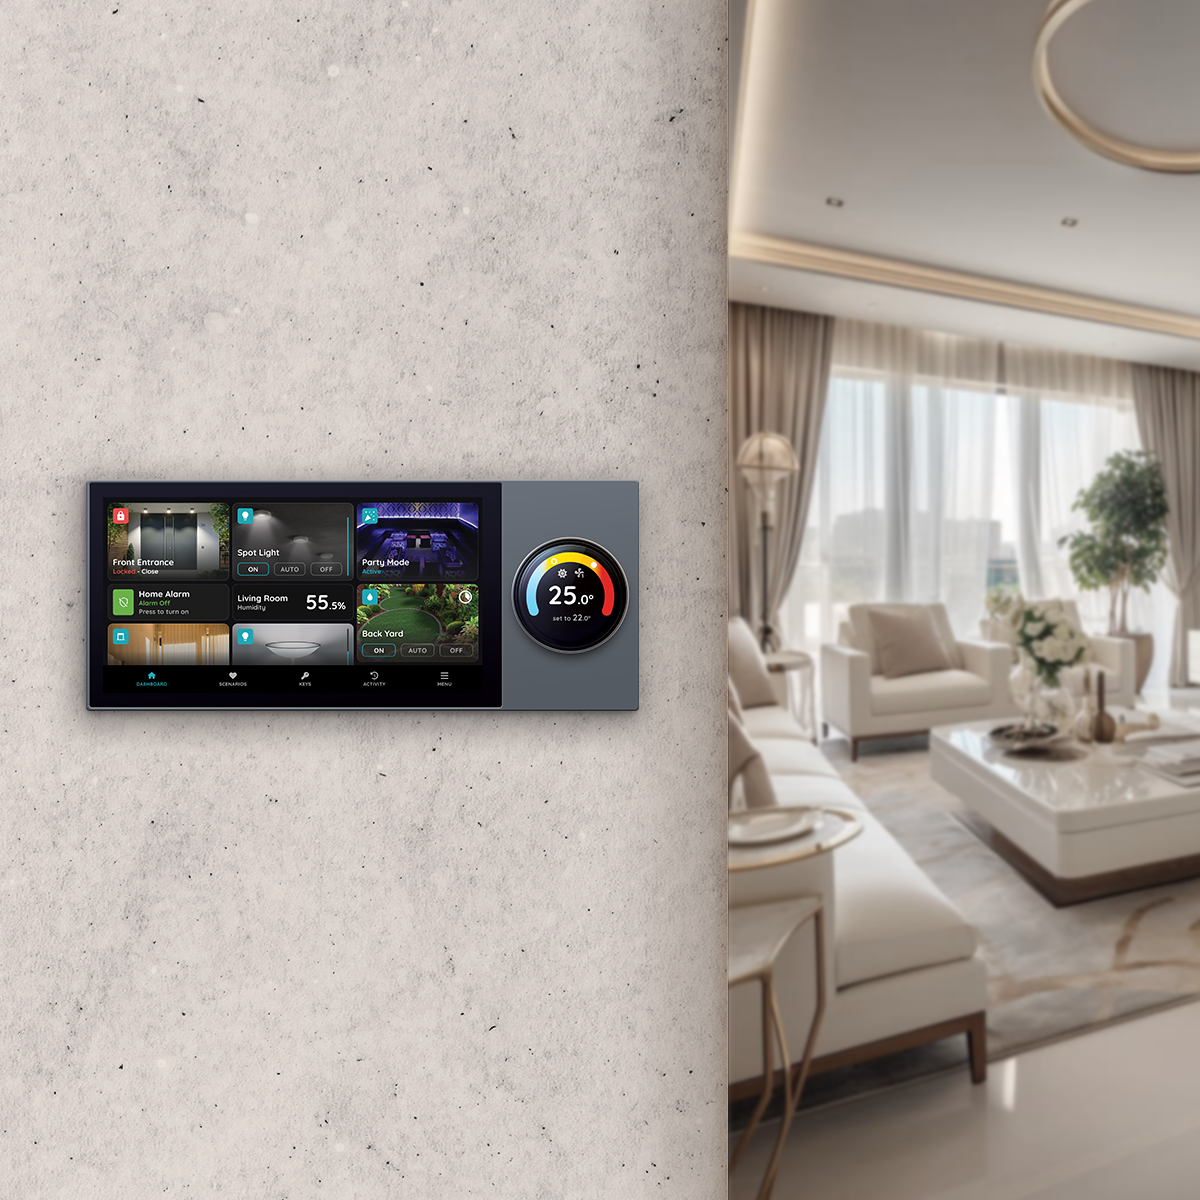
PIERRE displays,
-
Scenes,
-
Automations.
The maximum permitted electrical load of each output must always be observed. Higher-power loads must be controlled through an appropriately rated relay, contactor, or other suitable power switching device.
GND
Ground/reference potential (0 V / −) connection for the appropriate system circuits.
Configurable I/O
Configurable connections whose functions are defined according to the connected device and the configuration set within the PIERRE system.
RFID / Wiegand
Dedicated digital communication connections can be used for Wiegand communication with compatible RFID readers.
RFID reader wiring and configuration must always be carried out according to the current PIERRE technical documentation.
AP – Access Point
AP Mode enables a direct local connection to the Controller.
It is primarily used for the initial setup of the controller, as well as for supported local configuration and maintenance operations at a later stage.
LED
The controller's LED provides a visual indication of its current network, configuration, and operating status.
LED Status Indications
Green – Online
The Controller is online and properly connected to the network.
Pulsing Green – Online
The Controller is connected to local broker.
Red – Offline
The Controller is offline. The network or internet connection is not available or is not functioning correctly.
Light Blue – AP Mode
The Controller is in Access Point Mode and provides its own Wi-Fi network for local connection and configuration.
Dark Blue – Controler Identification
The Controller LED turns dark blue when the Controller is selected in the PIERRE Partner application.
This function is used to physically identify the selected Controller during installation or commissioning. It is especially useful when the Controller's labels, stickers, or other physical markings are missing or no longer readable.
Purple – Searching for IP Address
The Controller is waiting to obtain a network IP address or is attempting to establish a network connection.
Orange – Firmware Update
The Controller is performing a firmware update.
The power supply to the Controller must not be interrupted during the firmware update process.
Design and Wiring Requirement
If an input directly controls or affects the operation of a specific output, the input and the corresponding output must be connected to the same PIERRE Controller.
For example, if an RFID reader is used to unlock an electric door lock, the RFID reader and the output controlling the electric lock must be connected to the same Controller.
This ensures the correct control architecture and optimal system operation.
Technical Notes
-
The Controller requires a 12 V DC power supply.
-
Correct polarity must always be observed.
-
The Controller is DIN-rail mountable and is typically installed in an electrical distribution board.
-
The maximum permitted load of the outputs must not be exceeded.
-
Higher-power loads must be controlled through an appropriately rated relay, contactor, or other suitable power switching device.
-
Network connectivity can be established via Ethernet or a supported 2.4 GHz Wi-Fi network.
-
Wiring and configuration must always be carried out according to the current PIERRE technical documentation, electrical drawings, and the technical requirements of the connected equipment.
PIERRE Controller Commissioning
Overview
This document describes the commissioning process for a new or existing PIERRE Controller using the PIERRE Partner application.
During commissioning, the Controller can be connected and assigned to the appropriate PIERRE system, while the required network and basic system settings can be configured.
The commissioning process can be used for:
- commissioning and configuring a new Controller,
- reconfiguring an existing Controller,
- restoring the settings of an existing Controller,
- transferring or copying the configuration of a previously configured Controller to another Controller.
During the commissioning process, the required network, Controller, and I/O settings can be configured through the PIERRE Partner application.
Proper commissioning ensures that the Controller is connected to the PIERRE system according to the project configuration and communicates correctly with the connected devices and services.
Commissioning Process
When a Controller is in commissioning mode, this is indicated by a white LED on the Controller.
1. Powering On a New Controller
When a new PIERRE Controller is powered on for the first time, it automatically enters Commissioning Mode.
No manual activation is required for the initial commissioning process.
2. Entering Commissioning Mode on an Existing Controller
An existing Controller can be manually placed into Commissioning Mode.
Press and hold the AP button on the Controller until the device enters Commissioning Mode. The white LED indicates that the Controller is ready for commissioning.
3. Scanning for Controllers
Open the Controllers screen in the PIERRE Partner application.
The application automatically scans for nearby Controllers that are currently in Commissioning Mode.
The available options depend on whether the detected Controller has already been configured in the current building.
New Controller
If the detected Controller has not previously been created or assigned to the current building, it appears in the Controllers list as:
New Controller – $controllerChipID
A blue Bluetooth icon indicates that the Controller has been detected and is available for commissioning.
Select the Controller to open a window with the following options:
- New Controller – Configure the detected device as a new Controller.
- Copy Existing Controller – Copy the configuration of an existing Controller to the detected Controller.
- Restore Controller – Restore a previously configured Controller to the detected device.
Existing Controller
If a Controller that is already configured and assigned to the current building is detected in Commissioning Mode, it appears under its existing Controller entry with a blue Bluetooth icon.
Select the Controller to access the following options:
- Edit Controller Settings – Modify the Controller's configuration settings.
- Edit Network Settings – Modify the Controller's network configuration.
- Restore Controller – Restore the Controller configuration.
When a new Controller is detected in Commissioning Mode, three setup options are available:
- New Controller
- Copy Existing Controller
- Restore Controller
The appropriate option depends on whether the device is being configured as a completely new Controller, created from an existing configuration, or used as a physical replacement for an existing Controller.
A. New Controller
Use New Controller when the device is being added to the PIERRE system as a completely new Controller.
Configuration
After selecting New Controller, enter the required settings:
- Name – Enter a name for the Controller.
- Connection Type – Select Ethernet or Wi-Fi.
- If Wi-Fi is selected, the application displays the available Wi-Fi networks.
- If the selected network is password-protected, enter the Wi-Fi password.
- IP Settings – Select the required IP configuration:
- Automatic (DHCP) – Network settings are assigned automatically by the network's DHCP server.
- Static IP – Network settings are entered manually.
If Static IP is selected, configure:
- IP Address
- Gateway
- Subnet
- DNS
Save
After completing the required settings, select Save.
The Controller is created in the PIERRE system, the configuration is applied to the device, and the commissioning process is completed.
B. Copy Existing Controller
Use Copy Existing Controller when a new Controller should be created using the configuration of an existing Controller as a template.
This creates a new Controller while copying the relevant configuration from the selected existing Controller.
Select the Source Controller
After selecting Copy Existing Controller, the application displays the available Controllers across the accessible buildings.
Select the Controller whose configuration should be copied.
Configure the New Controller
After selecting the source Controller, configure:
- Name – Enter a name for the new Controller.
- Roles – Assign the required role or roles to the new Controller.
- Connection Type – Select Ethernet or Wi-Fi.
- If Wi-Fi is selected, choose from the available networks.
- If the selected network is password-protected, enter the Wi-Fi password.
- IP Settings – Select:
- Automatic (DHCP), or
- Static IP.
If Static IP is selected, configure:
- IP Address
- Gateway
- Subnet
- DNS
Copied Configuration
The new Controller inherits the supported configuration of the selected source Controller, including:
- I/O Settings
- associated Automations
For example, if the source Controller contains an Automation where opening a door sensor turns on a light, the corresponding configuration is copied to the new Controller.
The copied Controller remains a separate Controller in the PIERRE system and does not replace the original device.
C. Restore Controller
Use Restore Controller when a physical Controller needs to be replaced while retaining the configuration of the existing Controller.
This function is typically used when an installed Controller has failed, been damaged, or must be physically replaced.
Select the Controller to Restore
After selecting Restore Controller, the application displays the available Controllers across the accessible buildings.
Select the existing Controller that the new physical device will replace.
Configure the Network Connection
Configure the network settings for the replacement Controller:
- Connection Type – Select Ethernet or Wi-Fi.
- If Wi-Fi is selected, choose from the available networks.
- If the selected network is password-protected, enter the Wi-Fi password.
- IP Settings – Select:
- Automatic (DHCP), or
- Static IP.
If Static IP is selected, configure:
- IP Address
- Gateway
- Subnet
- DNS
Controller Replacement
During the restore process, the physical identity of the selected Controller is replaced with that of the new Controller by updating its Chip ID.
The new physical Controller then takes over the existing Controller's configuration and position within the PIERRE system.
This allows a Controller to be replaced without manually recreating its complete configuration.
Example: If an installed Controller is damaged, for example due to water damage, a new Controller can be commissioned using Restore Controller. The replacement Controller takes over the configuration of the damaged Controller, avoiding the need to configure the system again from the beginning.
Copy vs. Restore
Copy Existing Controller and Restore Controller serve different purposes:
- Copy Existing Controller creates an additional, separate Controller based on an existing Controller's configuration. The original Controller remains unchanged.
- Restore Controller replaces an existing physical Controller with a new device while retaining the existing Controller's configuration in the PIERRE system.
Existing Controller in Commissioning Mode
When a Controller that is already configured and assigned to the current building is detected in Commissioning Mode, the following options are available:
- Edit Controller Settings
- Edit Network Settings
- Restore Controller
A. Edit Controller Settings
Select Edit Controller Settings to modify the existing Controller configuration.
This opens the same Controller settings interface that is available by pressing and holding the Controller component in the PIERRE Partner application.
When the Controller is in Commissioning Mode, an additional option is available:
- Delete Controller – Removes the Controller from the PIERRE system.
The Delete Controller option is only available while the Controller is in Commissioning Mode.
B. Edit Network Settings
Select Edit Network Settings to modify the Controller's network configuration.
The following settings can be changed:
- Connection Type – Switch between Ethernet and Wi-Fi.
- Wi-Fi Network – Select a different Wi-Fi network and enter the required credentials.
- IP Settings – Configure the network addressing method.
Depending on the selected IP configuration, the following settings can be modified:
- IP Address
- Gateway
- Subnet
- DNS
If Automatic (DHCP) is selected, the required network parameters are assigned automatically by the network's DHCP server.
If Static IP is selected, the network parameters must be entered manually.
C. Restore Controller
For an existing Controller in Commissioning Mode, the Restore Controller function resends the Controller's existing configuration to the same physical device.
This can be used when:
- the previous configuration process was interrupted,
- the configuration was not applied correctly,
- commissioning failed,
- or the Controller needs to receive its stored configuration again.
No other Controller needs to be selected. The PIERRE system uses the configuration already assigned to the Controller and sends it again to the Controller currently in Commissioning Mode.
Important: Restore Controller Functions
The Restore Controller function behaves differently depending on how commissioning was started:
- For a new, unconfigured Controller, Restore Controller is used to replace an existing physical Controller. The new device takes over the selected Controller's existing configuration and position in the PIERRE system.
- For an existing, already configured Controller, Restore Controller resends its existing configuration to the same physical Controller. It does not replace the Controller or change its Chip ID.
Schemes - Power supply with UPS
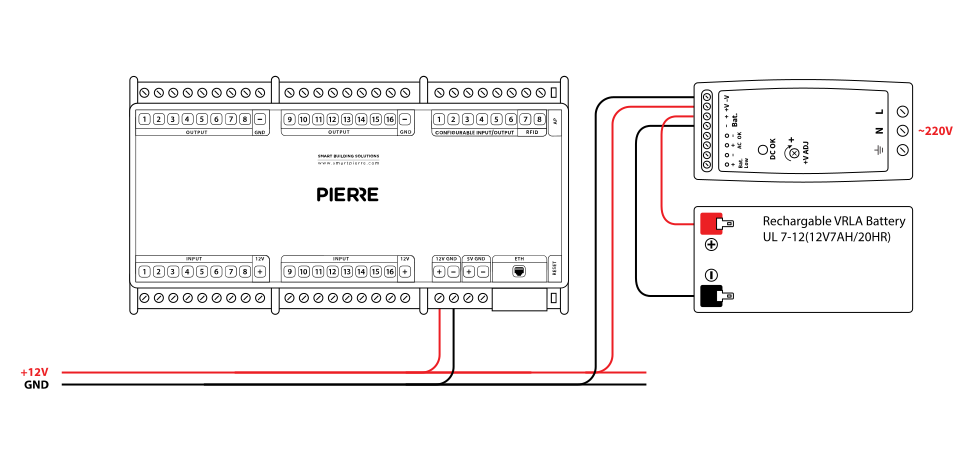
Wiring Controller-Power Supply - Compatible Big Power Supply - Electric schemes
Schemes - Power supply without UPS
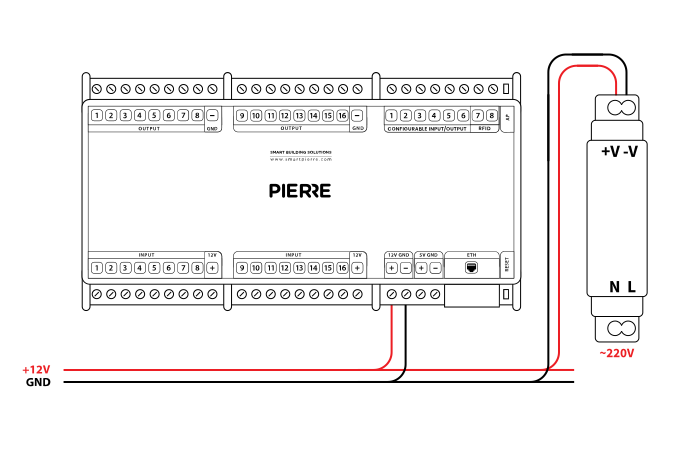
Wiring Controller-Power Supply - Compatible Small Power Supply - Electric schemes
Cables - Power Supply without UPS
| Position | Wires | Diameter | Type | Comment |
|---|---|---|---|---|
| From Power supply to PIERRE controller | 2 | 0.75 mm² | H07V-K | 12V, GND |
| From Power supply to Battery | 2 | 1 mm² | H07V-K | Batt+, Batt- |
Cables - Power Supply with UPS
| Position | Wires | Diameter | Type | Comment |
|---|---|---|---|---|
| From Power supply to PIERRE controller | 2 | 0.75 mm² | H07V-K | 12V, GND |
Troubleshooting
Green – Online: the controller is connected to the network and operating normally. Red – Offline: the controller is disconnected from the network, or there is no internet access. White – Commissioning: the controller has started in commissioning mode and is waiting to be commissioned. Light blue – AP mode: the controller is broadcasting its own network for setup or configuration. Dark blue – Selected in the app: the controller is currently selected in the PIERRE Partner app, which helps you identify the physical controller in the cabinet. Purple – Searching for IP address: the controller is waiting to receive an IP address from the router. Orange – Firmware update: a firmware update is in progress; do not power off the controller while the LED is orange.
The main difference between PIERRE Pro and PIERRE Lite Controllers lies in their software capabilities. The Pro Controller supports Modbus integration, allowing for more advanced communication with connected devices.
Open the building in the PIERRE Partner app, tap Add controller and follow the commissioning steps — see the lesson "PIERRE Partner – Controller Commissioning".
All PIERRE Controllers can connect via both LAN and Wi-Fi, providing flexible installation options.
Multiple Controllers communicate through the network, either wired (LAN) or wirelessly (Wi-Fi).
The wireless Wave system does not require a Controller, as a Wave gateway or display will suffice. However, the wired Pro system requires a Controller for operation.
Input/output ports on the PIERRE Controller that can be used for analogue communication with connected devices, such as temperature sensors or lighting control. Selected ports can be configured for 0–10 V control.
The system will continue to function locally without internet access, but remote access (such as controlling devices from a phone while away) will not be possible.
The PIERRE system uses star wiring: every device to be controlled must be wired back to a central point — the distribution box of the PIERRE Controllers. This box can be separate from the high-voltage wiring or combined with it. In larger installations a separate star point per floor is common, with each floor having its own PIERRE distribution box. All of these boxes are connected to the network, which keeps the whole system integrated.
High-voltage and low-voltage devices can be housed in the same cabinet or kept separate. PIERRE Controllers need a network connection, so a network switch also has to be installed — inside the cabinet or in a separate multimedia box. Plan enough space for the controller, the power supply and the outgoing terminals, plus room for future expansion.
Every fixture that must be switched separately needs its own cable. Lights on the same circuit can be wired together and controlled by a single switch. All cables — including the switch cables — must run to the PIERRE distribution box.
Every blind motor needs a dedicated cable to the PIERRE distribution box, and every switch must also have a direct cable to the PIERRE distribution box.
1. Connect your phone to the 2.4 GHz Wi-Fi network that the controller will use. 2. Power the controller and connect the Ethernet cable. 3. Create a new Building in the PIERRE Partner app. 4. Add the PIERRE Controller. 5. Enter the password of the 2.4 GHz Wi-Fi network. 6. Add the controller. 7. Once the controller appears in the app, leave it connected so it can complete the firmware installation. For more information, see: PIERRE Controller Activation (Smart Config).
Make sure the controller is in commissioning mode — the white LED shows that it is. On an already commissioned controller, hold the AP button until it enters commissioning mode. Also check that Bluetooth is enabled on your phone and that you are within Bluetooth range.
Verify the network credentials and the IP settings (DHCP or static). If the LED is purple, the controller is still waiting for an IP address from the router.