
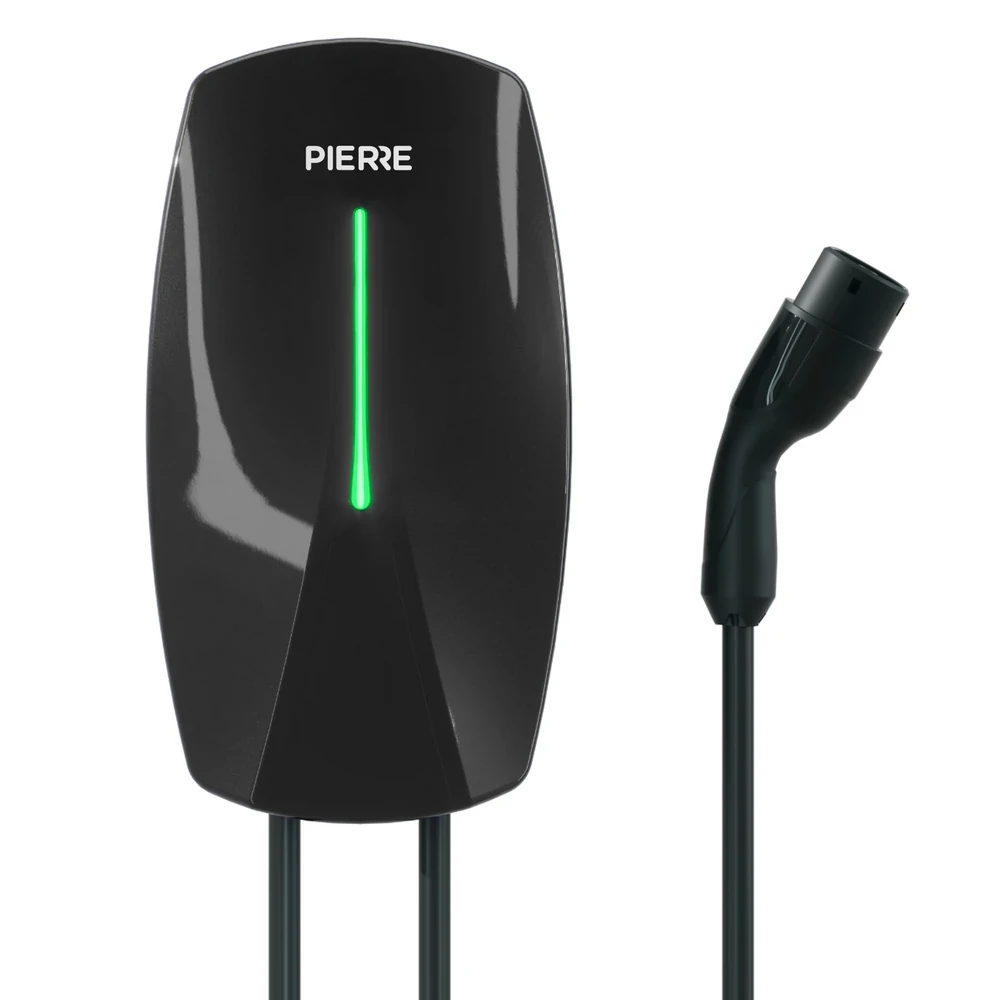
PIERRE Pro - EV Charger 7kW Single Phase (6-32A) - PREORDER
| SKU | PP-EVC32A7KW |
|---|---|
| Product line | PIERRE Pro |
| Category | EV Chargers |
| Manufacturer | Suntree |
| Manufacturer SKU | SWJ3E-7/32 7kW 32A Black |
| GTIN / EAN | 8606034721847 |
Overview
The EV Charger 32A 7kW single phase is a wall-mounted, 230 V single-phase EV charger with adjustable output current from 6 A to 32 A and a maximum rated power of 7 kW. It supports various user authentication modes, including RFID, plug-and-charge, and Smart Pierre application. OCPP 1.6 compliance allows backend integration for remote access, billing, and control.
Electrical protection includes overcurrent, undervoltage, surge, ground fault, short circuit, overtemperature, and DC leakage (6 mA). The charger is housed in an IP65-rated enclosure for outdoor or indoor use, and operates reliably between –30 °C and +50 °C with up to 95% relative humidity. GB/T or Type 2 connector variants are available with fixed cables in 5 m, 7 m, or 10 m lengths, making the unit suitable for private, fleet, or semi-public charging infrastructure. (Default is Type 2 connector with 5 m fixed cable)
Key features
Adjustable output current (6–32 A); 7 kW max output power; single-phase 230 V AC input; OCPP 1.6 protocol support, user access via RFID, plug-and-charge, Smart Pierre application, integrated protections: over/undervoltage, overcurrent, ground fault, short circuit, overtemperature, 6 mA DC leakage detection; IP65-rated enclosure for outdoor use; includes Type 2 connector with fixed cable.
Technical specifications
| Certification | |
|---|---|
| CE Marking | Yes |
| Warranty | 2 years |
| Connectivity | |
| Communication Frequency | 2.4GHz |
| Connectivity | 2.4GHz Wi-Fi (802.11 b/g/n) |
| Electrical | |
| Input Voltage | AC 220-240 V |
| Current | 32 A |
| Frequency | 50-60Hz |
| Environmental | |
| Operating Temperature | -22°F - +122°F |
| Operating Temperature (°C) | -30 - +50 |
| Operating Humidity | 5 - 95 % RH |
| Altitude | <2000 m |
| IP Rating | IP65 |
| Features | |
| LED Indicators | Yes |
| Physical | |
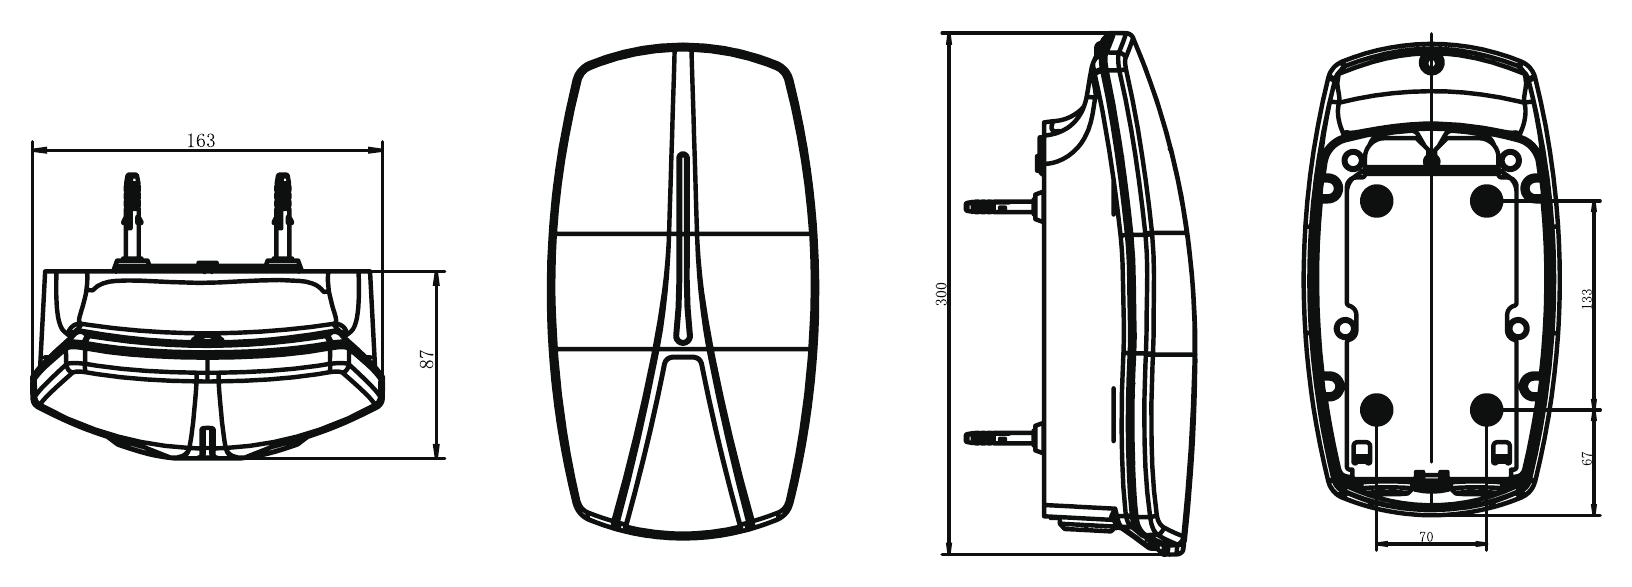
| Width | 163 mm |
| Height | 330 mm |
| Depth | 87 mm |
| Weight | 5000 g |
| Panel Material | ABS+PC material |
| Product Color | Black |
| Control | |
| Access Modes | Smartphone, Card (EM & Mifare) |
| Safety | |
| Safety Features | Overload protection, Over voltage protection, Short circuit protection, Thermal protection |
Electrical & I/O
| Operating voltage | 230 V |
|---|---|
| Power consumption | 7000 W |
| Max. current | 32 A |
| Connection | L+N+PE |
| Requires ground | Yes |
| Requires separate circuit | Yes |
Physical & packaging
| Dimensions (L × W × H) | 87 × 163 × 330 mm |
|---|---|
| Weight | 1300 g |
| Box dimensions (L × W × H) | 324 × 210 × 434 mm |
| Box weight | 6100 g |
User manual
- 1. Product Description
- 2. Safety and warnings
- 3. What you need
- 4. WARNING – HIGH TEMPERATURE
- 5. Technical Specification
- 6. Package contents
- 7. Before installation
- 8. Installation
- 9. Setting the charging current
- 10. Power-on check
- 11. LED indicator
- 12. Charging
1. Product Description
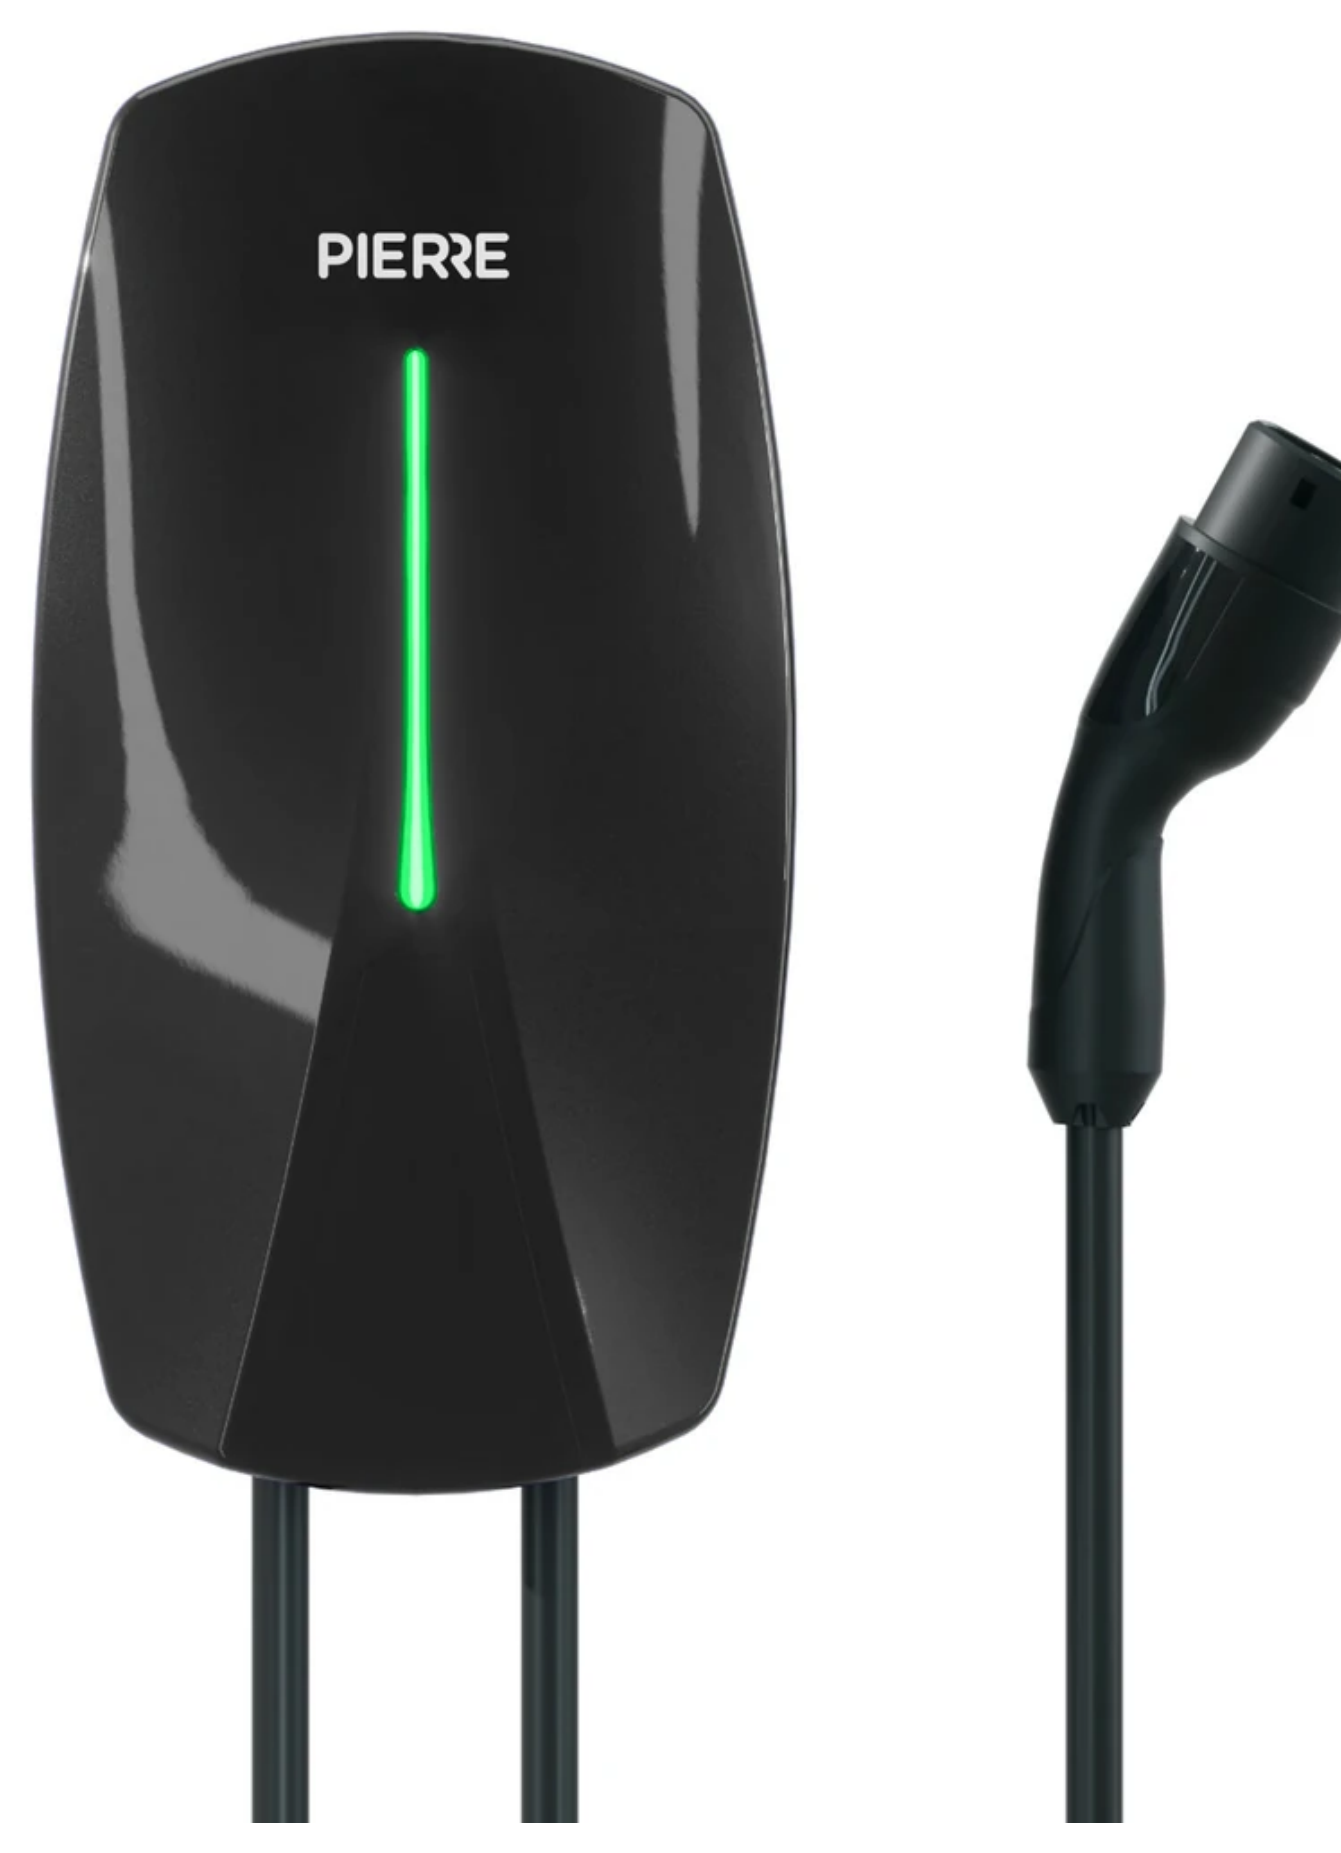
Single-phase AC EV charger with 7 kW nominal output, adjustable current (6–32 A), OCPP 1.6 compatibility, and multi-level protection features. Designed for fixed installation in residential and commercial settings, with Type 2 and GB/T connectors.
The EV Charger is monitored and controlled from the Smart PIERRE app. The charger communicates with the PIERRE cloud over OCPP 1.6 (Open Charge Point Protocol), which provides remote management, status monitoring and charging session control.
The integration enables features such as:
- Remote start and stop of charging sessions.
- Real-time charger status monitoring.
- Charging session history and energy consumption statistics.
- User authentication and access management.
- Automation with other PIERRE devices and building functions.
Charging Modes
The EV Charger supports two operating modes.
Plug & Play Mode
In Plug & Play mode, charging starts automatically as soon as the vehicle is connected to the charger. No user authentication is required. Use this mode only where access to the charger is physically restricted to authorized users.
Authorization Mode
In Authorization mode, users must authenticate before a charging session can begin. Authentication is performed with an RFID card, so only authorized users can start a session. This mode is recommended for apartment buildings, workplaces, hotels, public parking areas, and other shared charging locations where access control and user identification are required.
Electrical Installation Requirements
An EV charger is a high-power electrical device and must be installed according to local electrical regulations by a qualified electrician.
Before installation, the following requirements must be verified:
- The EV charger must be connected to a dedicated electrical circuit protected by its own circuit breaker.
- The protective devices (circuit breaker and residual current protection, where required) must be selected according to the charger's rated power and local electrical standards.
- The electrical wiring must have the appropriate cable cross-section for the expected charging current.
- The installer must verify that the building's electrical installation and the available power capacity are sufficient to support the charger without overloading the electrical network.
- If multiple EV chargers or other high-power consumers are installed, load balancing or power management should be considered.
Safety Notice
Improper installation may result in overheating, equipment damage, or electrical hazards. Always ensure that the electrical installation complies with local regulations and that the available electrical capacity is suitable for the selected charger and charging current. Installation and commissioning should only be performed by qualified personnel.
2. Safety and warnings
Keep these instructions. Read them fully before you install or use the charger.
Warning
- Have the charger installed by a qualified electrician only. PIERRE is not liable for damage caused by incorrect installation.
- Connect the charger to a permanent grounding system (equipment grounding conductor).
- Switch off the circuit breaker before you install, open or clean the charger.
- Do not install or use the charger near flammable, explosive or corrosive materials, chemicals or vapours.
- Supervise the charger when children are nearby.
- Stop using the charger if it is damaged: cracked, frayed, broken, worn or not working. Contact your PIERRE partner.
- Do not open, repair or modify the charger. It has no user-serviceable parts.
- Do not touch the charging connector's contacts with fingers or with metal objects such as wires, tools or needles.
- Do not insert foreign objects into any part of the charger.
- If you use a pacemaker or another implanted medical device, ask its manufacturer whether charging may affect it before you use the charger.
3. What you need
Wired and cloud connected. Needs an internet connection for OCPP communication with the PIERRE cloud; no PIERRE Controller is required. Controlled through the Smart PIERRE app.
4. WARNING – HIGH TEMPERATURE
6. Package contents
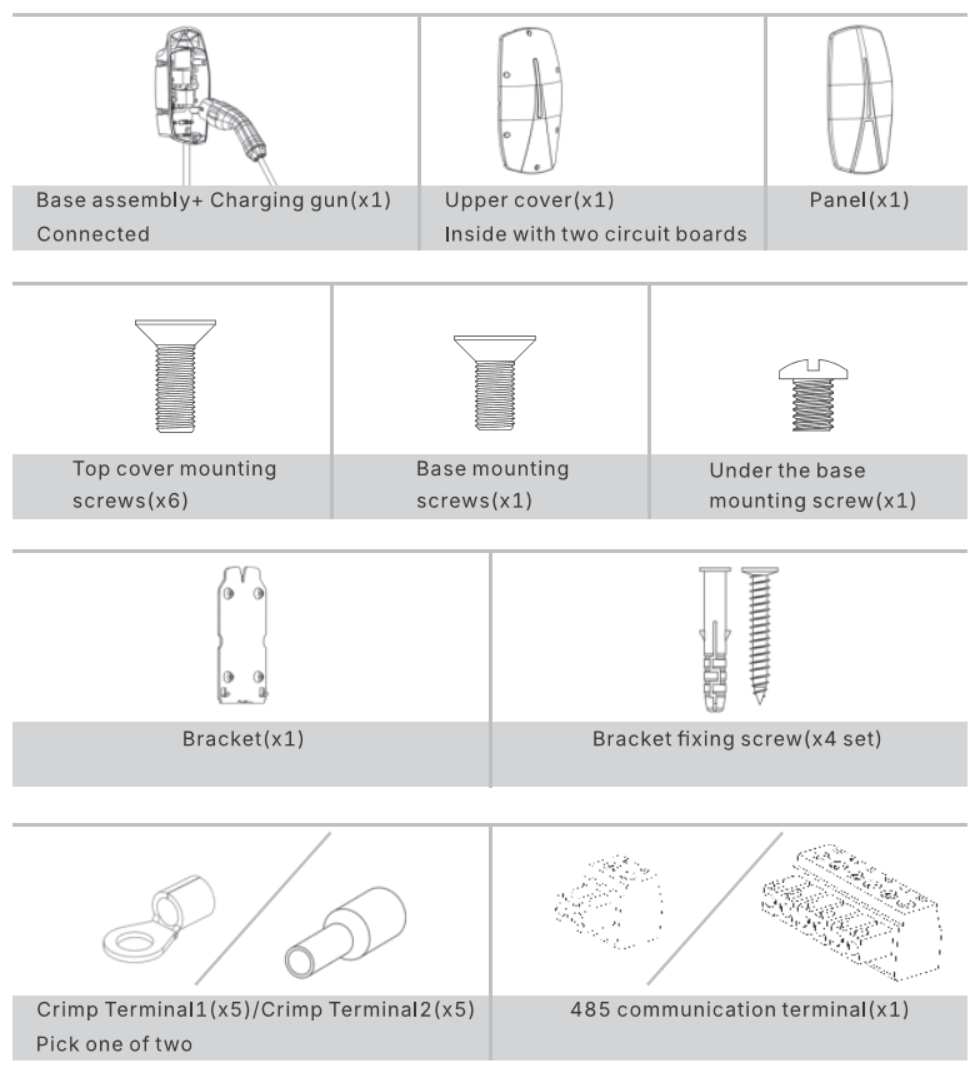
Unpack the charger and check that the box contains the following items.
Use either the ring or the ferrule crimp terminals, depending on your wiring.
Check the charger for transport damage. If anything is missing or damaged, contact your PIERRE partner before installation.
The package includes a CR1220 battery. During installation, please insert the battery into the device.
Without the battery, the device cannot retain the correct date and time. This may cause problems when using scheduled charging or charging sessions with the charger.
| Item | Quantity |
|---|---|
| Charger base with charging cable and Type 2 connector (pre-assembled) | 1 |
| Upper cover (with two circuit boards inside) | 1 |
| Front panel | 1 |
| Top cover mounting screws | 6 |
| Base mounting screw | 1 |
| Under-base mounting screw | 1 |
| Wall bracket | 1 |
| Bracket fixing screws with wall plugs | 4 sets |
| Crimp terminals - ring type | 5 |
| Crimp terminals - ferrule type | 5 |
| RS485 communication terminal | 1 |
7. Before installation
Who may install the charger
Only a qualified electrician may install, operate and maintain the charger: a person with certified electrical training who knows the applicable regulations and the hazards involved.
Choosing the location
- Check where the vehicle parks and where its charging port is. The 5 m cable must reach the port comfortably.
- Mount the charger in a well-ventilated place, preferably in an enclosed garage on the side of the charging port.
- Do not mount it in a closed box or next to hot appliances.
- Mount the charger about 1.2 m above the floor.
- Keep 190 mm free around it so the cable can be looped.
Tools you need
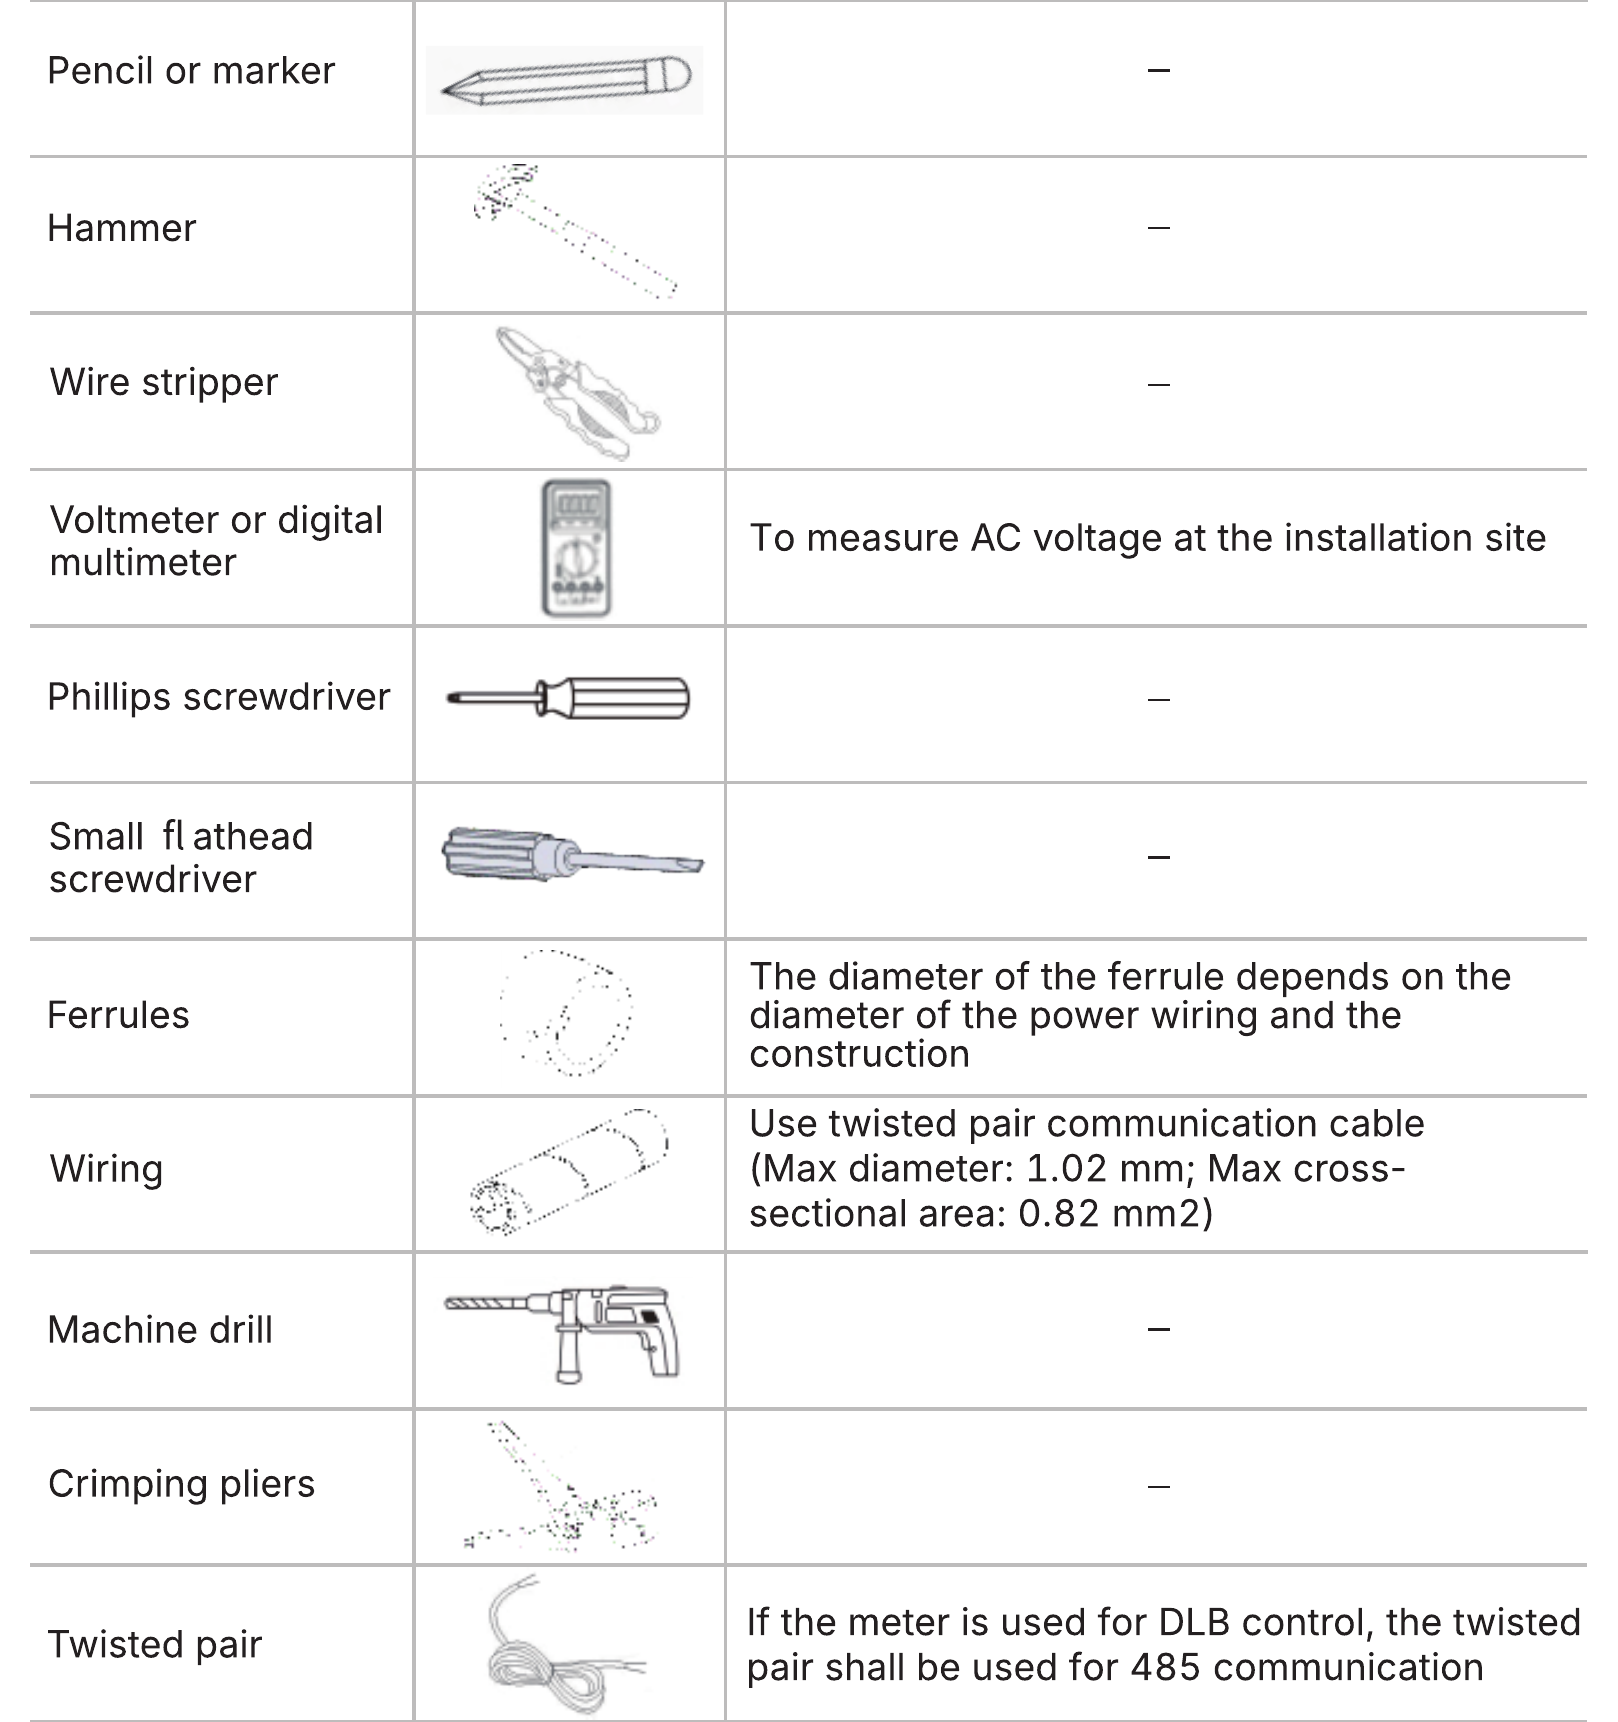
- Pencil or marker
- Drill and hammer
- Phillips screwdriver and small flat-head screwdriver
- Wire stripper and crimping pliers
- Ferrules sized to the supply cable cross-section
- Voltmeter or digital multimeter, to check the AC voltage at the site
- Supply cable
- Twisted-pair cable (max. conductor diameter 1.02 mm, max. cross-section 0.82 mm²) if you connect an energy meter for dynamic load balancing (RS485)
8. Installation
Switch off the circuit breaker before you start. Check with the multimeter that the supply cable is not live.
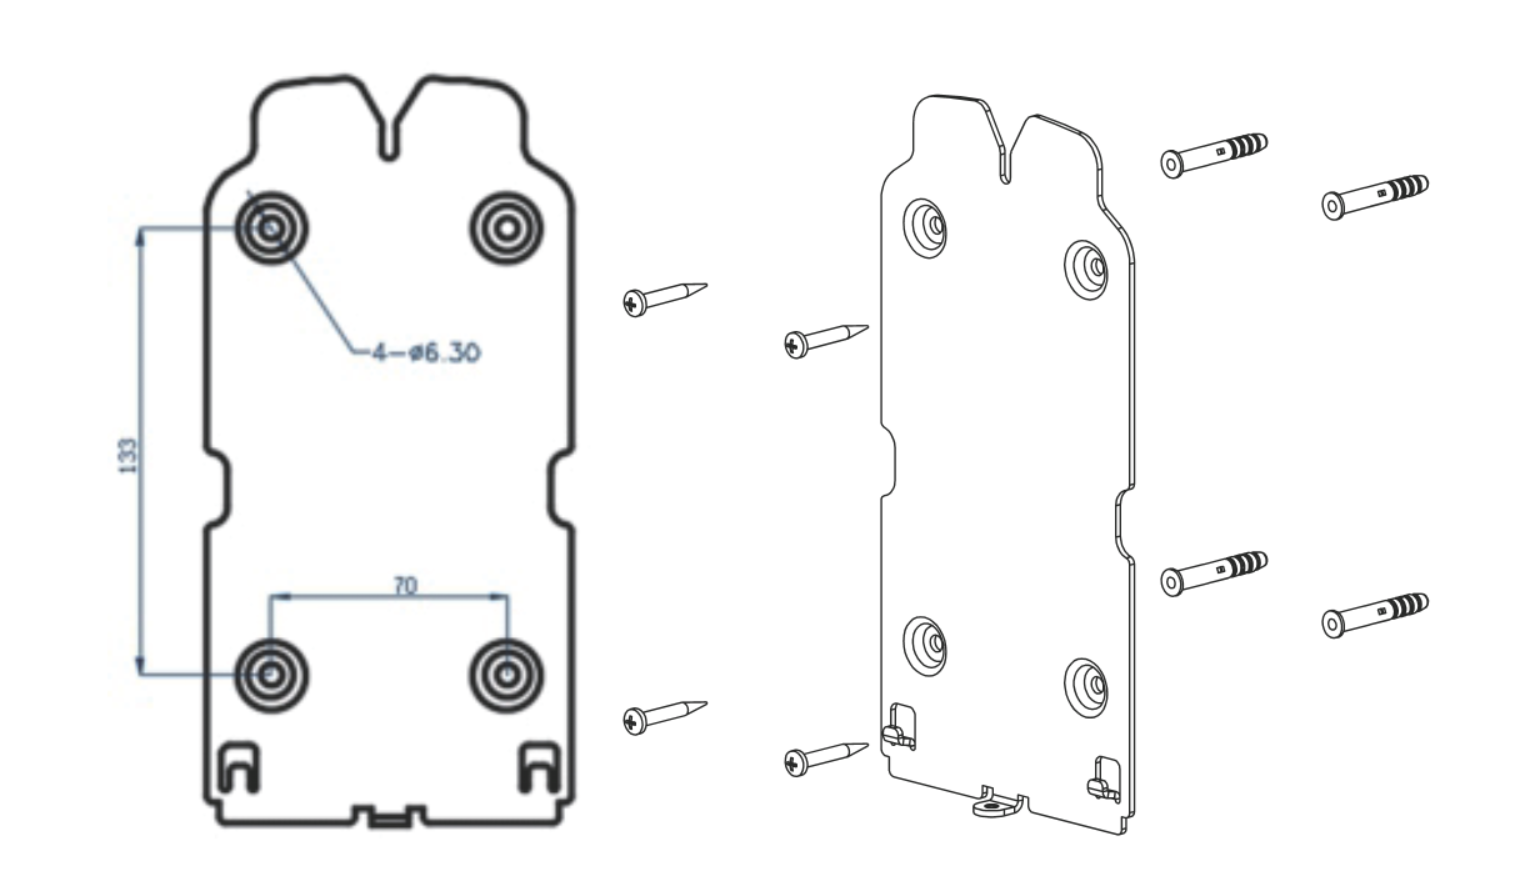
Step 1 – Fix the wall bracket
Hold the bracket against the wall and mark the four holes. Drill the holes to the size shown on the bracket, insert the wall plugs, then screw the bracket firmly to the wall with the four bracket screws.
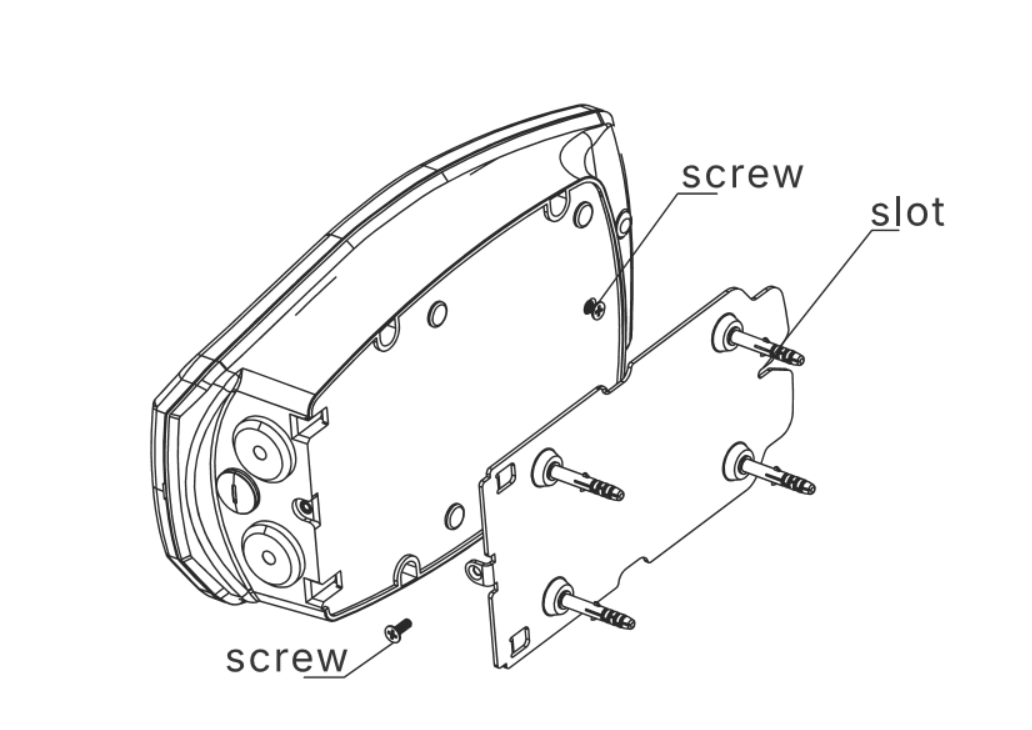
Step 2 – Hang the charger body on the bracket
Hang the charger body on the bracket so the slots sit on the bracket hooks. Secure it with the base mounting screw and the under-base mounting screw.
Step 3 – Connect the supply cable
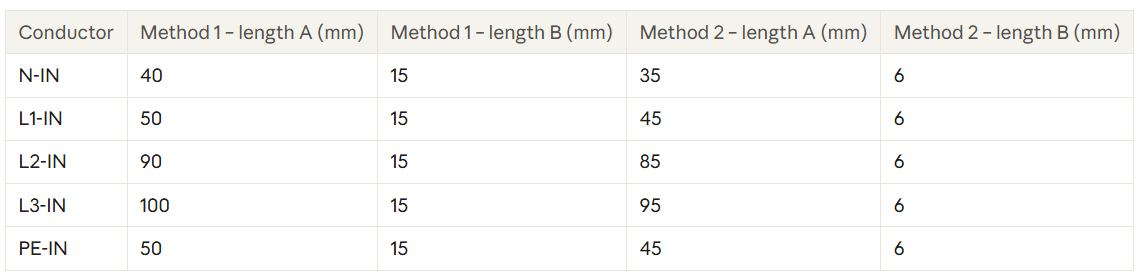
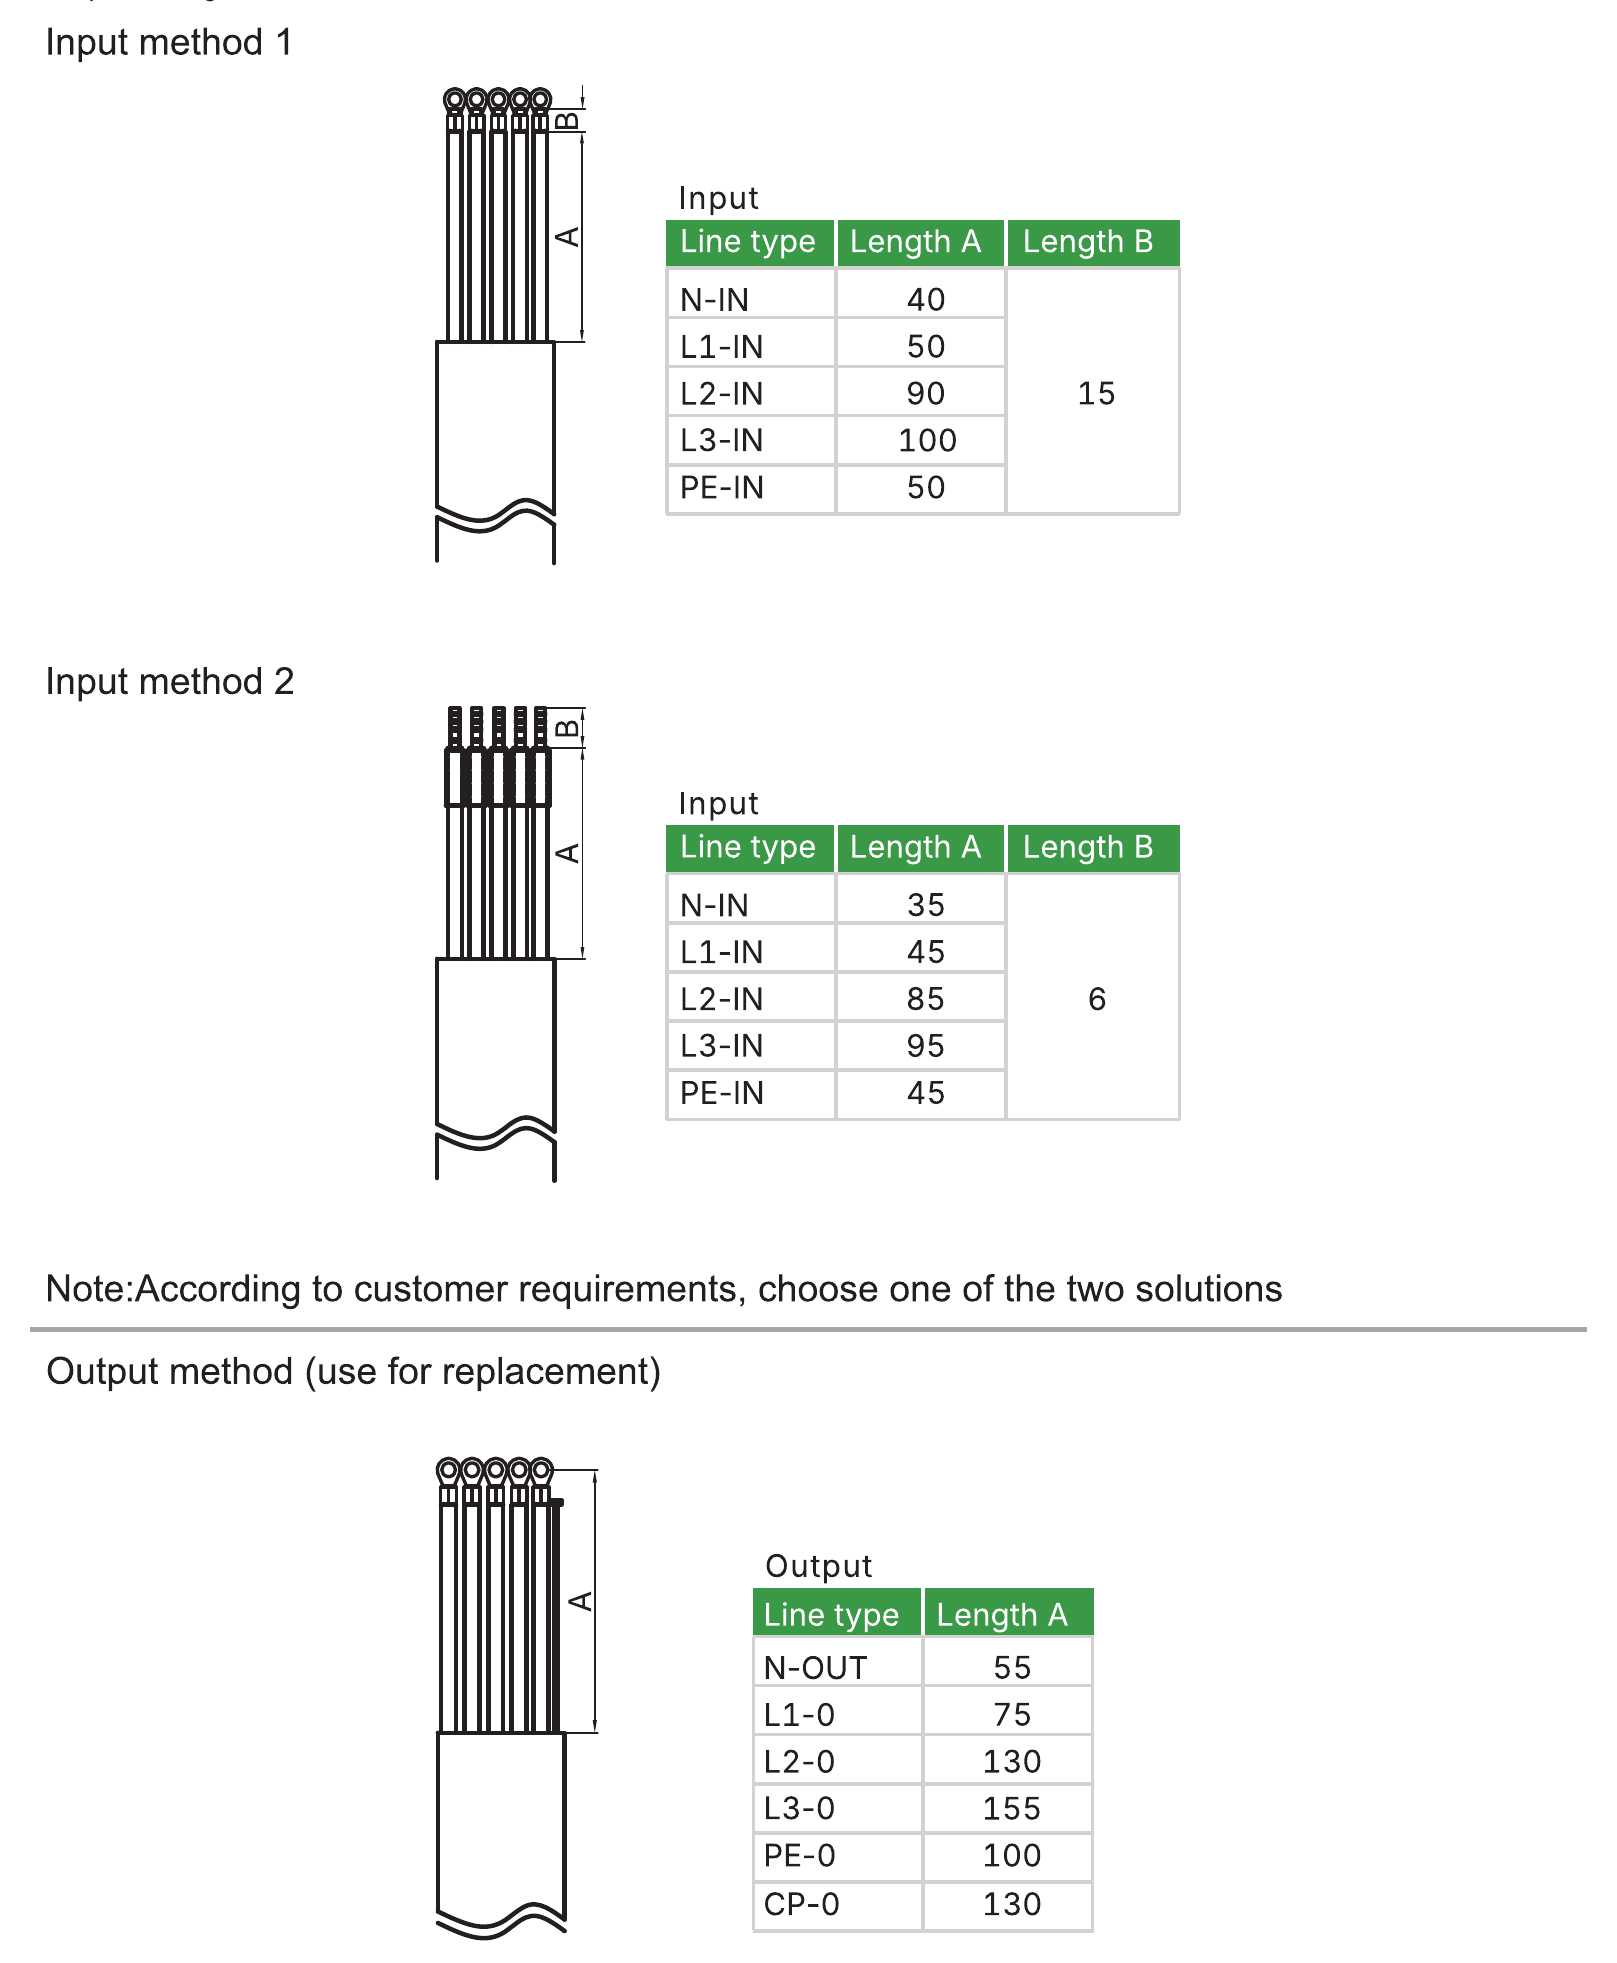
Strip the supply cable and its conductors to the lengths below. Choose the method that fits your cable entry; both are valid.
Crimp a terminal onto each conductor and connect it to the matching input terminal on the circuit board.
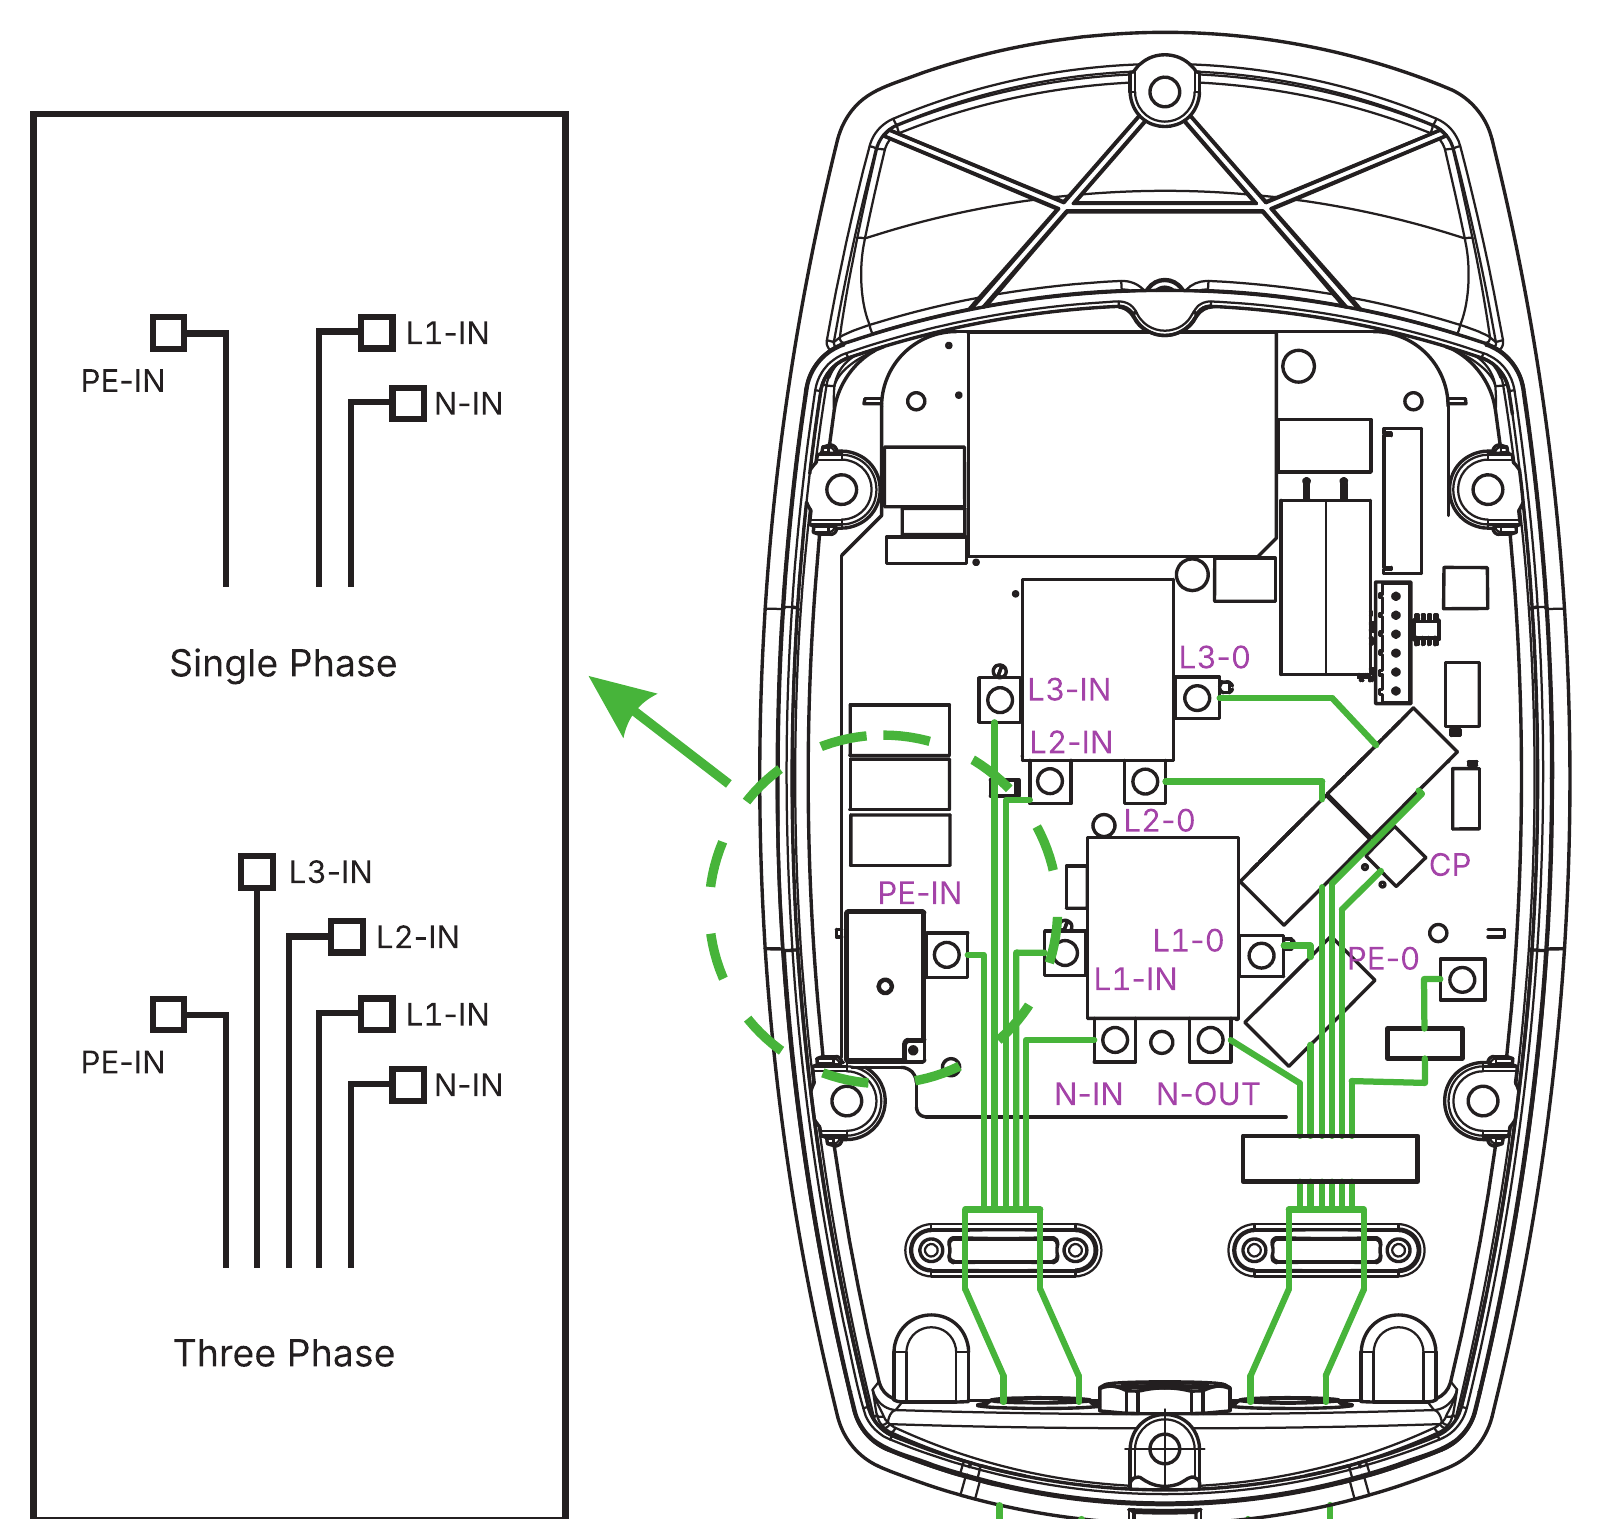
- Single phase (7 kW): connect N-IN, L1-IN and PE-IN.
- Three phase (11 kW / 22 kW): connect N-IN, L1-IN, L2-IN, L3-IN and PE-IN.
If you ever replace the charging cable, strip its conductors to: N-OUT 55 mm, L1-O 75 mm, L2-O 130 mm, L3-O 155 mm, PE-O 100 mm, CP-O 130 mm.
Step 4 – Connect dynamic load balancing (optional)
See section 7.
Step 5 – Set the charging current
See section 6.
Step 6 – Connect the upper cover
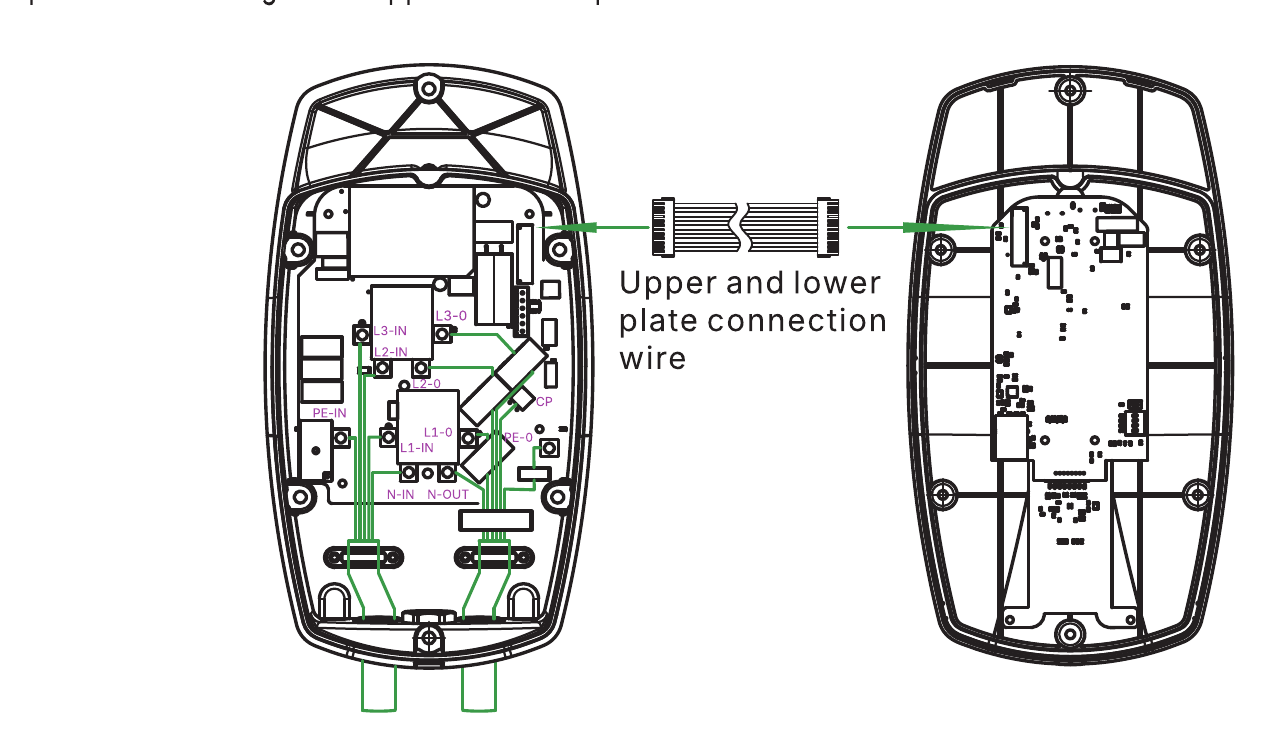
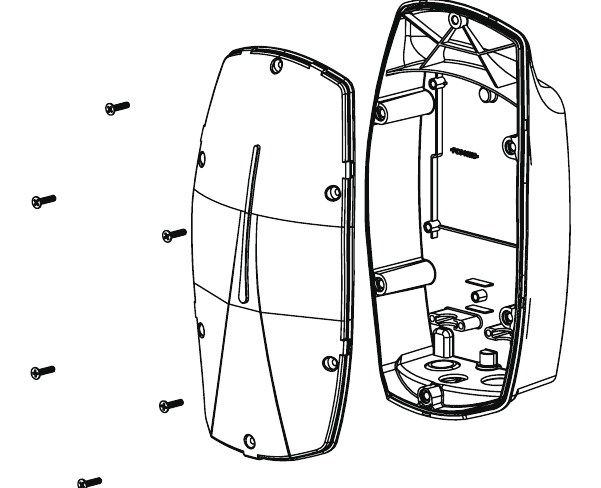
Plug the connection cable between the circuit board in the base and the circuit board in the upper cover.
Step 7 – Fit the upper cover
Place the upper cover on the base and fasten it with the six top cover screws.
Step 8 – Fit the front panel
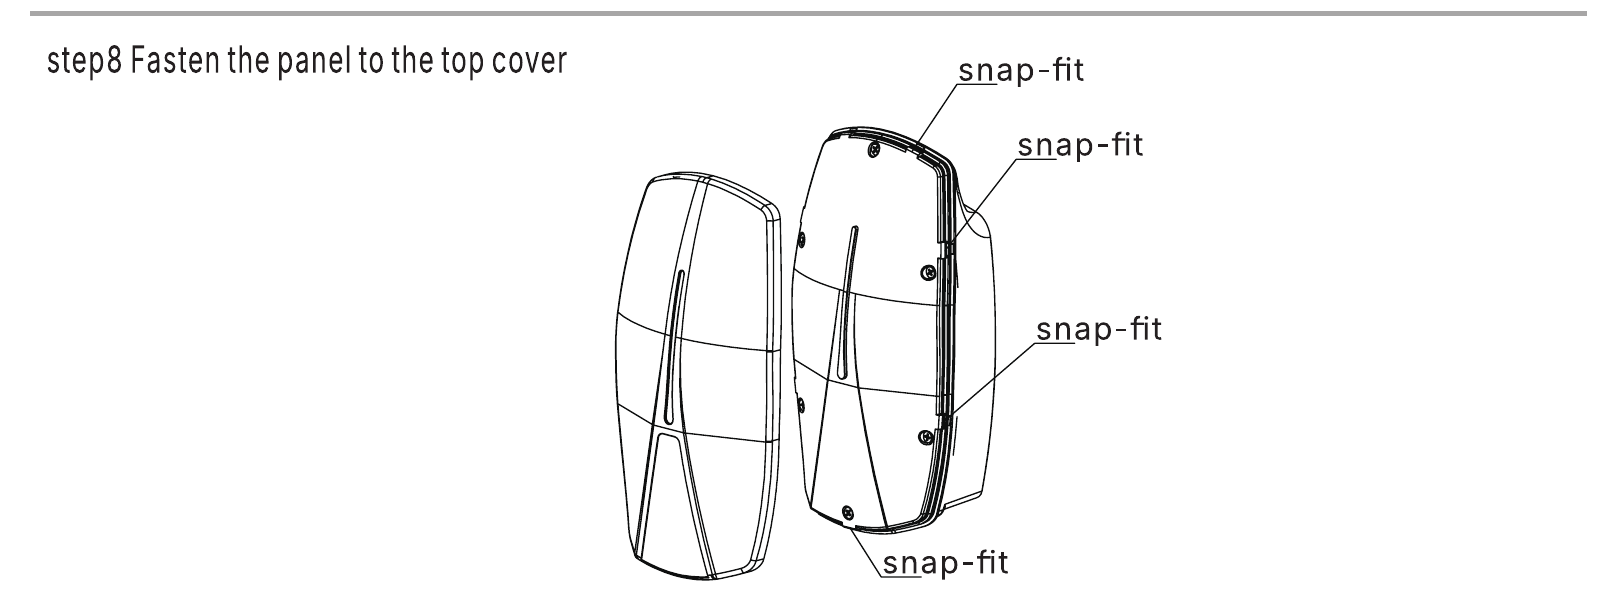
Press the front panel onto the upper cover until all snap-fits click into place.

Removing the front panel
Release snap-fit A at the bottom, then snap-fits B on the left and right, and push the panel upwards.
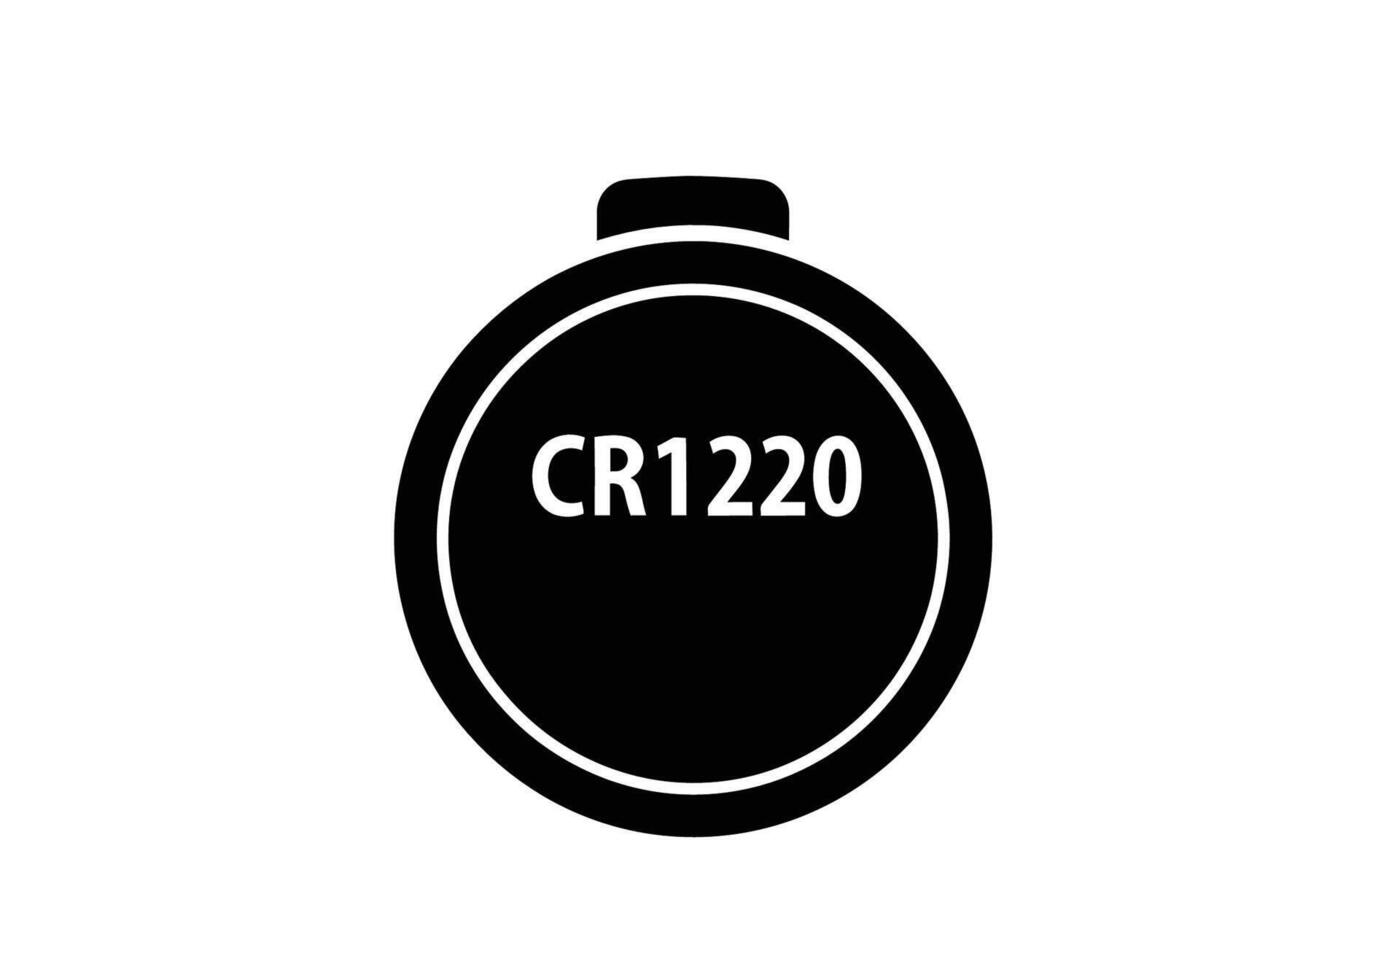
The package includes a CR1220 battery. During installation, please insert the battery into the device.
Without the battery, the device cannot retain the correct date and time. This may cause problems when using scheduled charging or charging sessions with the charger.
9. Setting the charging current
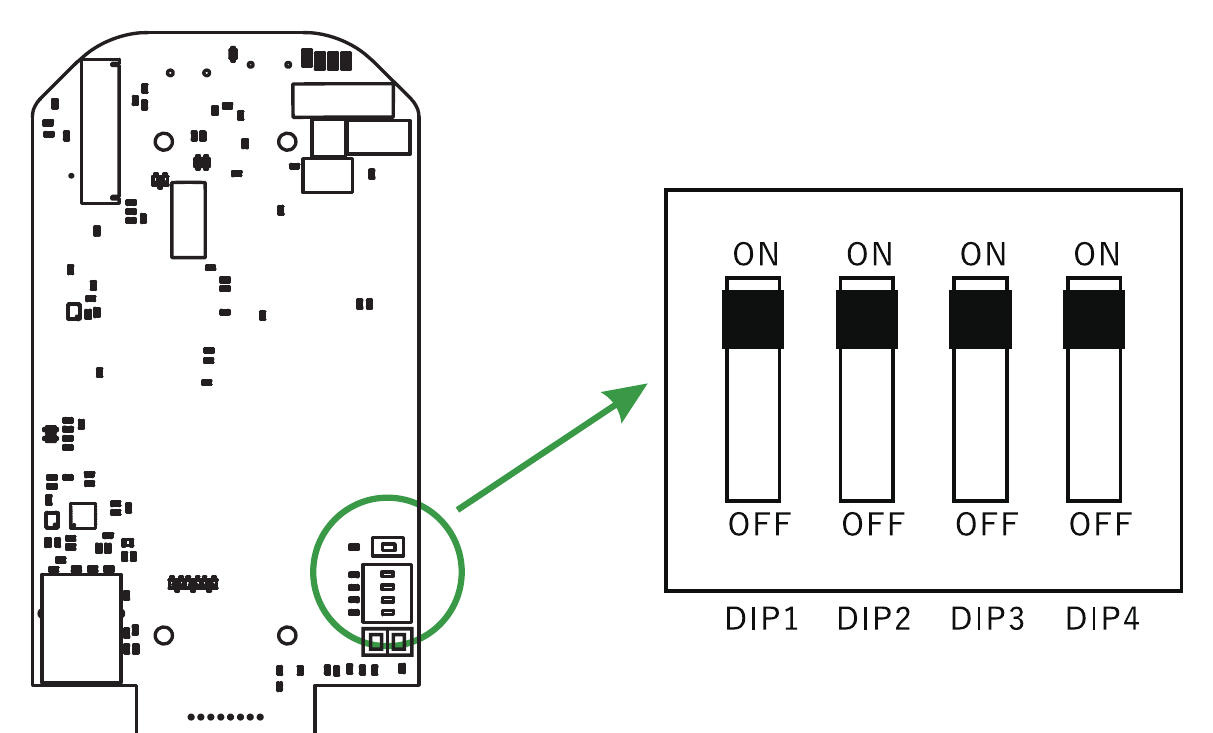
The four DIP switches on the circuit board set the maximum charging current and two operating options.
Warning: the power must stay OFF while you change the DIP switches. Changes made with the power on are not applied, and touching the board under power can cause an electric shock.
- Switch off the circuit breaker.
- Move the switches with a non-conductive tool.
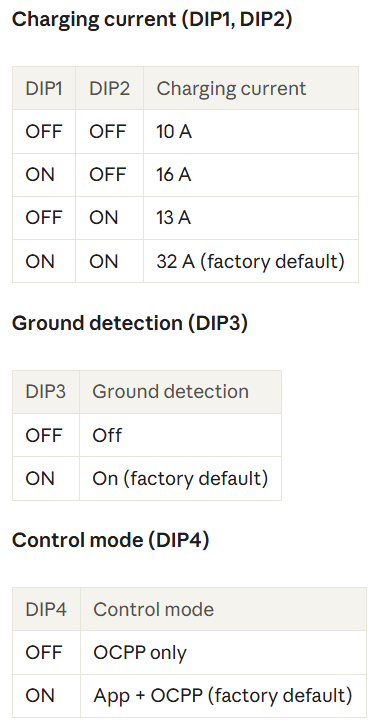
DIP switch settings:
Charging current (DIP1, DIP2)
Ground detection (DIP3)
Control mode (DIP4)
10. Power-on check
Before you switch the charger on for the first time, check the following.
- There is enough space around the charger for use, service and maintenance.
- The supply line has the correct circuit breaker and residual current device for the charger's rated current.
- The charger is mounted and wired correctly, and all covers are closed.
- Nothing is left on top of the charger.
Switch on the circuit breaker. The LED runs a self-check (blue, green and red flash alternately) and then shows a steady blue light: the charger is in standby.
11. LED indicator
| LED | Status |
|---|---|
| Blue - green and red flash alternately | Self-check after power-on |
| Blue - steady | Standby |
| Blue flashing | Connecting to the vehicle |
| Green steady | Charging |
| Red steady | Over-temperature protection |
| Red 3 fast + 1 slow | Over-current protection |
| Red 3 fast + 2 slow | Residual current (leakage) protection |
| Red 4 fast + 1 slow | Under-voltage protection |
| Red 4 fast + 2 slow | PEN fault protection |
| Red 5 fast + 1 slow | Over-voltage protection |
| Red 6 fast + 1 slow | Contactor welding protection |
| Red 7 fast + 1 slow | Ground fault protection |
| Red 8 fast + 3 slow | Electronic lock fault |
Slow flash: 2 s on, 0.5 s off. Fast flash: 0.5 s on, 0.5 s off.
If the LED shows red, unplug the vehicle, switch the charger off at the circuit breaker, wait 30 seconds and switch it on again. If the fault remains, contact your PIERRE partner.
12. Charging
Connect the vehicle
- Make sure the LED shows steady blue (standby).
- Plug the Type 2 connector into the vehicle's charging port and check that it sits firmly.
- The LED flashes green for about one second and then goes off: the charger is ready.
Start charging
Hold your RFID card against the card reader on the front panel, or start the session in the app. The LED turns steady green and charging begins.
Stop charging
Charging stops automatically when the battery is full. To stop earlier, hold your RFID card against the reader again or stop the session in the app. Wait until the LED returns to blue, then unplug the connector from the vehicle and hang the cable on the charger.