
Presence Sensor 360 (Flush Mount)
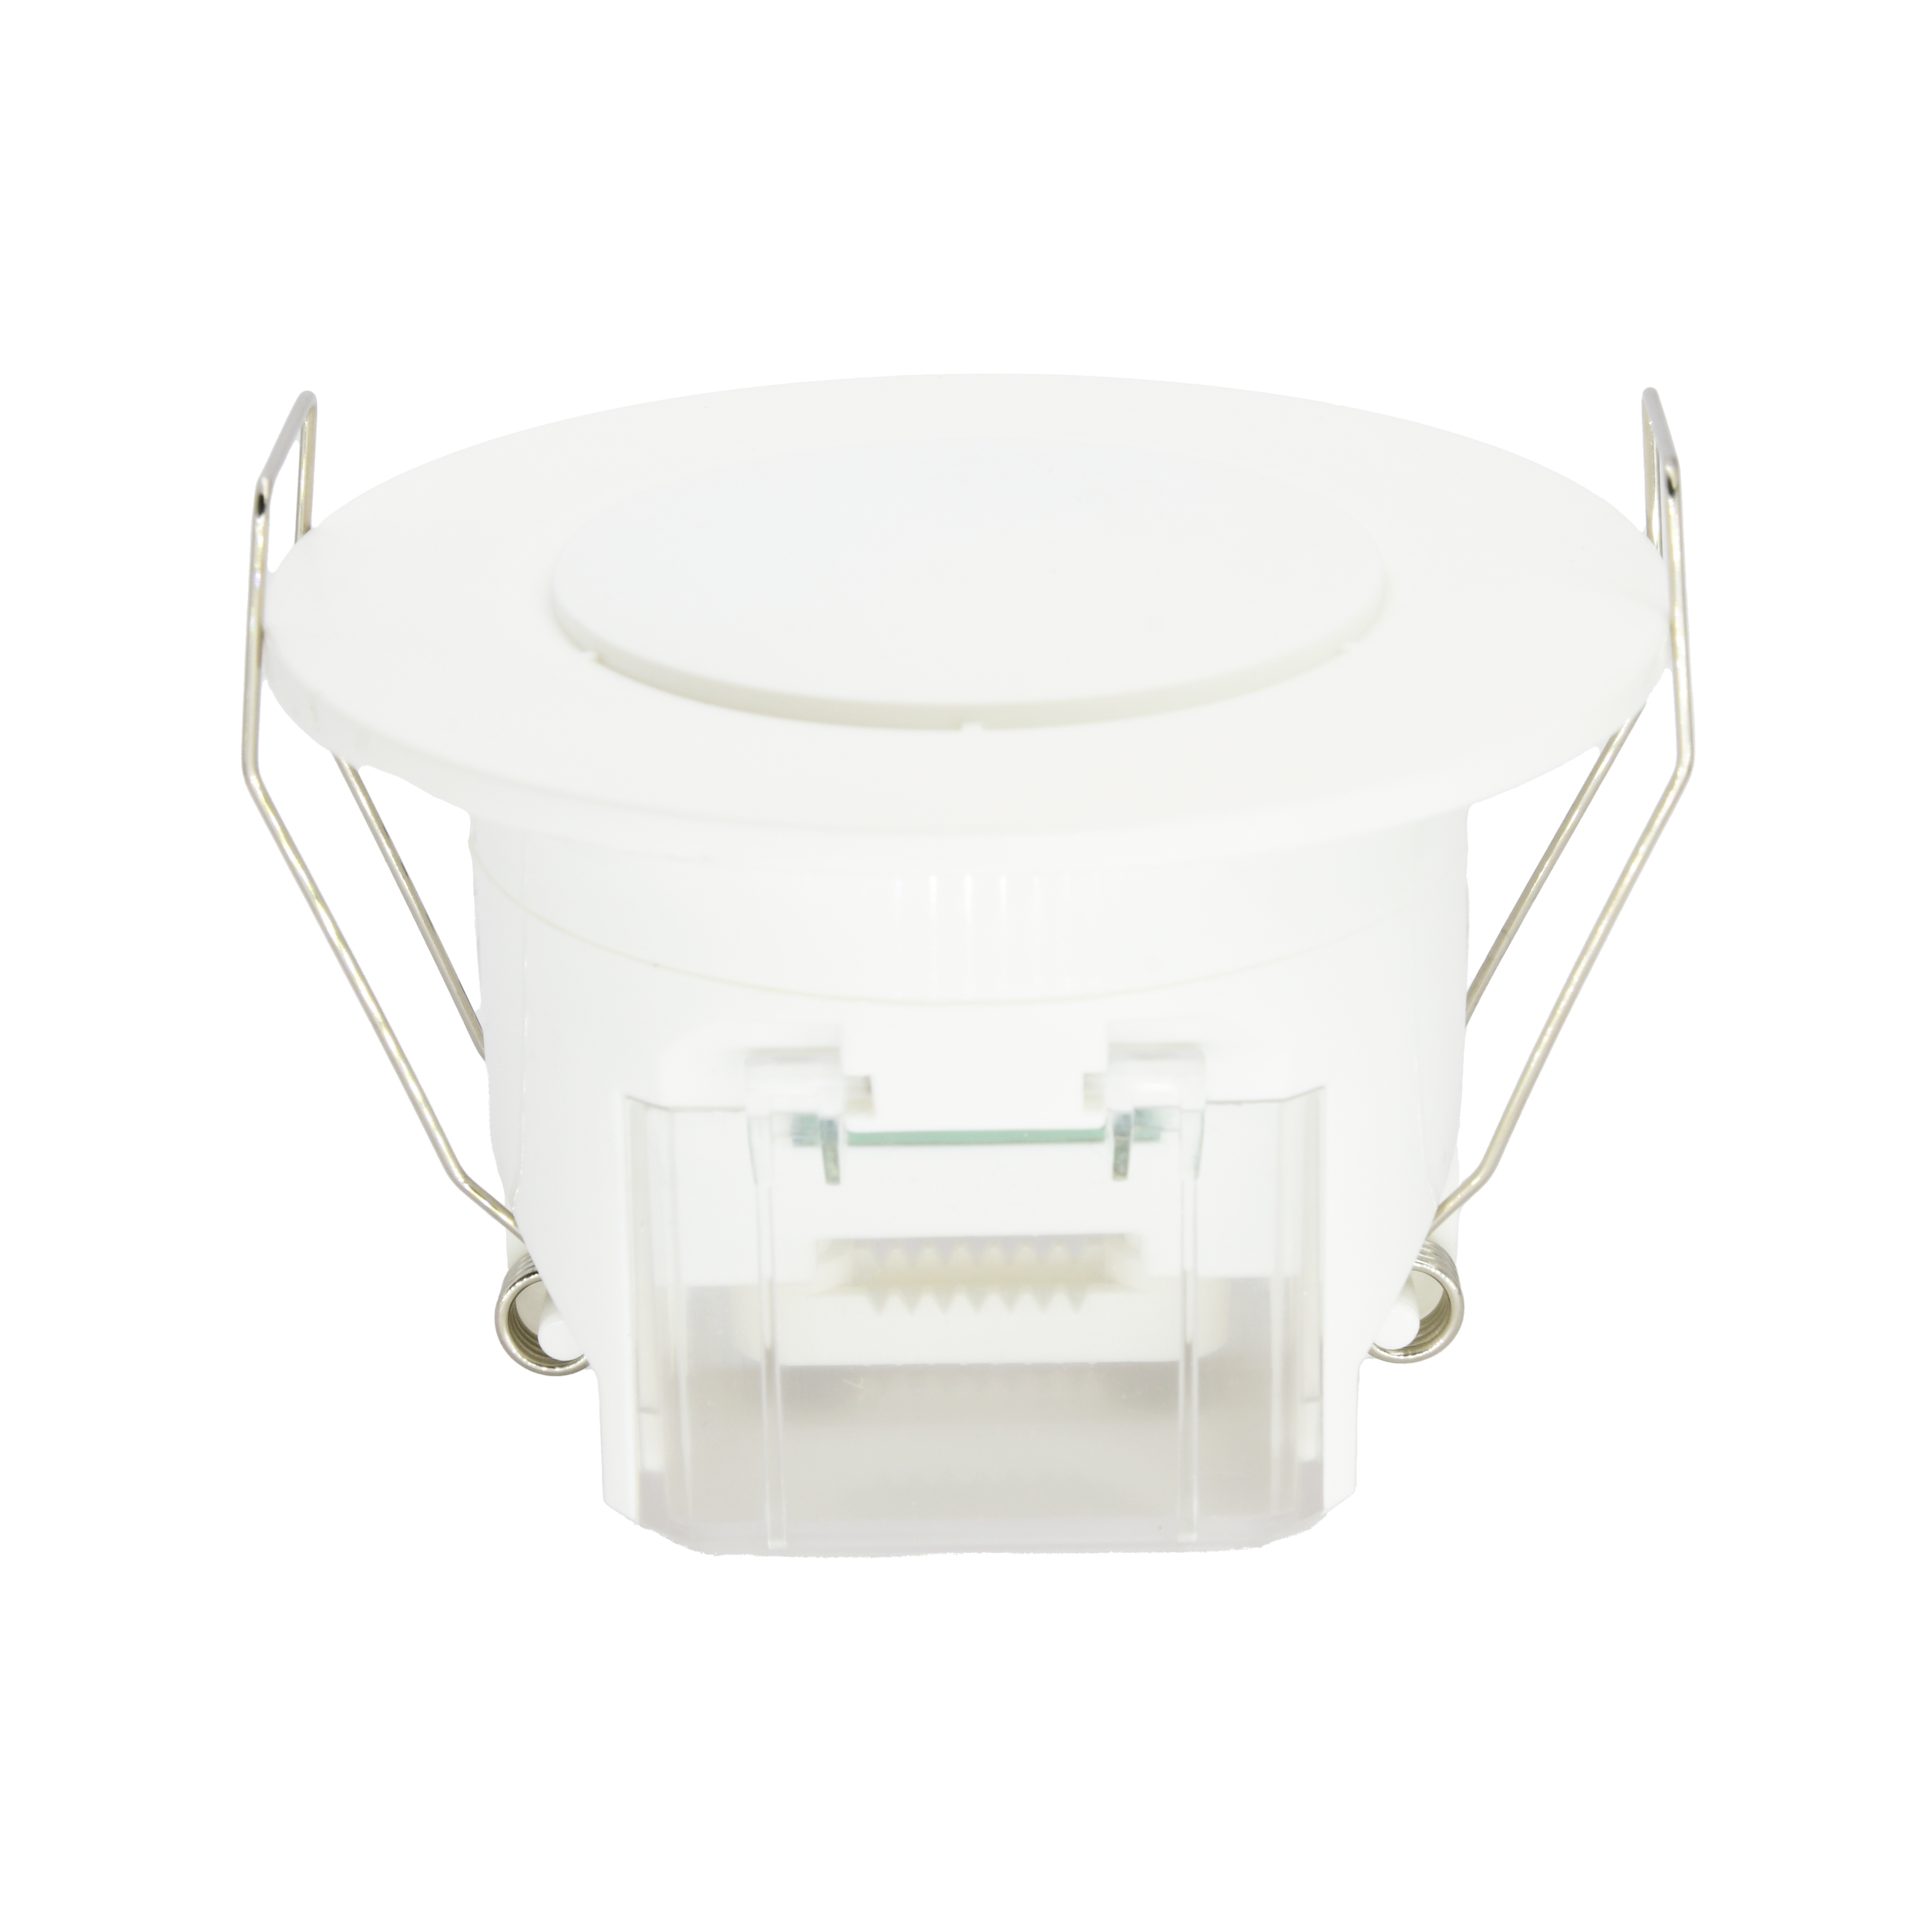
| SKU | PP-SNS-PRESENCE-F |
|---|---|
| Product line | PIERRE Pro |
| Category | Sensors / Motion & Presence Sensors |
| Manufacturer | Gasim |
| Manufacturer SKU | GSA021D |
| GTIN / EAN | 8606034720451 |
| HS code | 9031808000 |
Overview
The PIERRE Pro Presence Sensor 360 (Flush Mount) detects that a room is occupied rather than that something moved. Radar at 5.8 GHz picks up slight motion and breathing, so lighting does not switch off on someone reading, working at a desk or sitting in a meeting.
It gives 360° coverage with a 4 m radius, and the detection area can be reduced to 75 %, 50 % or 25 % where the sensor would otherwise see into a corridor or an adjacent desk.
Output is a dry contact, selectable normally-open or normally-closed, so it drives a PIERRE controller input, a lighting relay or a third-party controller. A built-in daylight sensor can hold the output off above 5, 25 or 50 lux, or be disabled.
It runs from 12 or 24 V DC, mounts flush in a ceiling at a recommended 3 m, and is rated IP20 for -25 °C to +50 °C.
Key features
- Radar presence detection at 5.8 GHz — senses breathing and slight motion
- 360° coverage, 4 m radius
- Detection area adjustable to 75 %, 50 % or 25 %
- Dry contact output, NO/NC selectable
- Daylight hold-off at 5, 25 or 50 lux
- 12/24 V DC, ceiling flush mount at 3 m
Technical specifications
| Electrical | |
|---|---|
| Power Supply | DC 12V/24V |
| Frequency | 5.8GHz ±75 MHz, ISM band |
| Output Power | Dry contact NO/NC |
| Physical | |
| Product Color | White |
| Recommended Installation Height | 3 m |
| Environmental | |
| Operating Temperature (°C) | -25 - +50 |
| Operating Temperature | -13°F - +122°F |
| Operating Humidity | Non condensing 85 % RH |
| IP Rating | IP20 |
| Storage Temperature | -40°C - +80°C |
| Safety | |
| Safety Features | Over Voltage, Short Circuit, Thermal Protection, Anti-Flammable Housing, Static Protection, Surge Protection |
| Sensors | |
| Detection Radius | 4 m |
| Detection Angle | 360° |
| Detection Technology | Radar-based motion/breathing |
| Daylight Sensor | 5 lux / 25 lux / 50 lux / Disable |
| Detection Range | Movement: 4-5m (Speed: 0.3m/s), Slight motion: 4-5m, Breathing: 3-4m |
Pin layout
| Pin | Label | Type | Position |
|---|---|---|---|
| 1 | 12V+ | power_12V_input | top |
| 2 | GND | power_gnd_in | top |
| 3 | COM | power_12V_input | top |
| 4 | NO | sensor_signal | top |
Physical & packaging
| Dimensions (L × W × H) | 85 × 85 × 59 mm |
|---|---|
| Weight | 82 g |
| Box dimensions (L × W × H) | 99 × 68 × 92 mm |
| Box weight | 108 g |
User manual
- 1. Dimensions
- 2. What you need
- 3. Functions
- 4. Structure
- 5. Installation
- 6. Wiring
- 7. Detection pattern
- 8. DIP Switch settings
- 9. Initialization
- 10. Factory Settings
- 11. Add the Presence sensor to the App
- 12. Installation Notes and Precautions
- 13. FAQ
1. Dimensions
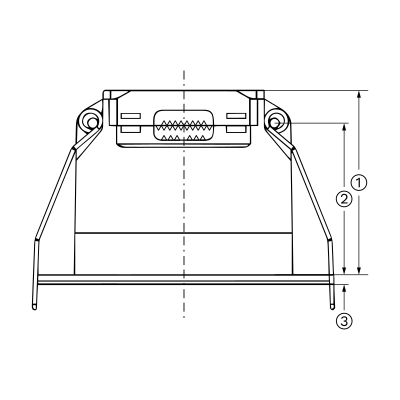
- 52.50 mm
- 43.20 mm
- 2.50 mm
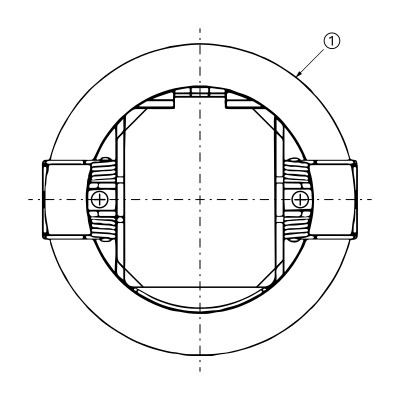
- Φ 85.00 mm
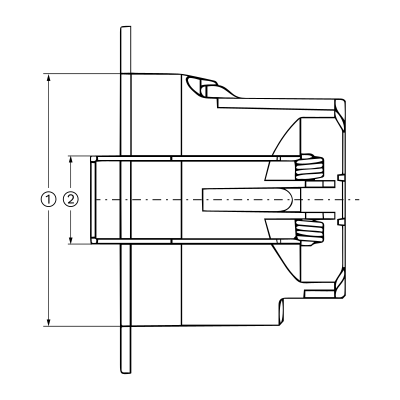
- 62.00 mm
- 21.60 mm
2. What you need
Wired. Needs a PIERRE PRO or LITE Controller with a free input, plus the Presence Sensor 360 (Flush Mount).
3. Functions
Signal detection: The sensor detects walking, slight movements (such as body shifts, head turns, and other minor actions), and breathing to identify human presence during a non-sleep state.

Movement signal: Large or noticeable movement that activates the sensor
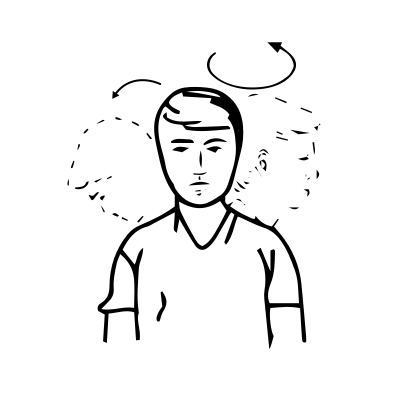
Slight motion signal: When only very small body movements are detected, the indicator flashes once.

Breathing signal: When no slight motion is detected, only the breathing signal is collected. The indicator flashes three times after detecting three valid breathing signals.
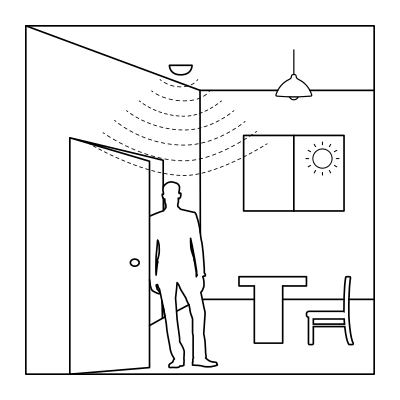
When the ambient light is sufficient, the light will not turn on even if motion is detected.
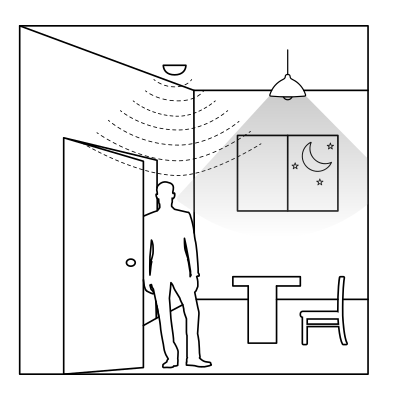
When the ambient light is low, motion is detected and the light turns on automatically.
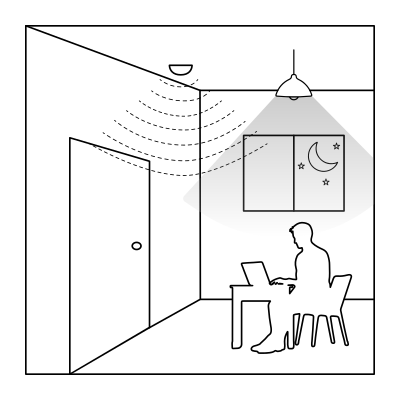
Movements like the body, head, and other small actions are detected during normal use, the light stays on continuously.
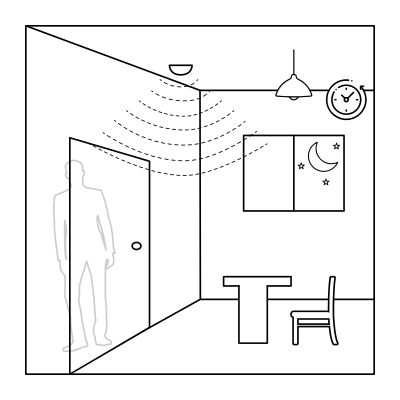
When the sensor fails to detect movement or slight motion, the light will automatically turn off after the set delay time
4. Structure
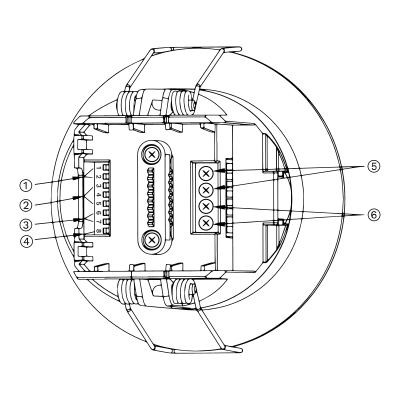
- Adjustable detection area
- Hold-time
- Daylight threshold
- Minor motion indicator
- Switch
- 12/24V DC Input
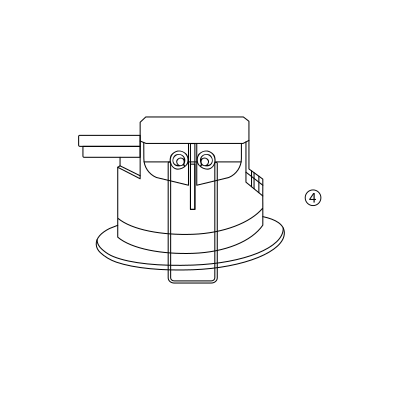
5. Installation
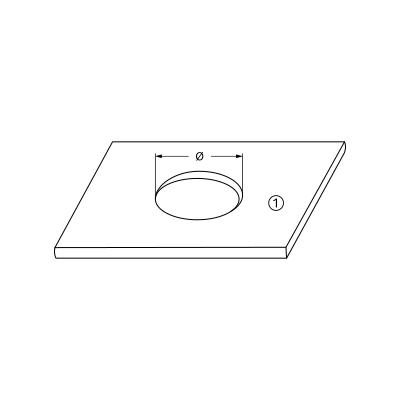
- Cut a hole of 65–70 mm in the ceiling
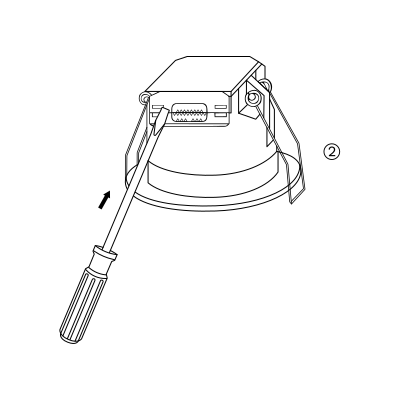
- Turn the rotating protective cover fully open
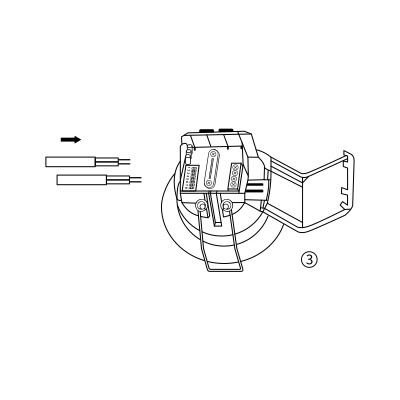
- Wiring (input & output)
- Fit the cable clamp screw and turn the protective cover back onto the housing
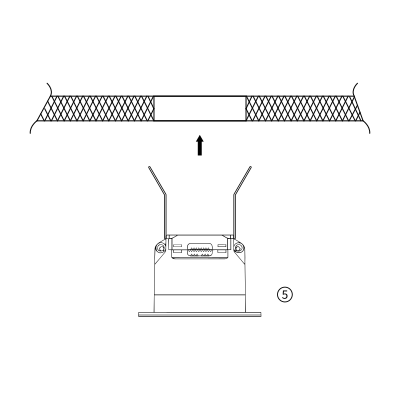
- Bend the spring clips back and push the sensor into the pre-cut hole in the ceiling
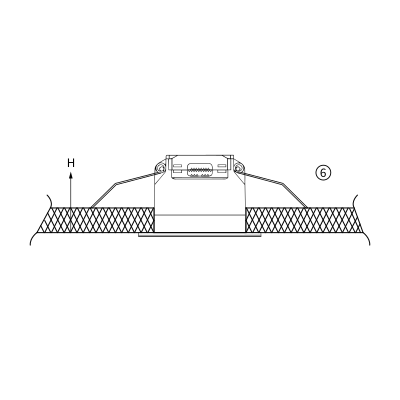
- Check that the sensor sits flush and firmly in the ceiling
6. Wiring
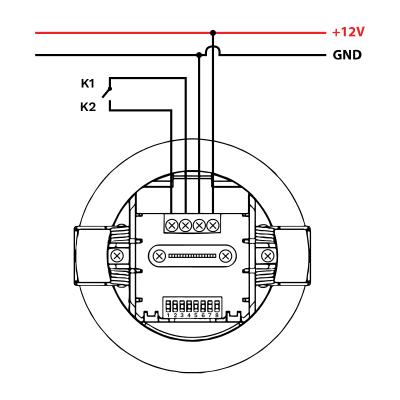
The sensor is powered with 12 V DC on the +12V and GND terminals. K1 and K2 are the two terminals of the switch contact: bridge K1 to +12 V and wire K2 to a PIERRE Controller input.
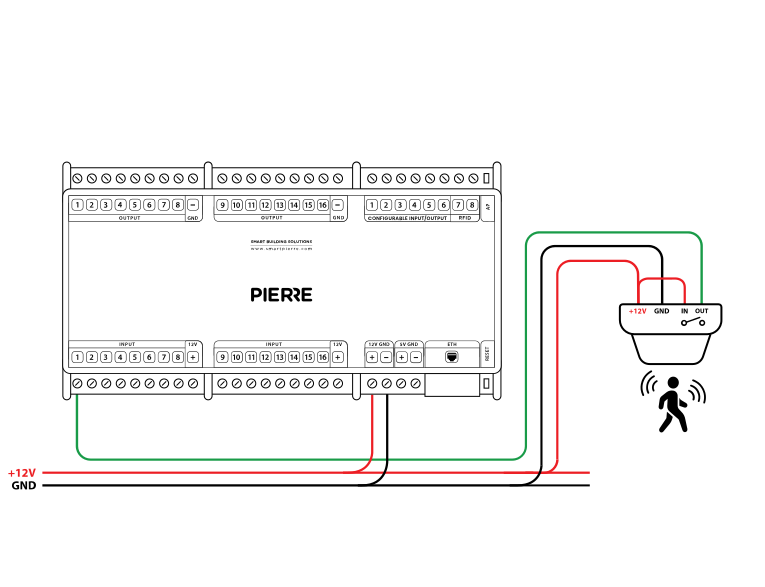
- Connect the +12 V terminal of the sensor to the +12 V output of the controller.
- Connect the GND terminal of the sensor to the GND terminal of the controller.
- Bridge the IN and +12 V terminals on the sensor to enable the output switching logic.
- Connect the OUT terminal of the sensor to a PIERRE input on the controller (e.g. INPUT 1).
| Run | Wires | Cross-section | Cable type | Conductors |
|---|---|---|---|---|
| From presence sensor to PIERRE Controller | 3 | 0.2 mm² (24 AWG) | Cat 5e U/UTP | +12 V, GND, SIGNAL |
One run, three conductors — 12 V, ground and signal — on a single Cat 5e U/UTP home-run to the controller. Identical to the motion sensor run; only the mounting and the detection behaviour differ.
7. Detection pattern
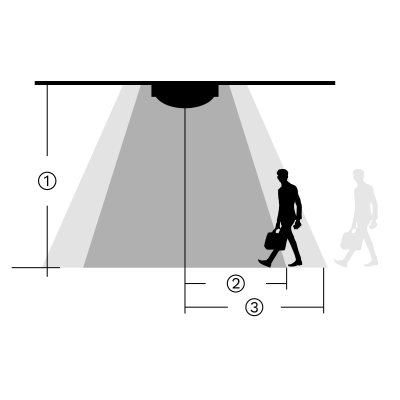
- Movement detection speed 0.3 m/s
- 3.0 m
- 4.0 m
- 5.0 m
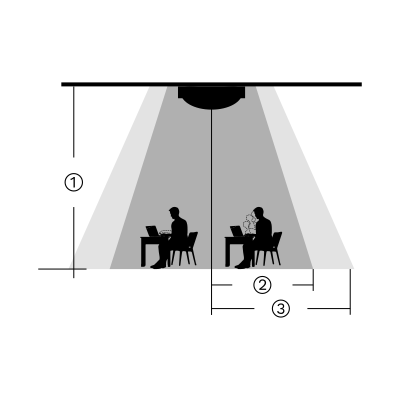
- Minor Motion Detection
- 3.0 m
- 4.0 m
- 5.0 m
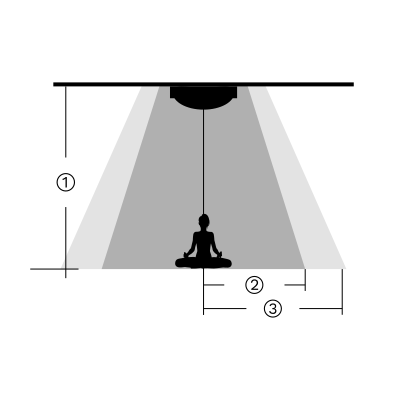
- Breathing Detection
- 3.0 m
- 3.0 m
- 4.0 m
8. DIP Switch settings
Detection Area
DIP switches 1 and 2 set the sensitivity, i.e. the size of the detection area.
| Position | 1 | 2 | Detection area |
|---|---|---|---|
| I | ON | ON | 100% |
| II | - | ON | 75% |
| III | ON | - | 50% |
| IV | - | - | 25% |
Hold Time
DIP switches 3, 4 and 5 set how long the output stays active after motion is detected.
Note: To enable presence detection (breathing detection), set the hold time to at least 1 minute, preferably longer. The 5-second setting is intended for motion-sensor testing only.
| Position | 3 | 4 | 5 | Hold time |
|---|---|---|---|---|
| I | ON | ON | ON | 5s |
| II | ON | - | ON | 30s |
| III | ON | ON | - | 1 min |
| IV | ON | - | - | 3 min |
| V | - | ON | ON | 5 min |
| VI | - | - | ON | 10 min |
| VII | - | ON | - | 20 min |
| VIII | - | - | - | 30 min |
Daylight Sensor
This table shows how DIP switches 6 and 7 control the daylight (ambient light) threshold. This setting determines when the sensor is allowed to turn on the light, based on the surrounding brightness level:
Note: When set to "Disable", the sensor will turn on the light whenever it detects movement, regardless of the ambient light level.
| Position | 6 | 7 | Threshold |
|---|---|---|---|
| I | ON | ON | 5 Lux |
| II | ON | - | 25 Lux |
| III | - | ON | 50 Lux |
| IV | - | - | Disabled |
Indicator Light
This setting, DIP switch 8, controls whether the indicator LED on the sensor is ON or OFF.
HS: The indicator light is on.
LS: The indicator light is off.
Note: The indicator is ON by default. It can be turned OFF using the DIP switch or by pressing the LS button on the remote control.
| 8 | |||
|---|---|---|---|
| I | ON | Indicator on (HS) | |
| II | - | Close |
9. Initialization
When powered on for the first time, the sensor enters a self-test mode. This process lasts 20 seconds, after which the sensor switches to normal operation.
During initialization, external motion signals are not detected and remote control signals are ignored.
10. Factory Settings
- Indicator Light: On
- Detection Area: 100%
- Hold Time: 1 minute
- Daylight Sensor: Disabled
11. Add the Presence sensor to the App
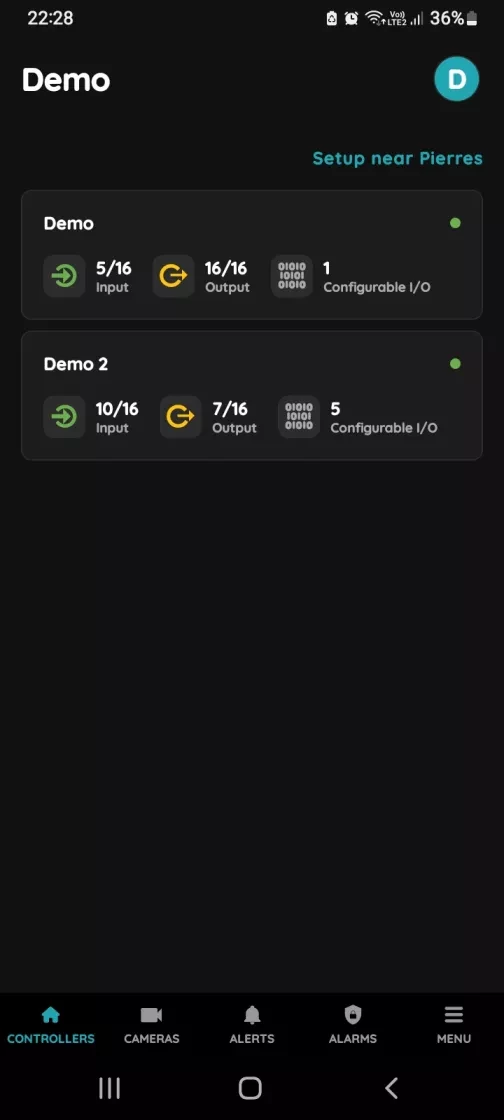
- Choose Controller
- Tap on the Controller that you would like to add new I/O to.
- To edit the I/O, click on the Controller to which the I/O is added.
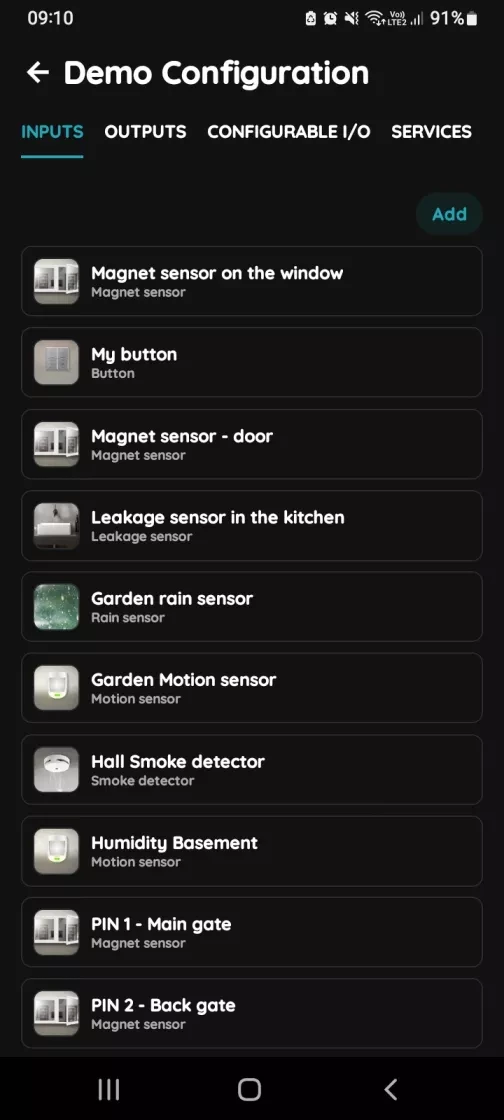
- Add button for Inputs
- Inputs tab is selected.
- List of Inputs is shown.
- In order to add new Input tap on the Add button.
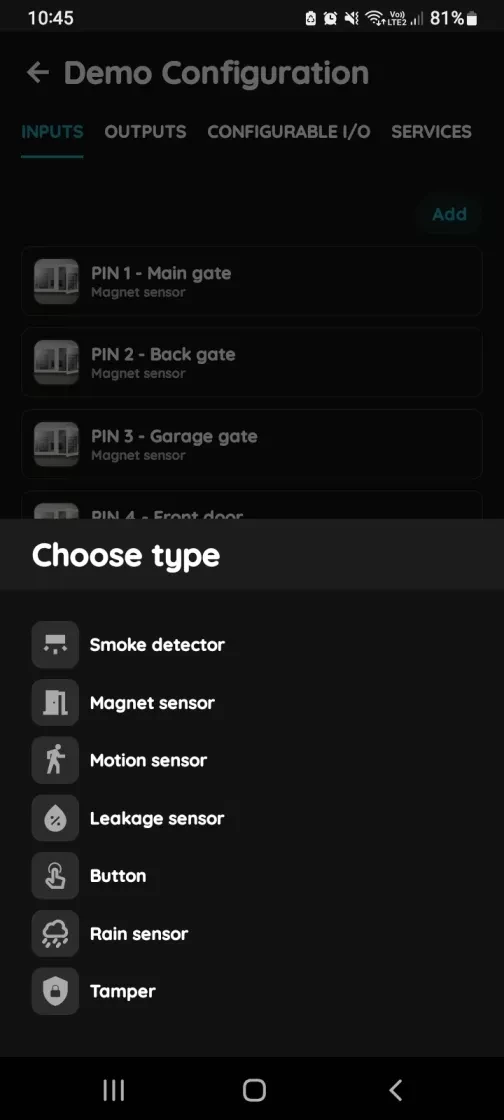
- Choose type - Inputs
- Scroll to the I/O from the list that you would like to add and tap on it.
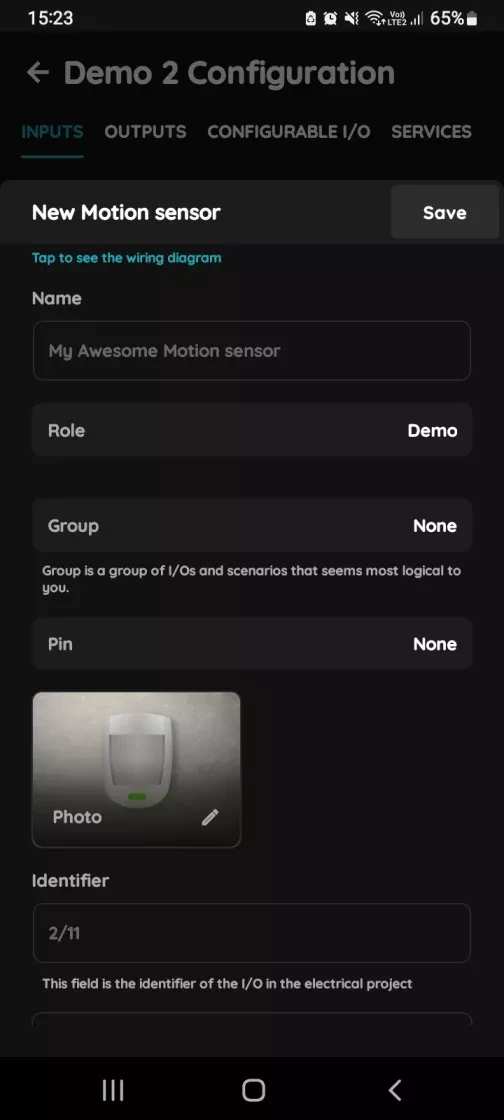
- New Motion sensor
- Fill following form:
- Name - Write the name of the Motion sensor.
- Role - Choose Role from the list.
- Group - Choose Group from the list. Group is a group of I/O and scenarios that seems most logical to you.
- Pin - Choose Pin from the list. Pin is physical place on the Controller where I/O is connected to it.
- Photo - Choose photo for the Motion sensor.
- Identifier - This field is the identifier of the I/O in the electrical project.
- Advanced - You can choose type of the signal that activates or triggers the Motion sensor: rising, falling, change, change inverted.
- Timeout - The duration for which the Motion sensor will remain active in auto mode.
- Fill following form:
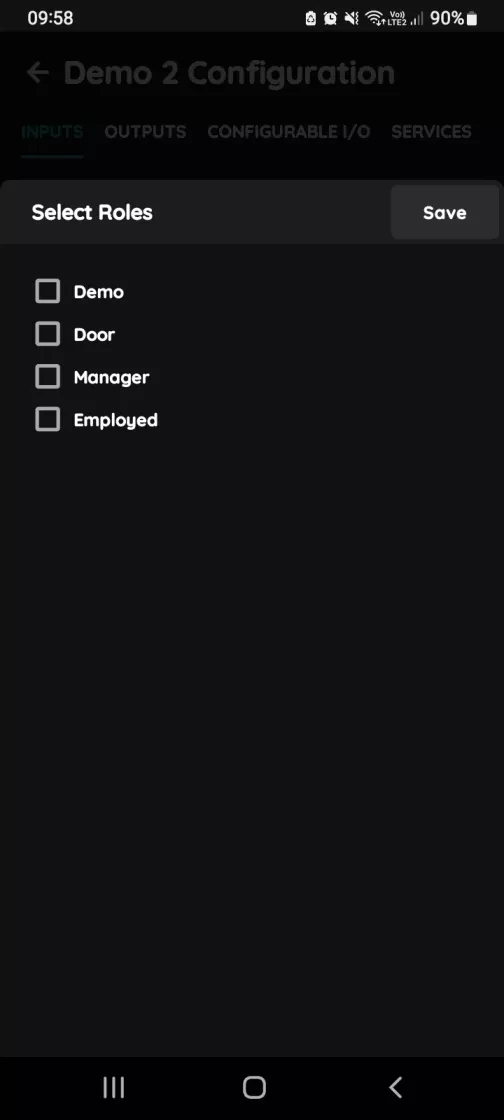
- Select Roles - Inputs
- Tap in the field Roles.
- Select checkbox/checkboxes (for multiple choice) next to the Role/Roles that you would like to choose.
- To confirm selection tap the button Save/Done.
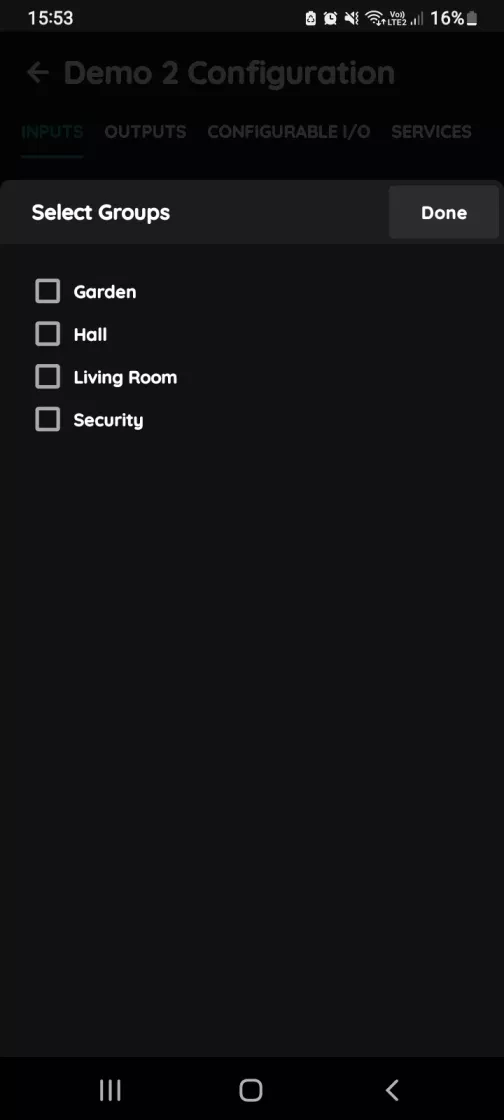
- Select Groups - Inputs
- In this step you should select Group.
- Select check box/check boxes next to the desired Group/Groups from the list.
- When you want to confirm your choice tap button Done/Save.
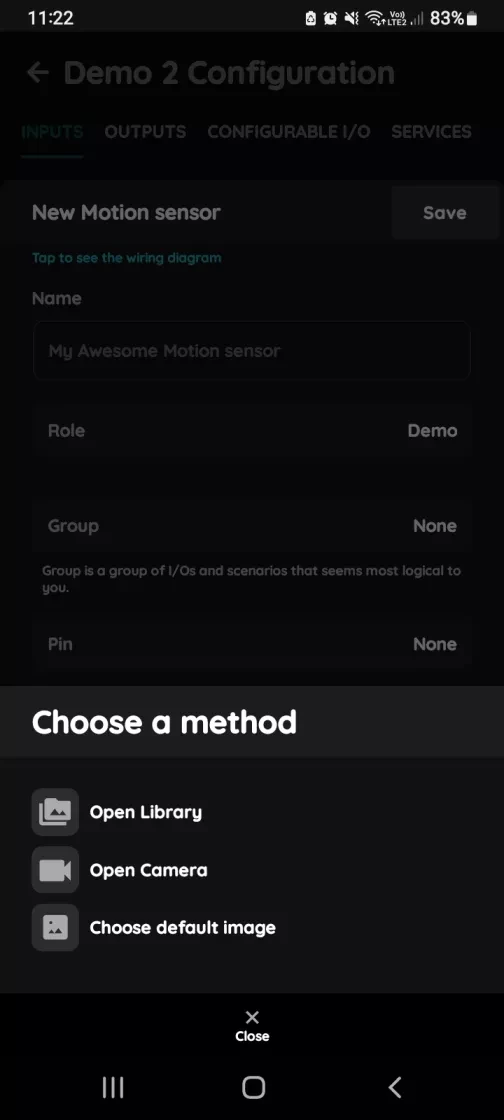
- Change photo
- Tap on the photo of the Motion sensor.
- You have three options:
- Open Library - The phone’s Library will open.
- Open Camera - You can take a picture using your smartphone.
- Choose default image - Use one of the prepared images.
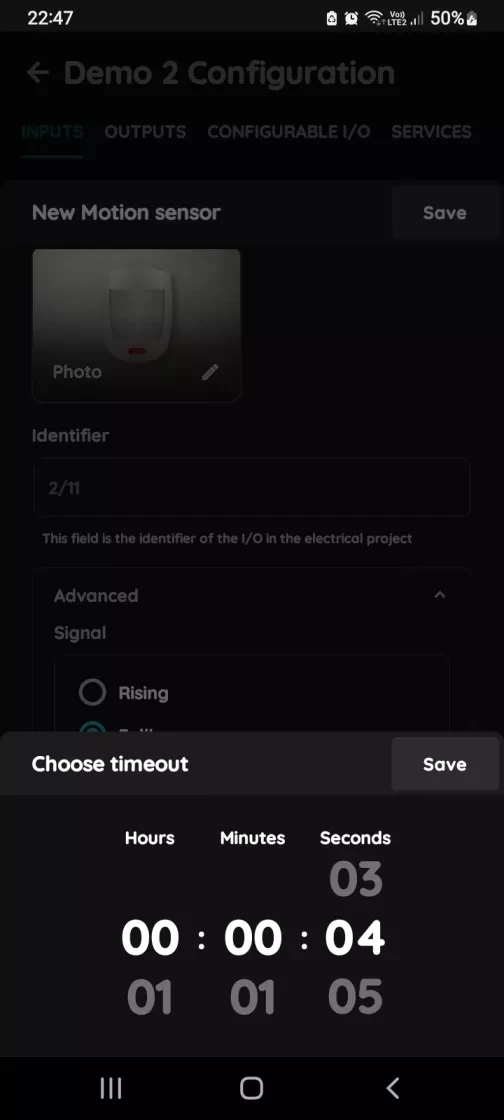
- Timeout
- In order to set Timeout - hours, minutes and seconds, you should scroll through each of these columns and when you are satisfied with your choice tap on Save button.
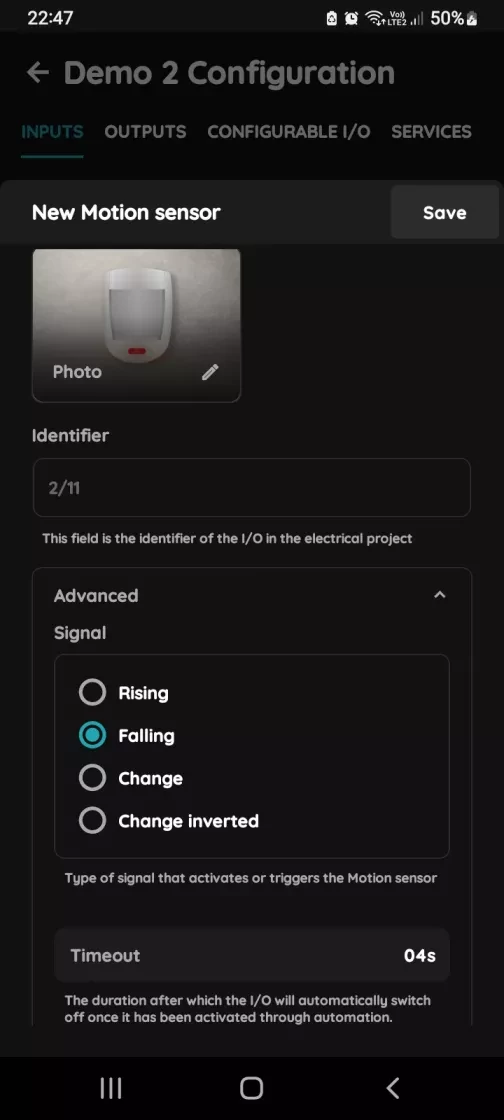
- Advanced Configuration
- Select radio button next to the Signal that you would like to choose:
- Rising
- Falling
- Change
- Change inverted
- Select radio button next to the Signal that you would like to choose:
12. Installation Notes and Precautions
- Professional Installation Required:
- The sensor must be installed by a qualified electrician. Make sure to disconnect the power supply before installation, wiring, or adjusting the DIP switch settings.
- Avoid High-Density Materials:
- Install the sensor away from large metal surfaces, glass panels, or other materials with high medium density, as these can cause false triggers.
- Avoid Constant Vibrations:
- Do not place the sensor near objects that vibrate continuously (e.g. ceiling fans), as vibration signals may be misinterpreted as motion, leading to false activation.
- Prevent Light Interference:
- Make sure that the daylight sensor’s detection window is not exposed to invalid or stray light sources, as this can interfere with accurate ambient light detection.
- Microwave Penetration Warning:
- The microwave sensor can penetrate walls. Movement outside the intended detection area (e.g. behind thin walls) may cause false alarms. To prevent this, carefully choose the installation location and adjust the detection range appropriately.
- Detection Range Disclaimer:
- The detection pattern and range are based on typical factory testing. Actual performance may vary depending on movement speed, mounting height, type of moving object, and environmental conditions.
13. FAQ
Q1: What do the controller LED colours mean?
Green – online and connected. Red – offline, no network or no internet. Light blue – AP mode, broadcasting its own network for setup. Dark blue – AP mode managed through PIERRE Partner. Purple – searching for an IP address from the router. Orange – downloading a firmware update.
Q2: The sensor does not react in the app. What should I check first?
Check that the sensor has been added to the configuration in the PIERRE Partner application.
Q3: The sensor was just added and shows no state. Why?
A newly added sensor needs a state change before it reports. Trigger it, then let it go idle again.
Q4: How do I check that the sensor is wired correctly?
It must be connected to 12 V, GND and a PIERRE input as shown in the wiring diagram, with the IN terminal bridged to +12 V.
Q5: How do I find out whether the fault is in the sensor or in the cable?
Briefly bridge 12 V to the PIERRE input the sensor uses. If the dot turns green in the app, the controller and the configuration are fine and the fault is the sensor or a broken wire.
Q6: When should input and output be on the same controller?
If one input influences an output, both should be added to the same controller. A motion sensor triggering a lamp, for example, performs best when both sit on the same controller.
Q7: What is the difference between presence and motion sensors?
A motion sensor detects movement and suits high-traffic areas like hallways. A presence sensor detects that someone is in the room even when stationary, which suits offices and living areas.
Q8: How should the sensors be wired?
Each sensor is wired individually back to the PIERRE cabinet in a star pattern. INPUT 12–24 V takes 12 V DC from the controller, GND takes ground from the controller, switch terminal K1 (IN) is bridged to INPUT 12–24 V, and switch terminal K2 (OUT) goes to the input on the controller.