
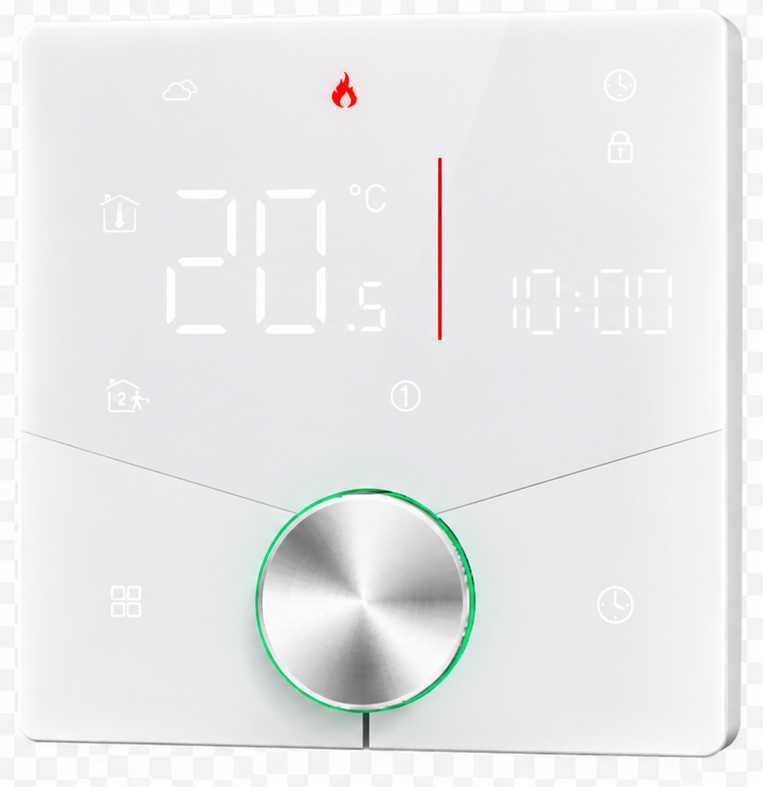
PIERRE T2 - Dry Contact Thermostat (110-230V AC, White)
| SKU | PP-T-MODBUS-WHI |
|---|---|
| Product line | PIERRE Pro, PIERRE Wave |
| Category | Thermostats |
| Manufacturer | Beca Smart |
| Manufacturer SKU | BAC-009ELNZB-GC-H-no fan |
| GTIN / EAN | 8606034720901 |
| HS code | 9032102000 |
Overview
The PIERRE T2 - Dry Contact Thermostat controls a zone from the wall. Its outputs are volt-free contacts, so the thermostat closes a circuit rather than switching a supply of its own.
It runs from 100-230 V AC 50/60 Hz at 1.5 W and provides two dry-contact channels. Room temperature is read by a built-in sensor to ±1 °C, and humidity is measured as well.
Two control routes are available: Zigbee 3.0 for the PIERRE system, and Modbus for direct integration with a BMS or a plant controller. The LCD touch interface allows local setpoint and schedule changes independently of either.
It fits an 86x86x50 mm back box with 60 mm fixing centres, is rated IP20 for dry indoor locations, and operates from 0 °C to +40 °C at 5–95 % RH.
Key features
- Dry-contact relay output for zone control
- Two channels
- 100-230 V AC 50/60 Hz, 1.5 W
- Zigbee 3.0 and Modbus
- Built-in temperature and humidity sensing, ±1 °C
- White finish, 86x86x50 mm back box
Technical specifications
| Certification | |
|---|---|
| Warranty | 2 years |
| Control | |
| Relay Type | Dry Contact None |
| Number of Channels | 2 channels |
| Electrical | |
| Power Supply | 100-230V AC 50-60Hz |
| Power Consumption | 1.50 W |
| Environmental | |
| Operating Temperature (°C) | 0 - +40 |
| Operating Humidity | 5% - 95% RH Non condensing % RH |
| Storage Temperature | +5°C to +45°C |
| IP Rating | IP20 |
| Physical | |
| Panel Material | ABS+PC material |
| Product Color | White |
| Mounting Type | Wall mount |
| Mounting Box | 86x86x50mm |
| Bolt Hole Distance | 60 mm |
| Wiring Requirements | N - Neutral, L - Live |
| Sensors | |
| Temperature Accuracy | ±1 °C |
| Built-in Sensors | Temperature, Humidity |
| Connectivity | |
| Connectivity | Zigbee, Modbus |
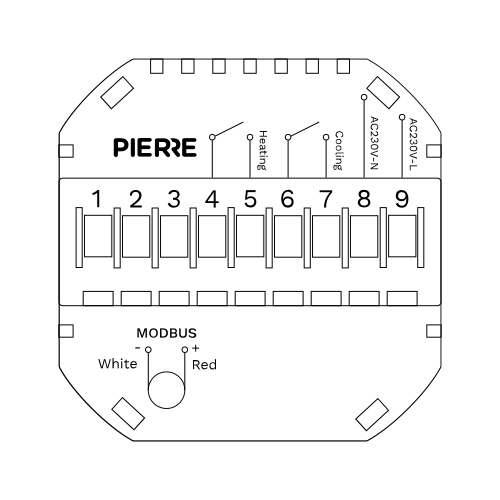
Pin layout
| Pin | Label | Type | Position |
|---|---|---|---|
| 1 | L | power_line | bottom |
| 2 | N | power_neutral | bottom |
| 3 | A+ | rs485_a_in | bottom |
| 4 | B- | rs485_b_in | bottom |
| 5 | NO1 | relay_no | top |
| 6 | COM1 | relay_com | top |
| 7 | NC1 | relay_nc | top |
| 8 | NO2 | relay_no | top |
| 9 | COM2 | relay_com | top |
| 10 | NC2 | relay_nc | top |
Physical & packaging
| Dimensions (L × W × H) | 89 × 44 × 89 mm |
|---|---|
| Weight | 145 g |
| Box dimensions (L × W × H) | 110 × 97 × 70 mm |
| Box weight | 211 g |
User manual
- 1. Product Size
- 2. Product Description
- 3. What you need
- 4. System integration
- 5. Technical Specification
- 6. Before Wiring and Install
- 7. Wiring
- 8. Installation
- 9. Operation
- 10. FAQ
1. Product Size
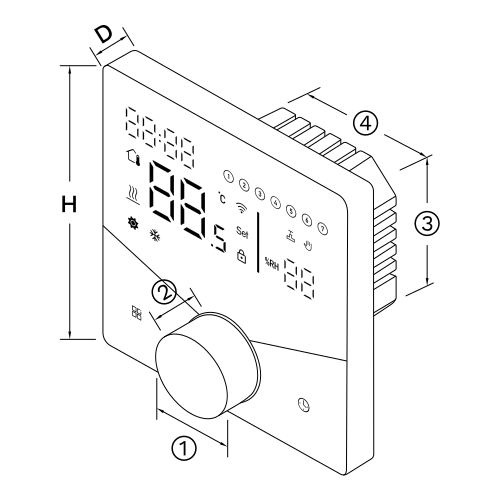
- 25 mm
- 12 mm
- 50 mm
- 50 mm
H: 88 mm
2. Product Description
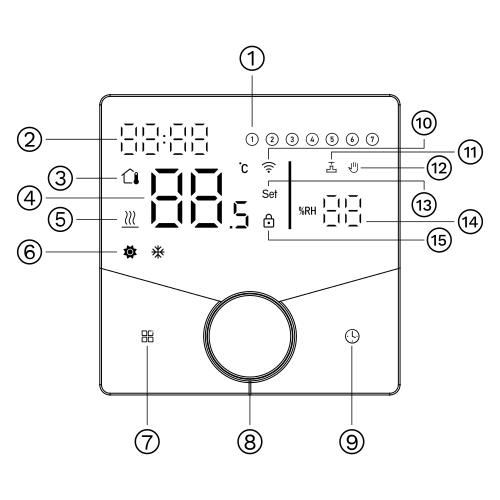
- Week
- Time
- Room Temperature
- Displayed Room Temperature
- Underfloor Temperature
- Heating / Cooling
- Mode Button
- Power On/Off - Center Knob
- Clock Button
- Zigbee icon (not used on the Modbus version)
- Heating On
- Manual Mode
- Set Temperature
- Humidity
- Lock
3. What you need
Wired. Needs a PIERRE Pro Controller plus a Modbus (TTL to RS-485) converter.
4. System integration
Versions
The PIERRE T2 thermostat is made in two communication versions and two supply voltages. This manual covers the Modbus RTU version for PIERRE Pro installations; a Zigbee version exists for PIERRE Wave installations. Each version is supplied for either 24 V or 230 V AC (L, N). The version must match the communication method and the supply voltage of the installation, and a thermostat must only be connected to the supply voltage it is rated for.
Local and integrated operation
The T2 works as a room thermostat on its own: the user sets the temperature at the thermostat and its relay output switches the heating or cooling circuit. Once it is connected to the PIERRE system over Modbus RTU or Zigbee, its temperature, set point and mode become available for central control, the Smart PIERRE app, PIERRE displays, scenes, schedules and automations. Local operation keeps working when the connection is down.
PIERRE Pro – Modbus RTU
The Modbus version connects by wire: T2 thermostat → Modbus RTU (A+, B−) → TTL to RS-485 converter → PIERRE Pro Controller. Several thermostats share one bus; each needs its own Modbus address (function 14) and the same baud rate (function 15). The bus is a shielded twisted pair, terminated at both ends. Wiring details are in the Wiring section.
PIERRE Wave – Zigbee
The Zigbee version needs no communication cable: T2 thermostat → Zigbee → a PIERRE display and/or gateway → PIERRE system. It is powered from its 24 V or 230 V supply and paired with the gateway from the Smart PIERRE app. Zigbee range is reduced by distance, reinforced-concrete walls and floors; where coverage is weak, use Zigbee repeaters or additional gateways, and plan the gateway positions during system design in large or multi-storey buildings.
Controlling the heating or cooling circuit
Two arrangements are possible:
- From the thermostat relay. The T2 switches the valve actuator or the control input of the heating/cooling device through its own output and regulates the room locally, while the PIERRE system monitors and adjusts it over the bus or Zigbee.
- From the PIERRE Pro Controller (Modbus version). The T2 supplies the room temperature and set point over Modbus RTU; the Pro Controller switches the circuit from its own output through a relay, for example a 230 V thermoelectric valve actuator. This suits installations where all heating and cooling zones are wired centrally to the distribution board.
| PIERRE Pro | PIERRE Wave | |
|---|---|---|
| Communication | Modbus RTU (wired) | Zigbee (wireless) |
| Supply voltage | 24 V or 230 V AC | 24 V or 230 V AC |
| Required PIERRE device | PIERRE Pro Controller + TTL to RS-485 converter | A PIERRE display and/or gateway |
| Communication cable | Required | Not required |
| Local thermostat operation | Yes | Yes |
| App access, scenes, automations | When integrated | When integrated |
5. Technical Specification
6. Before Wiring and Install
- Read these instructions carefully. Failure to follow them could damage the product or cause a hazardous condition.
- Check the ratings given in the instructions and on the product to make sure the product is suitable for your application.
- Installer must be a trained, experienced service technician.
- After installation is complete, check the product operation as described in these instructions.
7. Wiring
PIERRE T2 Modbus thermostat — underfloor heating / ceiling cooling
| Run | Wires | Cross-section | Cable type | Conductors |
|---|---|---|---|---|
| From controller to MODBUS converter | 4 | 0.2 mm² (24 AWG) | Cat 5e U/UTP | 12 V, GND, TTL TX, TTL RX |
| From electric box to MODBUS thermostat | 2 | 1.5 mm² | NYM-O | L, N |
| From MODBUS converter to MODBUS thermostat (bus) | 2 | 0.75 mm² | Shielded twisted pair | A+, B− |
Controller to converter is four conductors: 12 V, GND and the two TTL data lines. Mains reaches the thermostat on two conductors at 1.5 mm². The Modbus bus itself is a two-conductor pair, A+ and B−: use shielded twisted pair in a bus topology, terminated at both ends of the line.
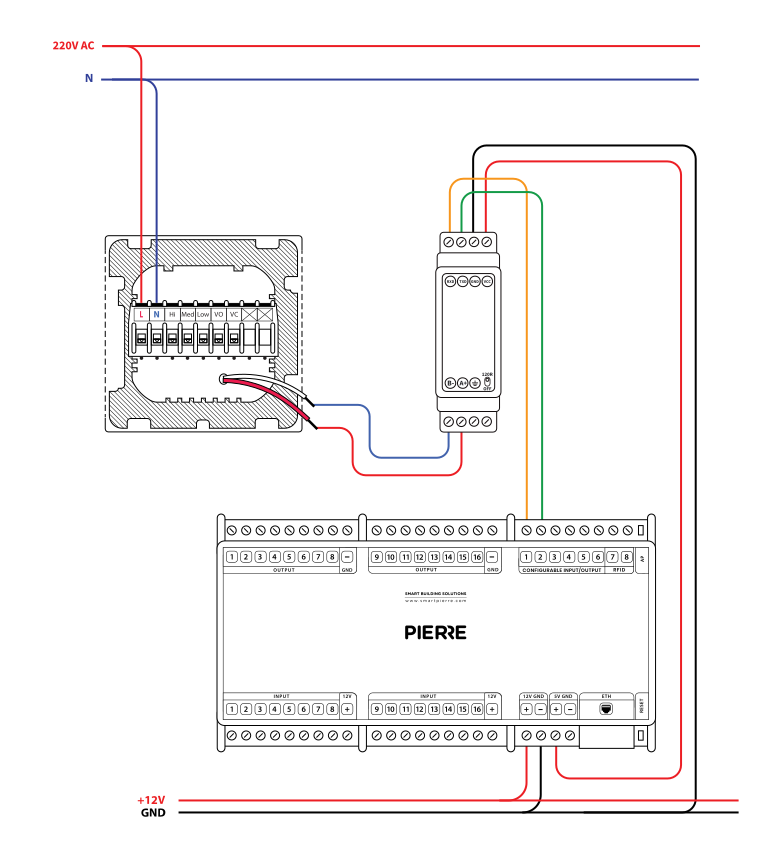
PIERRE T2 Modbus thermostat — wiring diagram
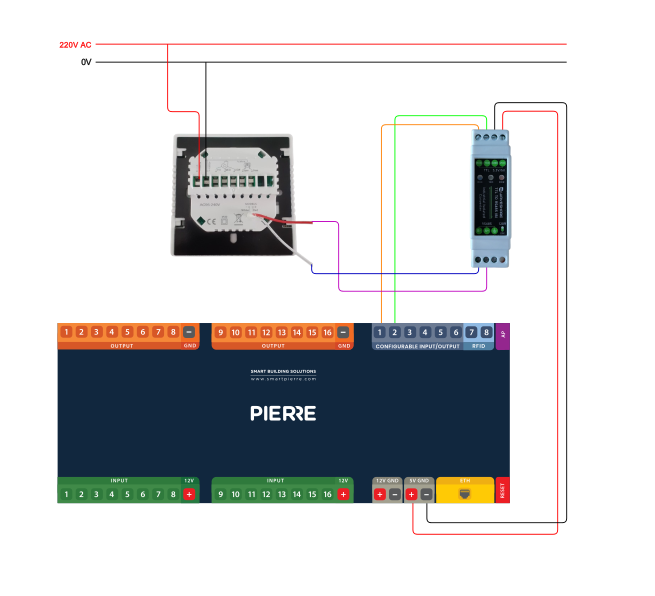
PIERRE T2 Modbus thermostat — wiring example
8. Installation
This Thermostat is suitable for installation within a standard 86 mm or European 60 mm wall box.
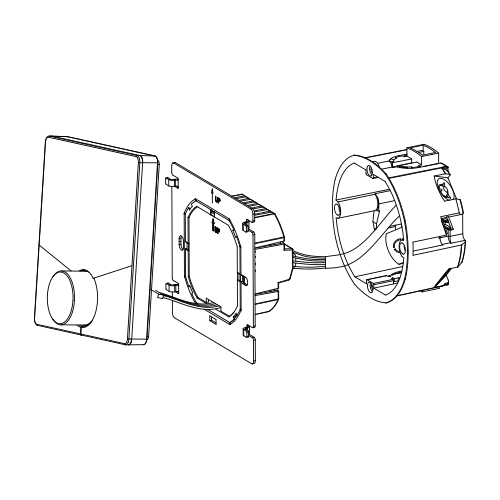
Connect the power cable to the power terminals.
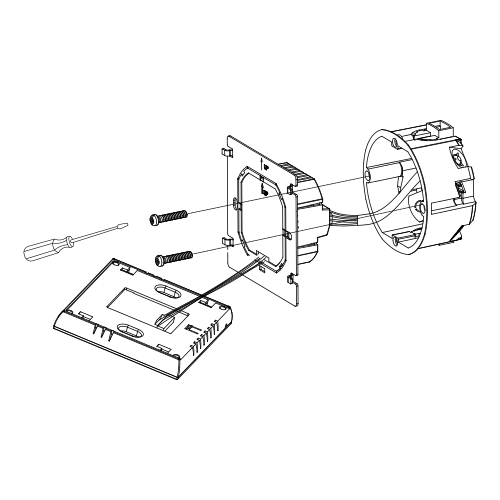
Fix the mounting plate to the wall box with two screws.
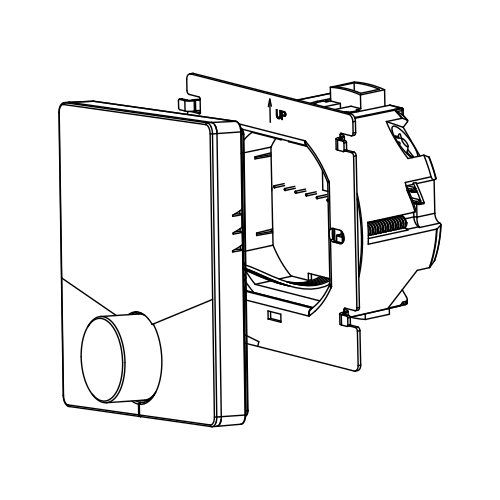
Hang the control panel onto the mounting plate
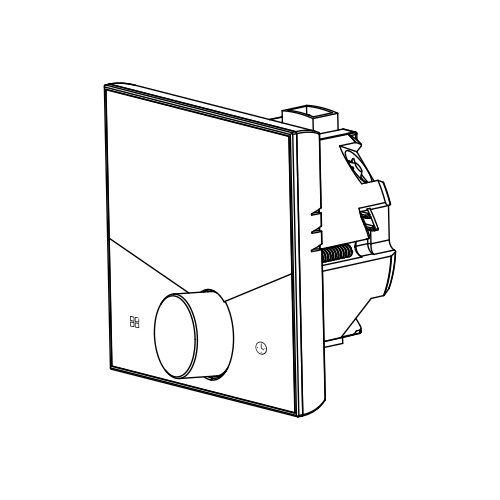
Installation is completed
9. Operation
During Power On
1. Power On/off:
Press the Center Knob to turn the thermostat on/off.
2. Manual & Programmable
Press the Mode button to change between manual mode (🔥) and programme mode (🕒).
- In manual mode, 🔥 will show on the display.
- In programmable mode, 🕒 will show on the display.
3. Setting Temperature
In the programming mode, the temperature setting and time setting will be locked. To adjust them, first switch the thermostat to manual mode by pressing the Mode button.
In the manual mode, the desired temperature can be set by turning the Center Knob.
4. Adjusting/Setting the Clock
Press 🕒 to set minute, hour and weekday, and adjust the values by turning the Center Knob.
Press the Mode button once more to confirm and exit.
5. Locking your Thermostat
Press and hold the Mode button and 🕒 for 5 seconds to lock/unlock your thermostat.
Full lock or partial lock is selected with function 4 (Button locking) in the function settings (see 8).
6. Adjusting/Setting the Programmable Schedules
Press icon 🕒 four times in a row. You can see "MON TUE WED THU FRI" and the minutes of time are flashing.
- Turn the Center Knob to set the minutes.
- Press the icon 🕒 again; the hour of the time will flash, set the hour by turning the Center Knob.
- Press the icon 🕒 again; the temperature setting will flash, set the temperature by turning the Center Knob.
This completes the setting of Period 1.
In the same way, complete the settings of the remaining periods.
Press the icon 🕒 once more to enter the Saturday schedule settings (you will see the SAT on the screen).
Repeat the above process to set the period and temperature, and Sunday schedule.
Press the icon 🕒 once more to confirm and exit.
| Time display | MON–FRI (①②③④⑤ shows on screen) | SAT. (⑥ shows on screen) | SUN. (⑦ shows on screen) |
|---|---|---|---|
| Period 1 | 6:00 20 °C | 6:00 20 °C | 6:00 20 °C |
| Period 2 | 11:30 20°C | 11:30 20°C | 11:30 20°C |
| Period 3 | 13:30 20°C | 13:30 20°C | 13:30 20°C |
| Period 4 | 17:30 20°C | 17:30 20°C | 17:30 20°C |
A separate schedule may be set for weekdays (Mon–Fri) and for weekends (Sat and Sun).
7. Checking the Temperature of Floor Sensor
Press and hold the 🕒 button for 5 seconds to display the temperature of the floor sensor.
If no external sensor is connected, the thermostat will display "Er".
⚠ Note: Do not use third-party external sensors; the temperature will be incorrect.
8. Setting the Functions and Options
During power off, press and hold the Mode button and 🕒 for 8 seconds in order to reach system function.
Then press the Mode button to scroll through the available functions, and turn the Center Knob to change the available options.
All settings are confirmed automatically.
| Code | Function | Setting and options | Default |
|---|---|---|---|
| 1 | Temperature compensation | -9 to 9 °C (for internal sensor) | -3 |
| 2 | Humidity compensation | -9 to 9 | 01 |
| 3 | Deadzone temperature | 1–5 °C | 01 |
| 4 | Button locking | 00: All buttons are locked except power button. 01: All buttons are locked. | 01 |
| 5 | Sensor type | In: Internal sensor (to control the temp.) Ou: External sensor (to control the temp.) AL: Internal/External sensor (internal sensor to control temp. external sensor to limit temp.) | AL |
| 6 | Min. set temp. | 5–15 °C | 05 |
| 7 | Max. set temp. | 30–45 °C | 35 |
| 8 | Display mode | 00: Display both set temp. and room temp. 01: Display set temp. only | 00 |
| 9 | Bright duty Day | 0–8 | 03 |
| 10 | Bright duty Night | 0–8 | 01 |
| 11 | Screen dividing line standby brightness | 1–5 | 01 |
| 14 | Modbus RTU Slave address | 1–255 | 01 |
| 15 | Modbus Baud rate (9600/ 19200/ 38400/ 57600/ 115200) | 1–5 | 01 |
| 16 | Reset | 00: No factory reset 01: Factory reset | 00 |
| 17 | Version number | Firmware version | U3 |
10. FAQ
Q1: The Modbus thermostat does not respond — what should I check first?
Check first that it is properly connected and powered.
Q2: The thermostat does not appear in the app — what should I check?
Check that it has been added to the configuration in the PIERRE Partner app.
Q3: Warming the sensor by hand does not raise the reading — what now?
The temperature sensor is faulty. Check the sensor type setting (function 5) and the external sensor connection.
Q4: Can I set different temperatures in different rooms?
Yes — temperature is controlled room by room.