Solution - IP Camera Integration
Description
The PIERRE system integrates both IP cameras and analog cameras connected through a Network Video Recorder (NVR), so new and existing surveillance installations can be viewed from one interface.
Supported Camera Types
IP Cameras
Live video streams are displayed directly within the application. Camera compatibility should be verified before installation.
Analog Cameras via NVR
Analog cameras connected to a compatible NVR are integrated by retrieving the stream from the NVR. This lets an existing analog installation be monitored alongside IP cameras.
What Cameras Can Be Used For
- Live video monitoring.
- Property surveillance.
- Remote viewing through the application.
- Integration with automation and access control, where supported.
Before Integrating an NVR
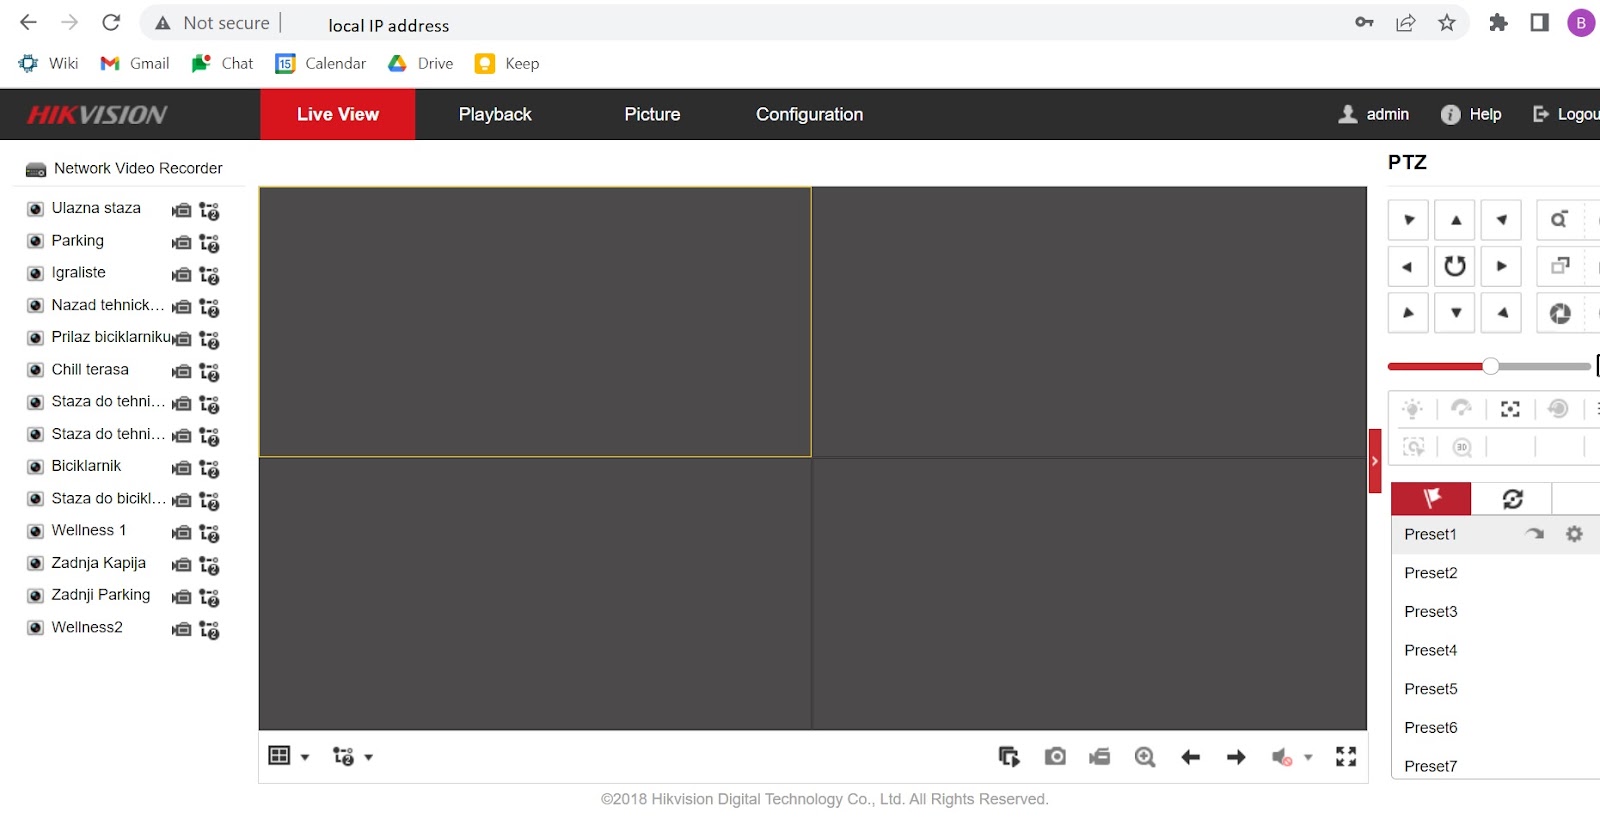
- Open a web browser and enter the local IP address of the NVR.
- Log in with administrator credentials.
- Verify that every connected camera is online and working.
Confirming this first saves time: a camera that does not appear in the system is usually one that was already offline on the NVR.
Technical Requirements
- A compatible IP camera or NVR.
- A stable network connection.
- An accessible video stream from the camera or NVR.
- Valid administrator credentials for the configuration.
- Camera compatibility verified before deployment.
Technical Notes
- Give each camera and the NVR a fixed address on the local network. A changing address breaks the configured streams.
- The stream path format differs between manufacturers; take it from the manufacturer's documentation.
- Test remote viewing from outside the local network before handover, not only from on site.
Video Encoding Configuration
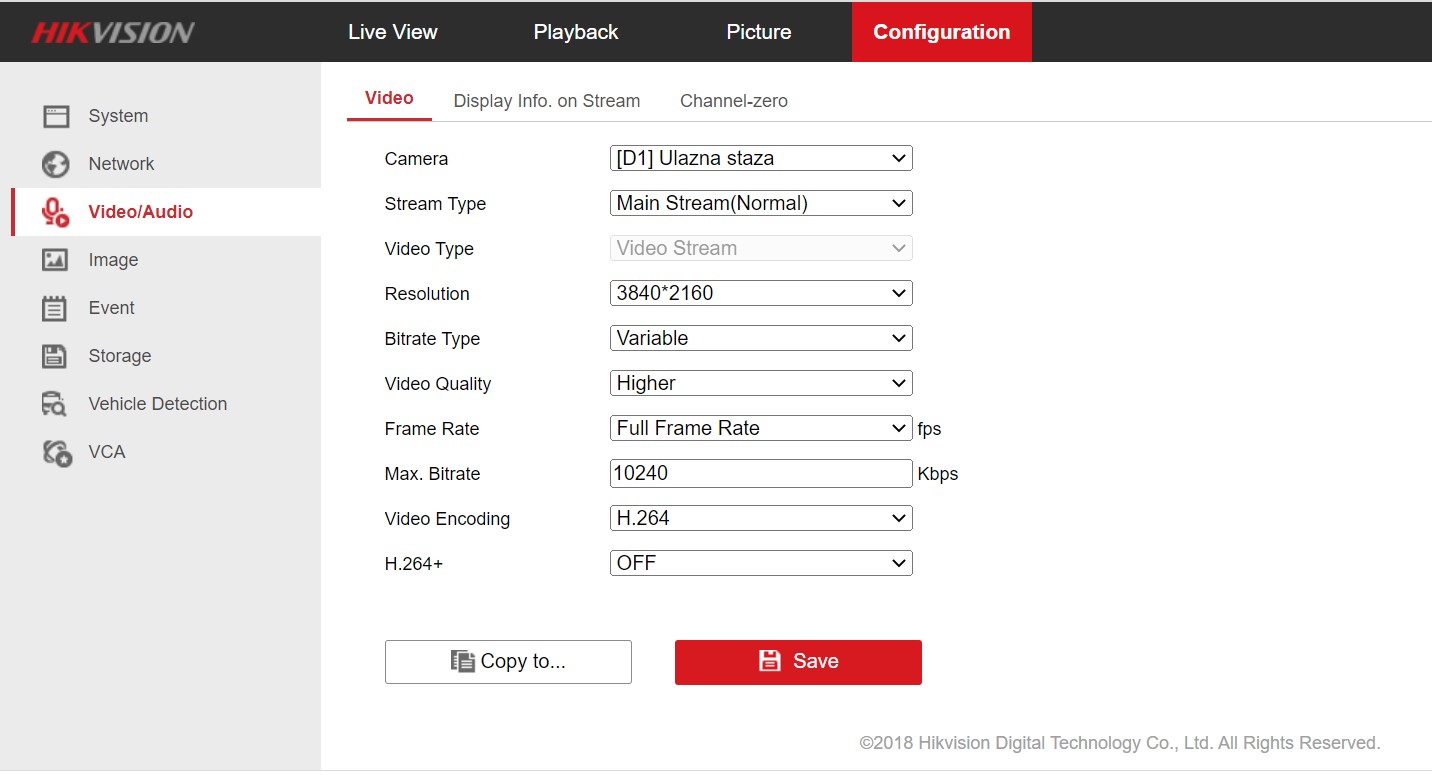
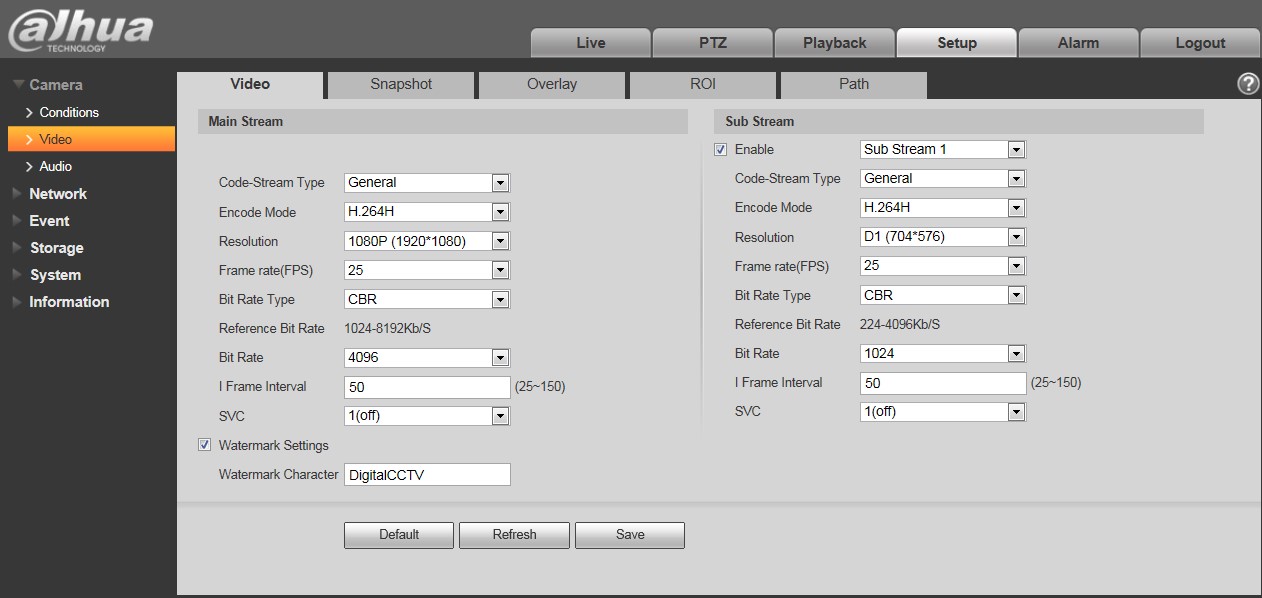
For proper integration with the PIERRE system, the video encoding format must be set to H.264.
Different camera and NVR manufacturers may use different menu structures.
-
Hikvision NVR:
- Navigate to Configuration → Video/Audio → Video.
- Set Video Encoding to H.264.
- Save the configuration.
-
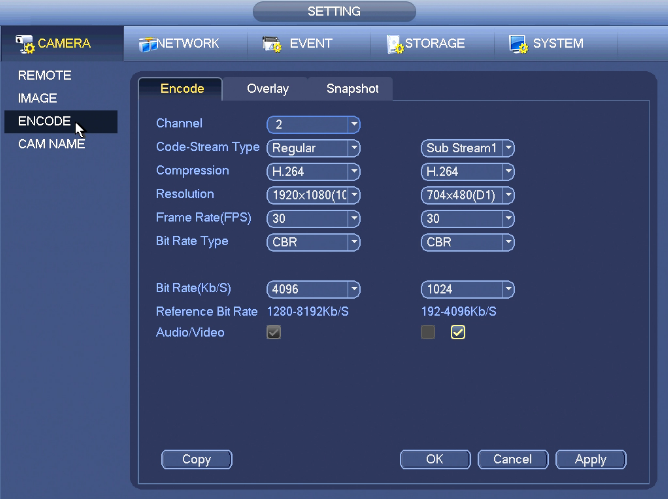
Dahua NVR:
- Navigate to Setup → Camera → Video.
- Disable H.265 Auto Switch.
- Set the encoding format to H.264 for each camera channel.
- Save the configuration.
RTSP Port Configuration
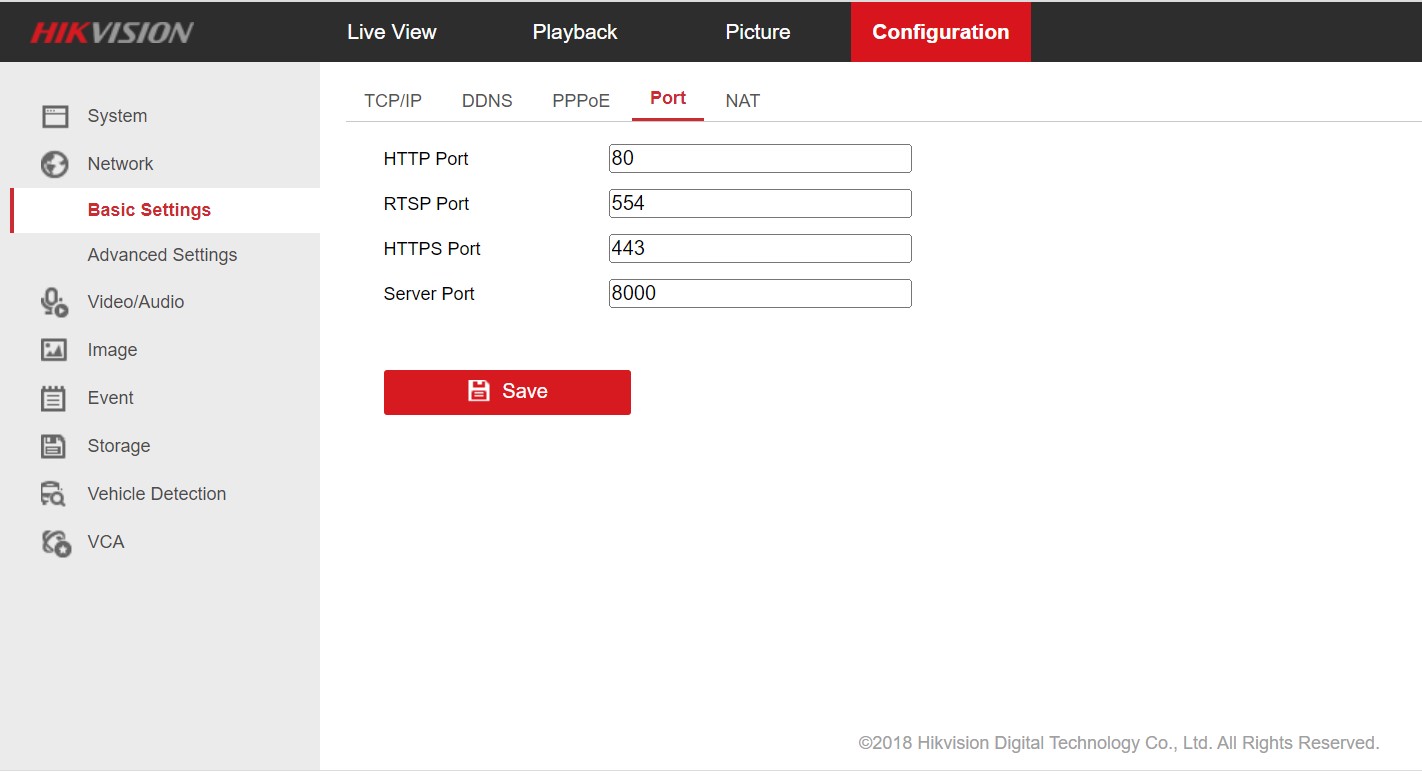
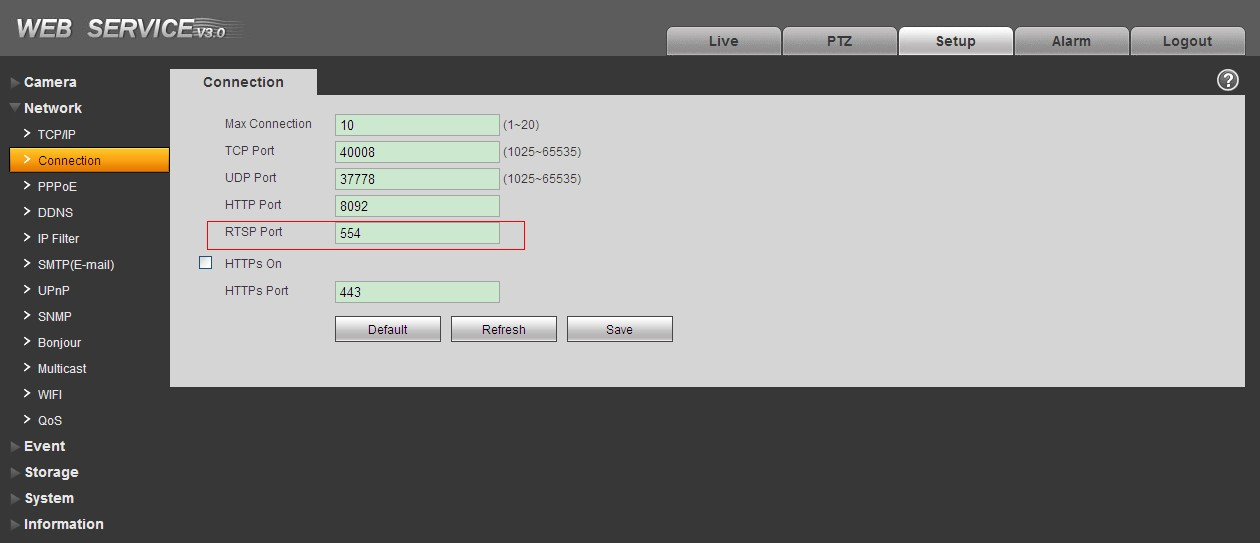
The RTSP port must be set to 554.
Hikvision
- Navigate to Configuration → Network → Basic Settings → Port.
- Verify that the RTSP Port is set to 554.
- Save the configuration if any changes are made.
Creating a New User in NVR:
- In the NVR settings, create a new account and set a username and password.
- These credentials will be used in the RTSP stream URL.
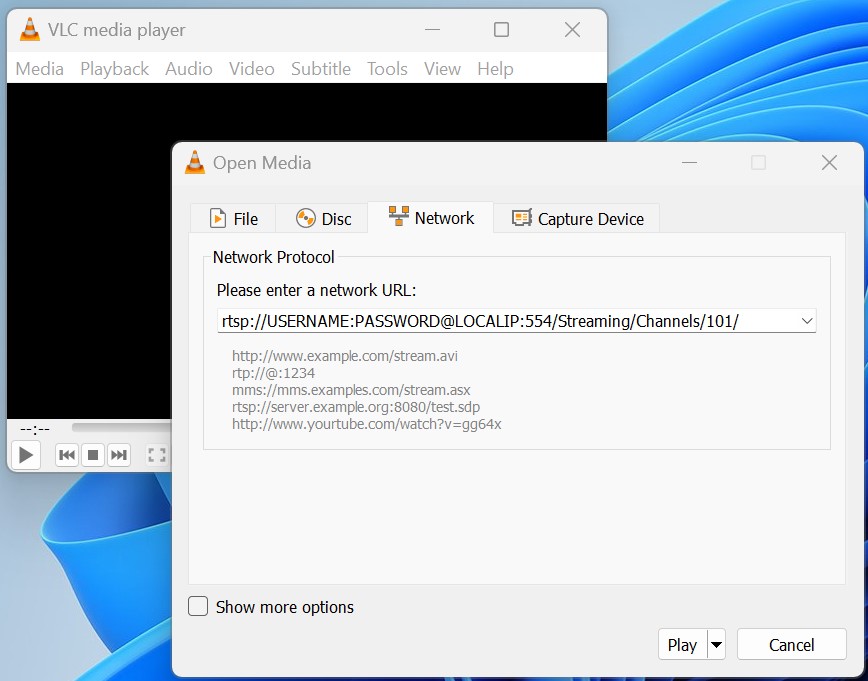
- To verify the stream, use VLC player:
- Open VLC, go to Media > Open network stream, and enter the RTSP URL:
- Hikvision: rtsp://username:password@local-ip-or-domain:554/Streaming/Channels/101
- Dahua: rtsp://username:password@local-ip-or-domain:554/live/ch00_0
- Open VLC, go to Media > Open network stream, and enter the RTSP URL:
No Video in the PIERRE App
If the video stream is visible on the NVR but not in the PIERRE application, the issue may be related to an incorrect RTSP URL or port forwarding configuration.
To verify the RTSP stream:
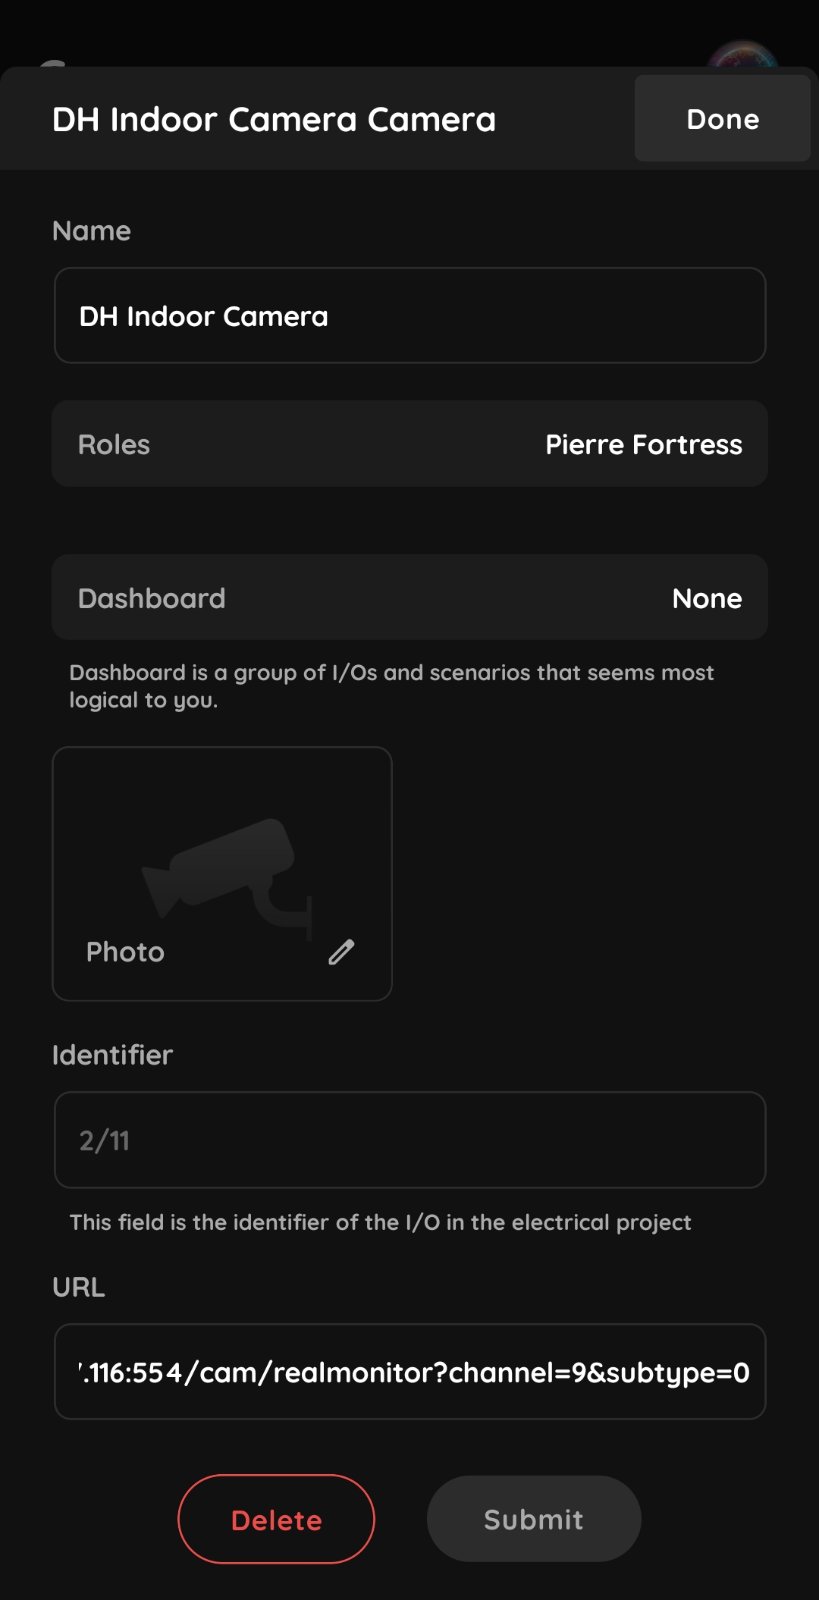
- Open the PIERRE Partner application.
- Navigate to the camera configuration.
- Copy the RTSP URL.
- Note the part of the URL after the @ symbol.
- Verify that the IP address, port, and stream path match the camera or NVR configuration.
Check RTSP Port Accessibility
If the video stream is not available in the PIERRE application, verify that the RTSP port is accessible from the network.
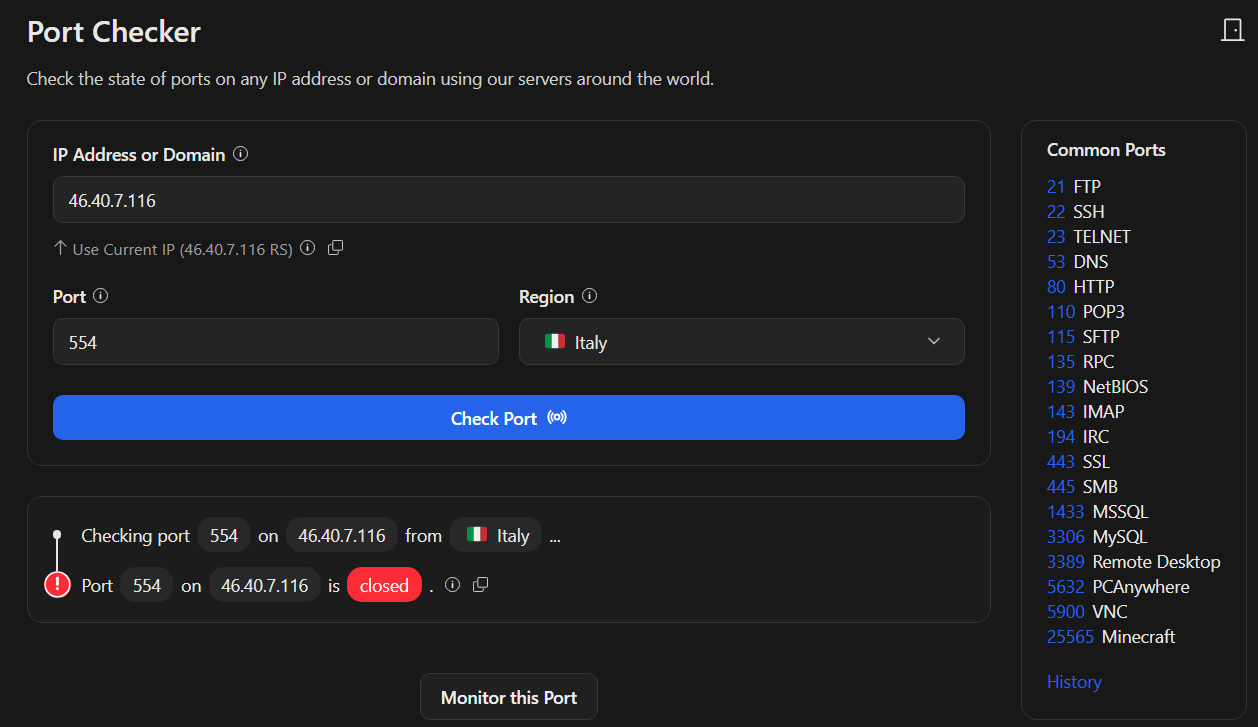
- Copy the IP address and RTSP port from the camera or NVR configuration.
- Use an online port checking tool to verify that the port is reachable:
- If the port is closed, review the firewall, router, NAT, and port forwarding settings.
- Verify that the RTSP service is enabled on the camera or NVR.
-
Configure Port Forwarding
If the RTSP port is closed, configure port forwarding on the router.
- Open a web browser and enter the router's IP address.
- Log in using an administrator account.
- Navigate to the Port Forwarding section (the exact menu may vary depending on the router manufacturer).
- Create a new port forwarding rule with the following parameters:
Parameter Value Name NVR Internal Port 554 External Port 554 Protocol ALL IP Address Local IP address of the NVR - Save the configuration.
- Verify that the RTSP port is accessible from the internet after applying the changes.
Note: Menu names and configuration options may vary depending on the router manufacturer and firmware version.
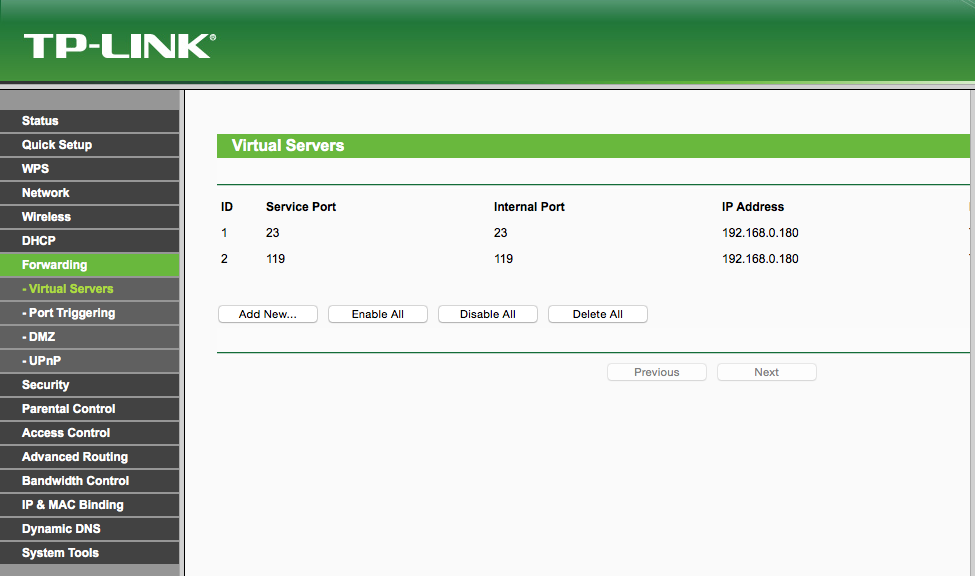
Click the Add New... to create a new record.
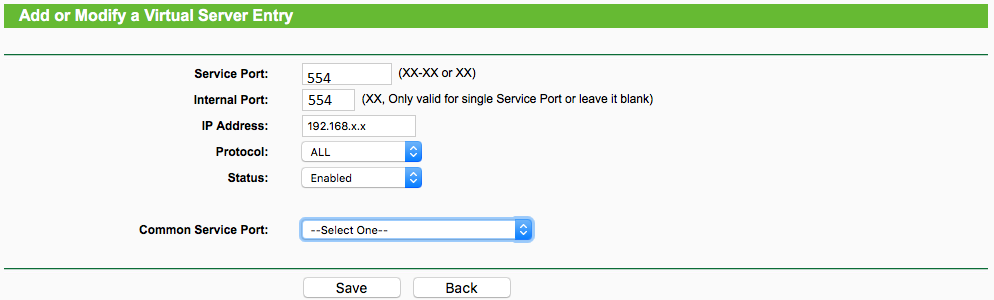
After saving the settings, make sure to enable the new record.
Remote Access and DDNS Configuration
Remote camera access requires a publicly reachable IP address. This can be achieved using either:
-
A Public Static IP Address (recommended)
-
A Public Dynamic IP Address combined with a DDNS service
DDNS Configuration
When using a dynamic public IP address, a DDNS service can be used to provide a fixed hostname for remote access.
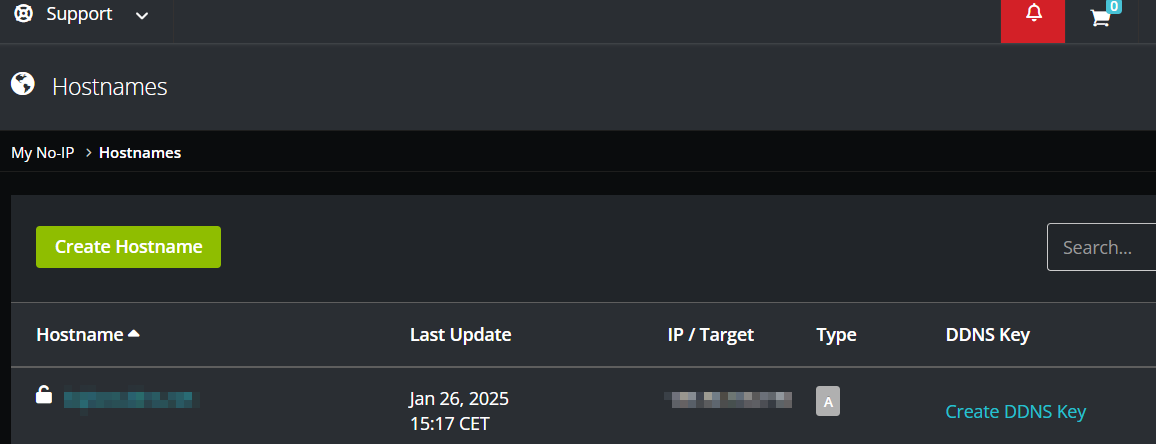
To configure DDNS using No-IP:
-
Create an account at No-IP.
-
Log in to your account.
-
Navigate to Dynamic DNS → No-IP Hostnames.
-
Create a new hostname.
-
Configure the generated hostname within the router or NVR.
-
Verify that the hostname resolves to your current public IP address.
The generated hostname can then be used instead of the public IP address when accessing the camera system remotely.
Troubleshooting Port Forwarding
If remote access does not work after configuring DDNS and port forwarding:
-
Verify that the required ports are correctly forwarded in the router.
-
Confirm that the RTSP port is reachable from the internet.
-
Verify that the DDNS hostname resolves to the correct public IP address.
If port forwarding still does not work, check whether the internet connection is operating behind Carrier-Grade NAT (CGNAT).
Carrier-Grade NAT (CGNAT)
Some Internet Service Providers place customers behind CGNAT, which prevents direct inbound connections from the internet.
In a CGNAT environment:
-
Port forwarding is not possible.
-
Remote access to the camera system will not function.
-
DDNS services will not solve the issue, as there is no publicly reachable IP address assigned to the connection.
If CGNAT is detected, contact your Internet Service Provider and request a Public Static IP Address. This is the recommended solution for reliable remote camera access and integration with the PIERRE system.
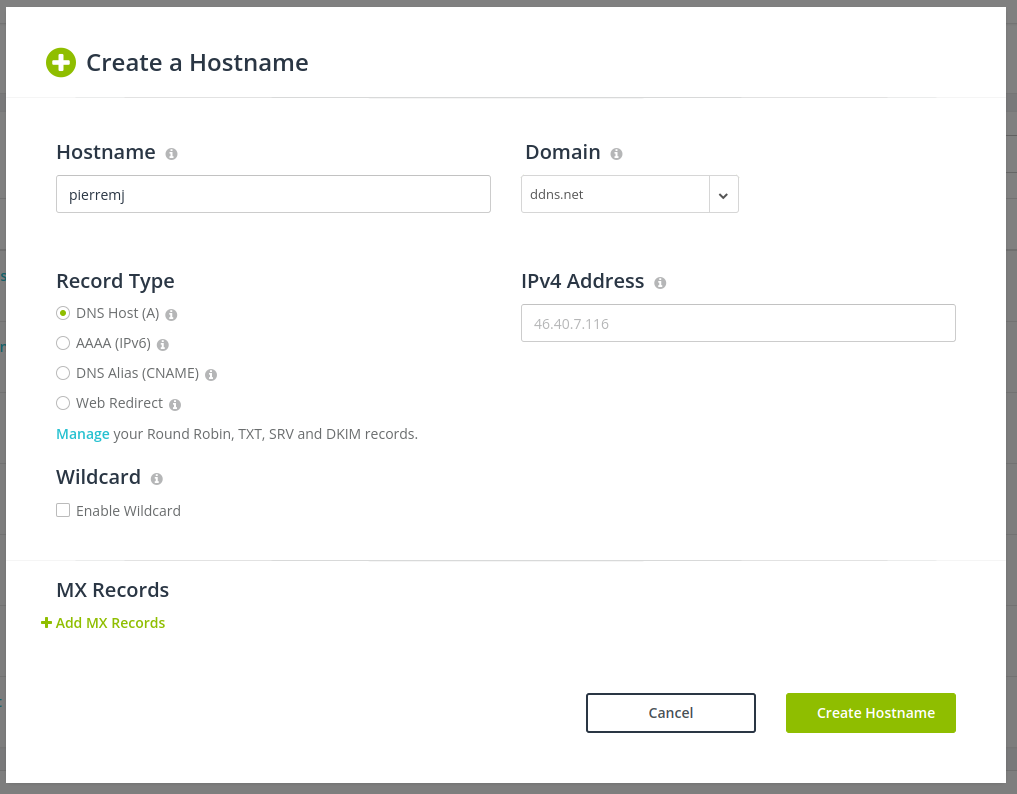
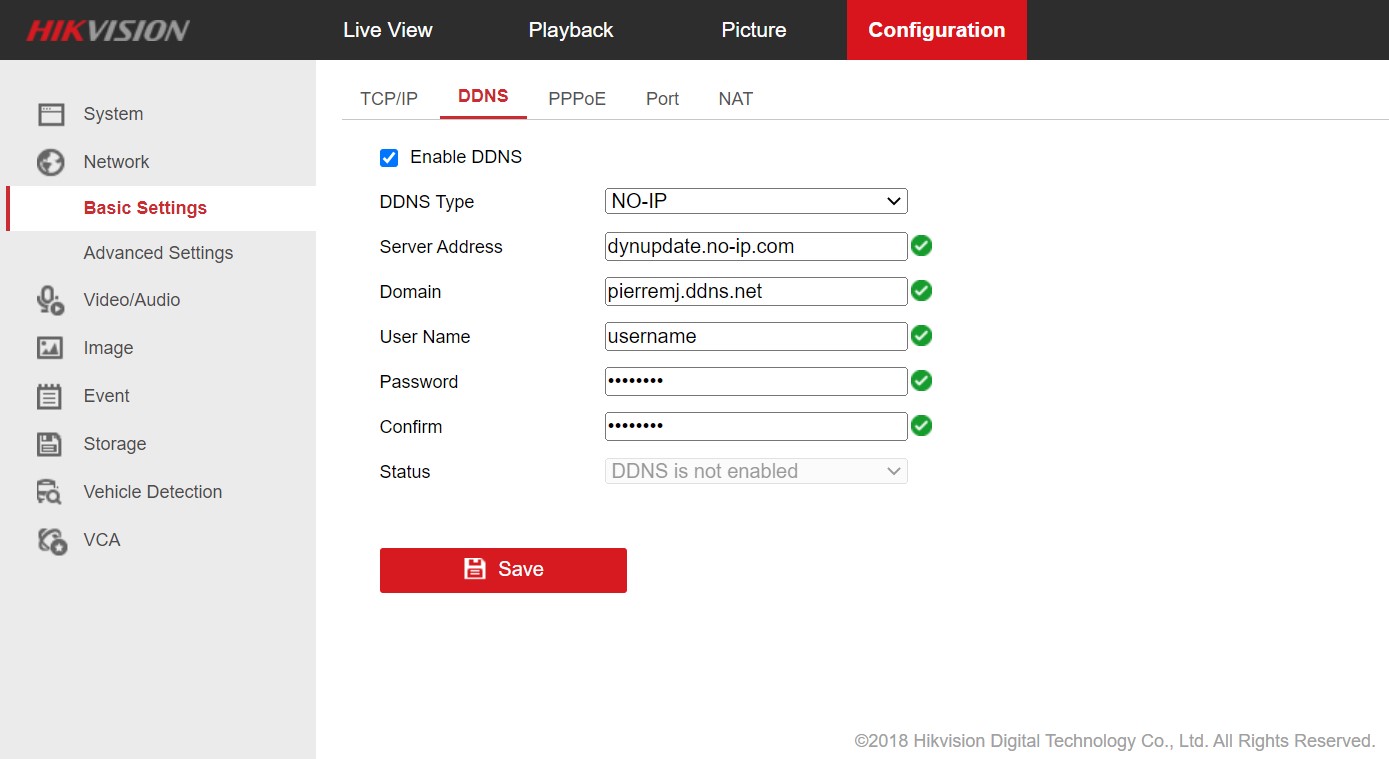
- Enter this hostname in your NVR settings:
- Hikvision: Configuration > Network > Basic Settings > DDNS tab.
-
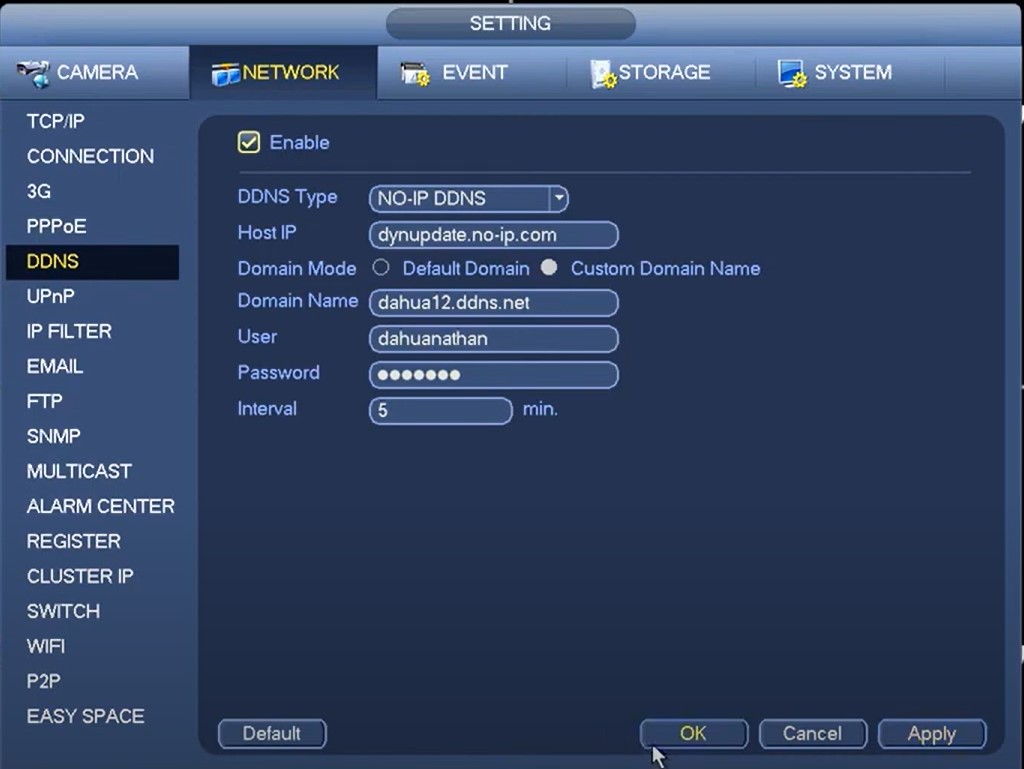
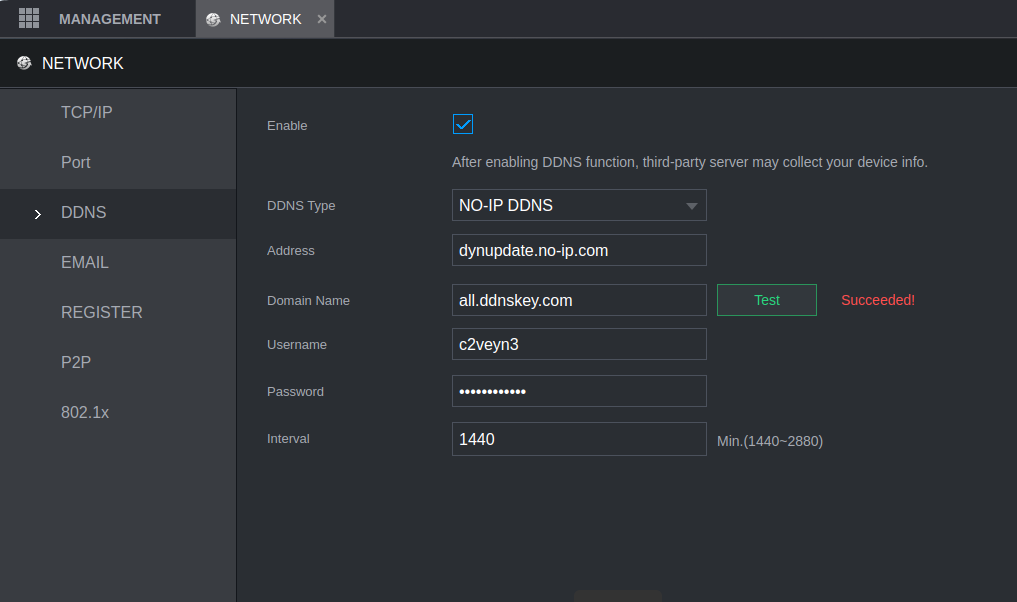
Dahua DDNS Configuration
- Navigate to Setting → Network → DDNS.
- Enable DDNS.
- Select No-IP DDNS as the service provider.
- Enter the following information:
- Hostname
- Username
- Password
- Save the configuration.
- Verify that the DDNS status shows Connected or Online.
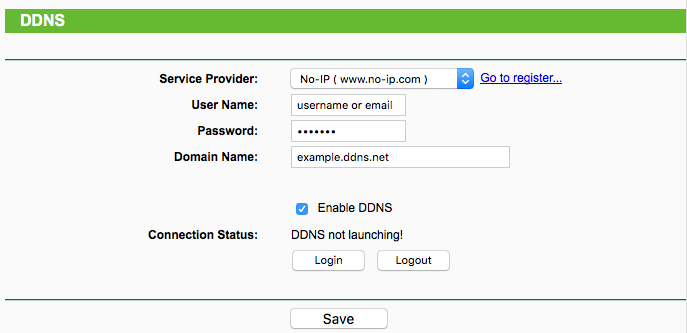
Router DDNS Configuration
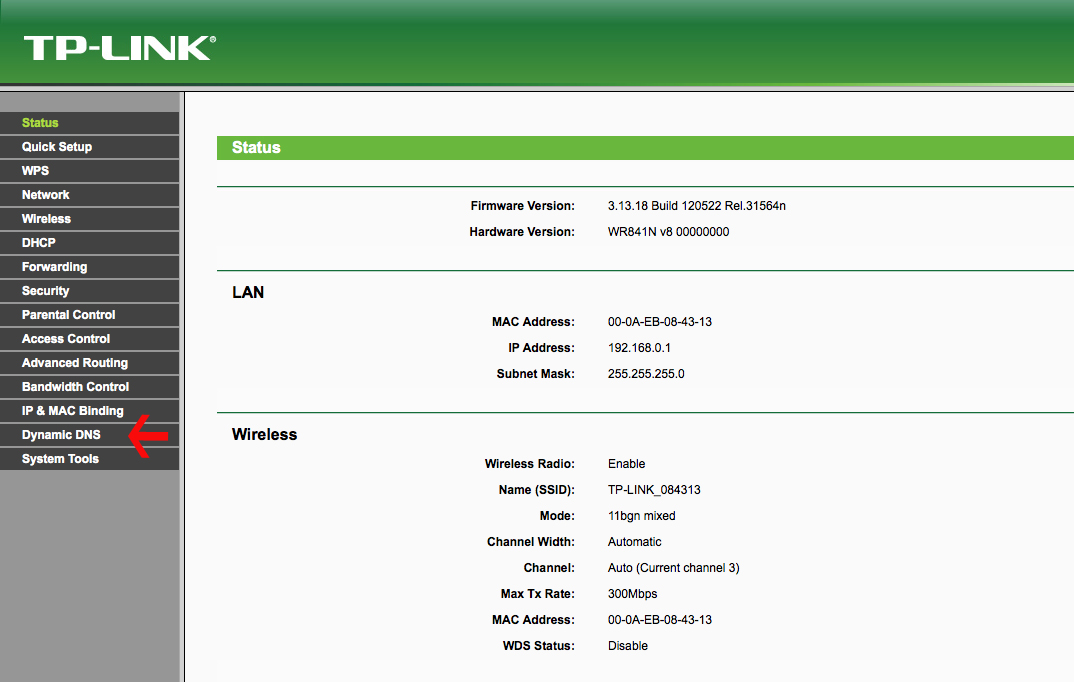
- Log in to the router's administration interface.
- Navigate to Dynamic DNS (DDNS) settings.
- Enable the DDNS service.
- Select No-IP as the DDNS provider.
- Enter the following information:
- Hostname
- Username
- Password
- Save the configuration.
- Verify that the DDNS status shows Connected, Online, or Updated, depending on the router manufacturer.
Note: Menu names and available DDNS providers may vary depending on the router model and firmware version.
-
Verify Port Accessibility
After completing the DDNS and port forwarding configuration, verify that the RTSP port is accessible from the internet.
-
Open the port checking tool:
-
Enter the public IP address or DDNS hostname.
-
Enter port 554.
-
Verify that the port status is reported as Open.
Using a DDNS Key
For improved security, No-IP supports authentication using a DDNS key.
-
Generate a DDNS key within your No-IP account.
-
Open the DDNS configuration page of the router and/or NVR.
-
Replace the standard DDNS username and password with the generated DDNS key credentials, if supported by the device.
-
Save the configuration.
-
Verify that the DDNS service reports a successful connection.
Note: DDNS key support depends on the router and NVR manufacturer. Some devices support only the traditional username and password authentication method.
-
Adding Cameras to the PIERRE Partner Application
DDNS credentials do not need to be configured in the PIERRE Partner application. DDNS settings are only required on the router, camera, or NVR.
To add a camera:
-
Open the PIERRE Partner application.
-
Navigate to the Cameras tab.
-
Select Add Camera.
-
Complete the required camera configuration fields.
-
Save the configuration.
The camera can be configured using either a local IP address or a DDNS hostname, depending on the network setup and access requirements.
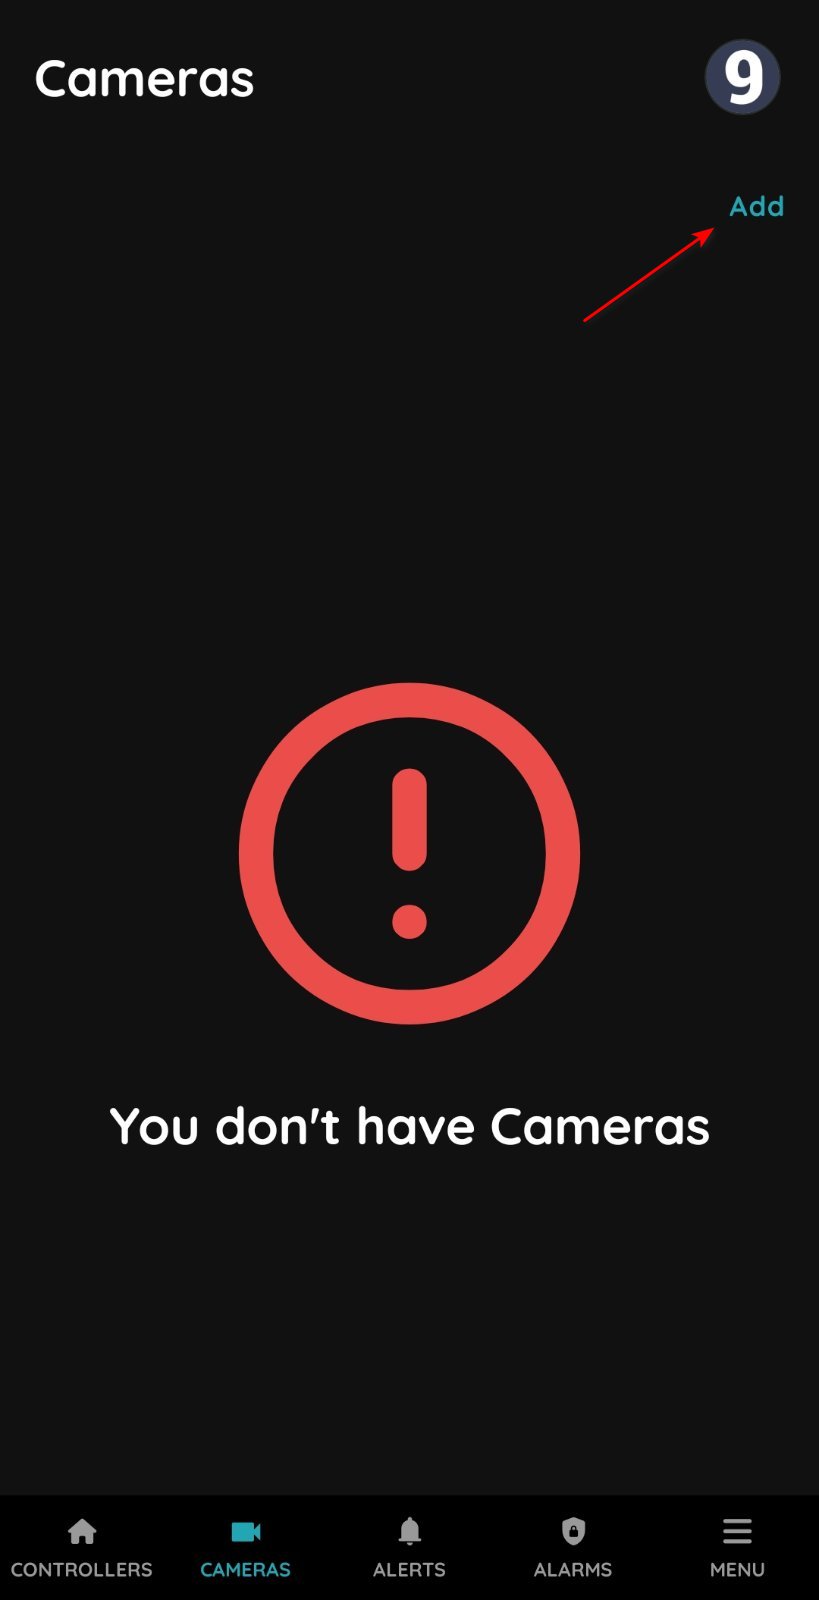
Click Add
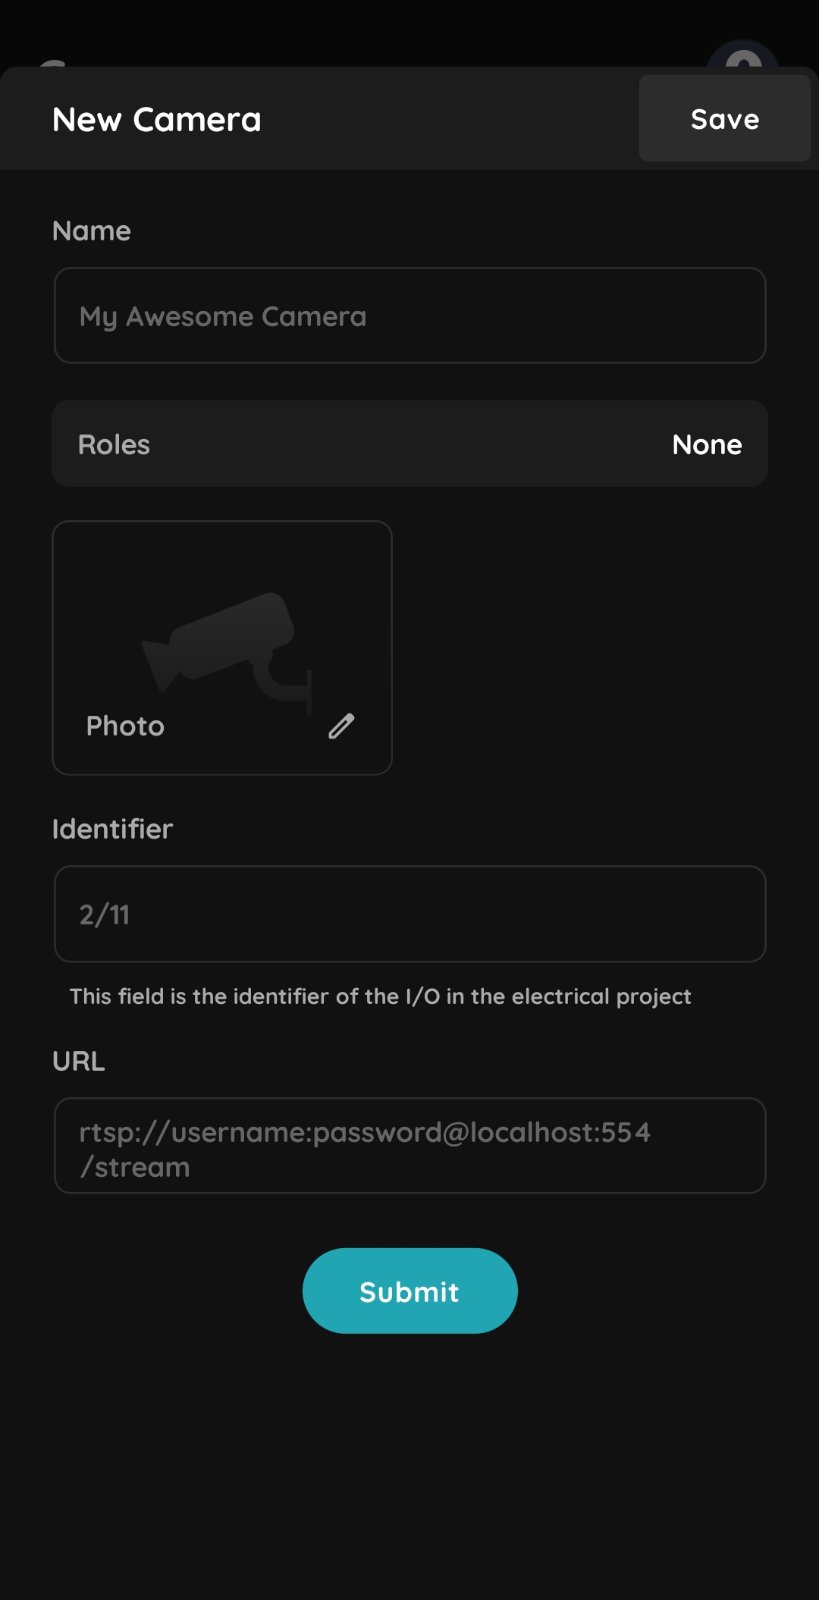
- Click Add Camera and enter the following details:
- Name: Name of the camera.
- Role: Select the appropriate role.
- URL: Enter the RTSP URL based on your camera type:
- Hikvision Main Stream:
rtsp://username:pass@ip.address-or-domain:554/Streaming/Channels/101 - Hikvision Sub Stream:
rtsp://username:pass@ip.address-or-domain:554/Streaming/Channels/102 - Dahua Main Stream:
rtsp://username:pass@ip.address-or-domain:554/cam/realmonitor?channel=1&subtype=0 - Dahua Sub Stream:
rtsp://username:pass@ip.address-or-domain:554/cam/realmonitor?channel=1&subtype=1
- Hikvision Main Stream:
Hikvision Intercom Setup
- After powering on, the intercom will receive an IP address via DHCP.
- Open the NVR’s camera list and find the intercom’s IP address.
- Open a browser, enter the intercom’s IP address, and log in.
- Assign a fixed IP address in the network settings. Ensure that the SIP status is set to Registered.
- In the NVR’s camera setup, manually add the intercom as a new camera:
- Manufacturer: Custom
- Main Stream: rtsp://intercom.local.ip.address
- Password: Enter the intercom’s password.
Troubleshooting
Open the RTSP URL of the camera (or of the NVR channel) in VLC: Media → Open Network Stream. If VLC shows the video, the stream works and can be added to PIERRE.
The stream must be reachable from the internet: give the site a DDNS hostname (or a fixed public IP) and forward the RTSP port on the router to the camera or NVR, or use a VPN. Always set a strong camera password — a forwarded RTSP stream without authentication is visible to anyone who finds it.
No. The app shows live streams only; recordings are viewed through the NVR.
Cameras are connected to the PIERRE system either via NVR (for analog cameras) or through the network (IP cameras). There is no need to run cables directly to the Controller.
No, analog cameras must be connected to an NVR, and the video stream from the NVR can then be integrated into the PIERRE app.
Any IP camera or NVR that provides an RTSP (Real Time Streaming Protocol) stream. Give it a fixed local IP address (DHCP reservation or static). For viewing from outside the building the stream must also be reachable from the internet (see the previous question).
The best solution is to use a network video recorder (NVR) system. The cameras connect to this hub.
The PIERRE system does not require direct wiring for cameras, as they connect to the NVR system via the internet or the local network. The NVR handles the recording, and the recorded videos can be viewed through the NVR. The PIERRE system only integrates live camera feeds.
iOS decodes H.265 (HEVC) in hardware; many Android devices do not. Set the camera or NVR stream to H.264.
Flush the DNS cache or restart the display/phone and the router.
Log in to the DDNS provider (e.g. No-IP) and check when the hostname was last updated; renew it if it has expired.