On this page
A Fan Coil is a heating and cooling device that regulates the temperature by blowing air over a heat exchanger through which warm or cold water flows. It offers precise temperature control in individual rooms, making it ideal for customizable climate management.
Key Features:
1. Dashboard Control:
- Fan Coil units can be controlled from the Dashboard, allowing users to easily turn the unit On or Off and adjust the temperature settings.
2. Edit Settings:
- By long-pressing the Fan Coil card on the Dashboard, users can edit the unit's settings, such as switching between heating and cooling modes, adjusting minimum and maximum temperature limits, and setting the target temperature step for more precise climate control. A slider is available for adjusting the heating and cooling levels, along with +/- buttons for fine-tuning.
3. Hysteresis:
- The system also includes hysteresis settings, which allow users to define the range within which the Fan Coil will activate or deactivate, preventing unnecessary cycling and maintaining more stable room temperatures.
4. Automation and Sensors:
- Fan Coil units can be automated based on temperature sensors, humidity sensors, motion detectors, or contact sensors for window, enabling precise climate control and energy efficiency based on room conditions.
The Fan Coil section offers complete control and customization, ensuring that each room in your smart home maintains the desired climate efficiently and effortlessly.
Controlling the Fan Coil is quick and simple, easily managed directly from the Dashboard.
Follow the example of the Fan Coil Living room.

Use the +/- buttons to adjust the set temperature. With each tap on these buttons, the temperature increases or decreases according to the pre-set hysteresis level.
The current temperature is displayed with larger white numbers, while the set temperature is shown with smaller grey numbers (when heating/cooling is On).
The Fan Coil status is also shown: a sun icon indicates heating, a snowflake icon indicates cooling, and the Fan icon with a number beneath it displays the intensity level of the Fan Coil.
On the temperature slider, blue represents cooling levels, while orange represents heating levels. A smaller circle on the slider shows the current temperature, while the larger circle represents the set temperature.
A Power button is located in the top right corner of the Fan Coil card, allowing you to easily turn the Fan Coil On or Off.

Tap the Power button to turn the Fan Coil On.
The Power button turns its border lines to blue.
Set temperature is displayed, too.
You can adjust desired temperature.

Tap the Power button to turn the Fan Coil Off.
The Power button turns its border lines to grey.
It is shown current temperature and it is written Heating off or Cooling off.
Use the +/- buttons to adjust the set temperature. With each tap on these buttons, the temperature increases or decreases according to the pre-set hysteresis level.
The current temperature is displayed with larger white numbers, while the set temperature is shown with smaller grey numbers (when heating/cooling is turned On).
On the temperature slider, blue represents cooling levels, and orange represents heating levels. A smaller circle on the slider shows the current temperature, while the larger circle represents the set temperature. Tap the larger circle on the slider and slide it along to adjust the set temperature.
Tap the On button to activate heating or cooling. When heating is set, the sun icon is displayed on the On button. When cooling is set, the snowflake icon is shown. Once activated, the button turns blue.
Tap the Off button to deactivate heating or cooling. When activated, the Off button also turns blue.

To turn the Heating On, tap the button On with icon of the sun.
You can set desired temperature now, that is written with smaller grey numbers by buttons +/-, or by sliding bigger circle on the temperature slider by your finger.
When heating is On, On button turns blue.
Tap Done to confirm.

To turn the Heating Off, tap the button Off.
You cannot set temperature now. It is displayed current temperature, and Heating off.
When heating is Off, Off button turns blue.
Tap Done to confirm.
Tap on the tab Intensity.

Use next buttons to control Fan Coil:
- On - Tap on this button to turn the Fan Coil On.
- Off - Tap on this button to turn the Fan Coil Off.
Also, you slide with your finger on the slider to set intensity of the Fan Coil from one to three.

Tap the On button to turn the Fan Coil On.
Once activated, the On button turns blue, and the intensity level is displayed on the slider. The Fan icon updates to reflect the On status.

Tap the Off button to turn the Fan Coil Off.
Once turned Off, the Off button turns blue, and the intensity level is removed from the slider. The Fan icon updates to reflect the Off status, indicating the Fan Coil is turned Off.
To edit Fan Coil follow next steps.

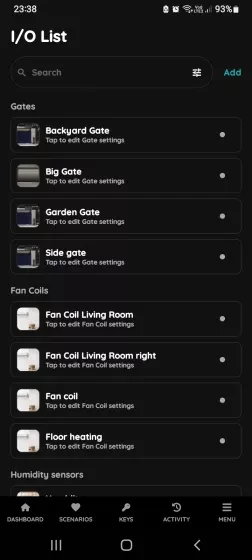
Open I/O list, scroll to the Fan Coils and tap on the desired Fan Coil from the list.
In this case on Fan Coil Living room.

Tap on Edit tab.
Edit following form:
- Name - Edit the name of the Fan Coil.
- Photo - Choose the source for the photo.
- Slide to confirm - When enabled, you'll be asked to confirm desired operation to avoid accidental action.
- Mode - Select either heating or cooling by tapping the corresponding radio button.
- Minimum temperature - Set this value by tapping the +/- buttons.
- Maximum temperature - Set this value by tapping the +/- buttons.
- Target step - Specify the step value for increasing or decreasing the target temperature by tapping +/-.
- Temperature format - Choose between Fahrenheit or Celsius by tapping the respective radio button.
- Temperature sensor - Select the temperature sensor by tapping on it.
Tap Submit/Done to save your changes.
GOOD TO KNOW:
Fan Coil can be edited by long-press the Fan Coil card on the Dashboard or tapping it in the I/O list.

Tap photo of the Fan Coil. You have four options:
- Open Library - The phone’s Library will open.
- Open Camera - You can take a picture using your smartphone.
- Choose default image - These images are prepared in advance for seamless experience.
- Remove image - Removes the existing image.

Tap on the radio button next to the desired Temperature sensor from the list.
To confirm tap Save/Done.
Set the Fan Coil to automatically turn on every day between 9:00 PM and 12:00 AM to maintain a comfortable environment. At 9:00 PM, the Fan Coil will start, adjusting the temperature based on the current mode (heating or cooling). It will run until midnight, after which it will automatically turn Off. This automation ensures that your space stays comfortable during the late evening hours without the need for manual control.

Open the Dashboard, find the Fan Coil and long press on its card.

In the Menu, under Settings, tap on the I/O.

Open I/O list, scroll to the Fan Coils and tap on the desired Fan Coil from the list.
In this case on Fan Coil Living room.

Tap on the tab Automation and then on +Add new Automation.
The Used In tab shows all the scenarios and automations where the Fan Coil is applied, making it easy to see where this I/O is used without the need to search manually. If it isn't used in any, the list will be empty, and a message will display: "This I/O is not in use anywhere." This feature is particularly useful as it consolidates all relevant information in one place.

In this case, Fan Coil is used in scenario Party time.


