On this page
The Valves section in the Smart Pierre app allows users to manage and control their connected valves directly from the Dashboard or the I/O list. This section provides a user-friendly interface for monitoring and adjusting the status of each valve in your smart home system.
Key Features:
1. Dashboard Control:
- Open or close the valve directly from the Dashboard with just a tap.
2. Edit Valve Settings:
- You can edit each valve's settings, such as updating the name, changing the associated picture, or modifying other details for easy identification.
3. Visual Status:
- Each valve is displayed with a corresponding icon and picture that reflect its current status, ensuring you can quickly see whether the valve is open or closed.
4. Automation:
- Valves, like all other I/O devices in the system, can be fully automated. You can create automations that control the valves based on specific triggers, such as time schedules, sensor readings, or other events.
The Valves section offers full control over your system’s valves, providing real-time status updates, easy access for managing them, and the ability to include them in automations from the Dashboard or I/O list.
Valve control is quick and simple, managed directly from the Dashboard.

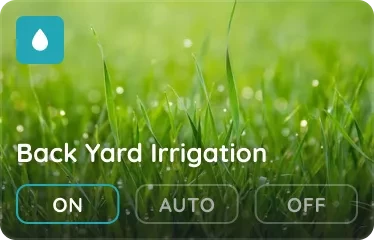
There are three buttons for controlling the Valve:
- Open - Tap on this button to open the Valve.
- Close - Tap on this button to close the Valve.
- Auto - If you tap the Auto button, the automation will activate when the conditions are met.

To open Valve, tap the button Open.
The icon of the Valve turns blue, and the picture changes according to the Open status.

To close the Valve, tap on the Close button.
The icon of the Valve turns grey, and the picture changes according to the Close status.

If you click on the Auto button, you will activate the previously created automation for the Valve, provided that all conditions from the automation are fulfilled. The icon of the Valve turns blue, and the picture of the Valve changes to reflect the Open status.
If you click on the Auto button when some of the conditions from the automation are not fulfilled, the Valve will not be activated. The icon of the Valve turns grey, and the picture of the Valve is set to the Off status. All conditions must be fulfilled for the automation to activate.
To edit the Valve settings, scroll and tap on it in the I/O list.

Scroll to the Valves and tap on the card of the Valve that you would to edit.

Edit following form:
- Name - Edit name of the Irrigation.
- Photo - (status Open, Closed) - Choose the source of the photo.
- Slide to confirm - When it is enabled you will be asked to confirm the desired operation to avoid accidental actions.
Tap Submit/Done.

You have four options:
- Open Library - The phone’s Library will open. It is recommended to take pictures from the same angle for both valve statuses to achieve a complete and consistent view.
- Open Camera - You can take a picture using your smartphone. For a complete and consistent view, it’s recommended to capture both valve statuses from the same angle.
- Choose default image - These images are prepared in advance to provide a complete and seamless experience.
- Remove image - Removes the existing image.

The Slide to confirm feature adds an extra layer of security, preventing accidental actions.
It asks you to confirm your choice once more.
Here's an example of how the Slide to confirm feature is applied:
If you want to close the Valve, tap on the Close button and Slide to Close from left to right.
The Used In tab shows all the scenarios and automations where the Valve is applied, making it easy to see where this I/O is used without the need to search manually. If it isn't used in any, the list will be empty, and a message will display: "This I/O is not in use anywhere." This feature is particularly useful as it consolidates all relevant information in one place.

In this case Valve is used for automation of Drip.
The Valve can be automated in the PIERRE app by linking it to a heating or cooling system or a leakage sensor. For example, the valve can automatically open or close depending on whether the heating or cooling system is running, optimizing energy efficiency. Alternatively, the valve can be set to close immediately if the leakage sensor detects water, preventing potential flooding and water damage. This ensures that the valve operates intelligently based on real-time conditions, whether for climate control or safety.
You can open Valve from the Dashboard or from the I/O list.

Find the Valve on the Dashboard and tap on its card.

In the Menu, under Settings, tap on the I/O.

Scroll to the Valves and long press the picture of the valve that you want to open.

Tap on the tab Automation.

The list of automations that include the Valve is displayed.
Tap + Add new Automation to create a new automation.
