On this page
The Lights in the Smart Pierre app offers users complete control over their lighting systems, from simple on/off commands to advanced features like dimming and color adjustments for RGB lights. The intuitive interface allows for easy management of lighting in various parts of the home.
Key Features:
1. On/Off Control:
• Users can toggle lights on or off directly from the Dashboard with a single tap. This feature applies to all types of lights, whether they are standard fixtures or smart-enabled.
2. Dimming and Brightness Control:
• For dimmable lights, such as LEDs or PWM-controlled lights, users can adjust brightness levels with a sliding bar, offering precision control over light intensity to create the desired atmosphere.
3. RGB and RGBW Lights:
• Control over RGB and RGBW lights allows users to change colors and adjust brightness, providing dynamic lighting customization to fit different moods or events.
4. Automation and Scenarios:
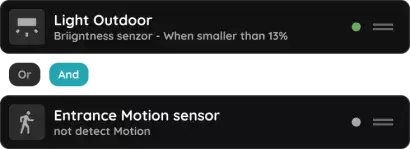
• Lights can be automated based on time, motion sensors, or light sensors, ensuring that they operate efficiently according to user needs. They can also be included in scenarios, such as setting all lights to turn off automatically when activating a “Goodnight” scene.
5. Customization:
• Users can rename, assign roles, or change the image for each light, making it easier to manage and identify lights within the app. Long-pressing on any light icon opens a menu for more advanced settings and customizations.
The Lights section provides seamless and customizable control, ensuring that lighting is both practical and energy-efficient.
Controlling the Light is easy and efficient, all managed directly from the Dashboard.
Follow the example of the Hall lamp back.

There are three buttons for controlling the Light:
- On - Tap this button to turn On the Light.
- Off - Tap this button to turn Off the Light.
- Auto - If you tap the Auto button, the automation will activate when the conditions are met.

To turn the Light On, tap the On button.
The icon of the Light turns blue and the picture is changed, indicating that Light has been turned On.

To turn the Light Off, tap the Off button.
The icon of the Light gets grey and the picture is changed, indicating that Light has been turned Off.

If you tap the Auto button, the previously created automation for the Light will be activated if all conditions from the automation are fulfilled. The icon of the Light turns blue, and the picture of the Light changes to reflect the On status.
If you tap the Auto button when some of the conditions from the automation are not fulfilled, the Light will not be activated. The icon of the Light turns grey, and the picture of the Light changes to reflect the Off status. All conditions must be fulfilled for the automation to activate.
To edit Light follow next steps.

Open I/O list, scroll to the Lights and tap on the desired Light.
In this case on the Hall Lamp back.

Fill out the following form:
- Name - Edit the name of the Light.
- Photo - (status On, Off) Choose the source of the photo.
- Slide to confirm - When enabled, you will be asked to confirm the desired operation to prevent accidental actions.
- Timeout - Set the time duration in which the Light will remain On in auto mode.
Tap Submit/Done to confirm.
GOOD TO KNOW:
The Light can be edited by long-pressing the Light card on the Dashboard or by tapping it in the I/O list.

You have four options:
- Open Library - The phone’s Library will open. It is recommended to take pictures from the same angle for both Light statuses to achieve a complete and consistent view.
- Open Camera - You can take a picture using your smartphone. For a complete and consistent view, it’s recommended to capture both Light statuses from the same angle.
- Choose default image - These images are prepared in advance to provide a complete and seamless experience.
- Remove image - Removes the existing image.

Choose Timeout - scroll through columns for the Hours, Minutes, Seconds.
In this case, Timeout is set on 3 minutes.
Tap Save button.
Automate your Light in the PIERRE app by setting conditions based on the door Magnet Contact sensor and time. For example, the Light can automatically turn On when the Magnet Contact sensor detects the door opening, and only during specific hours, such as between 6 PM and 10 PM. Or, additionally, the Light can also be activated manually by pressing a Button. This ensures the Light functions efficiently, turning On when needed, and allows manual control when required.

Open the Dashboard, find the Light and long press its card.

In the Menu, under Settings, tap on the I/O.

Open I/O list, scroll to the Lights and tap on the desired Light.
In this case on the Hall Lamp back.

Tap tab Automation and then tap the +Add Automation in order to add automation for the Light.
The Used In tab shows all the scenarios and automations where the Light is applied, making it easy to see where this I/O is used without the need to search manually. If it isn't used in any, the list will be empty, and a message will display: "This I/O is not in use anywhere." This feature is particularly useful as it consolidates all relevant information in one place.

Tap on the Used In tab.
In this case, the Light is used in the scenarios Cinema and Good Morning.
